
前面两篇文章把start servie和bind service的流程分析了一遍,在android 8.0开始,由于限制了在后台启动service,所以又多了一种启动service的方法startForegroundService,这种启动service会在启动后显示一个Notifacation,以此来提示用户在后台已经启动了一个service了,之所以这样做也是为了弥补取消了后台启动service的不方便,同时为了防止开发者在后台滥用service,所以前台会给用户一个提示,好让用户知道。而对于开发者来说,其实这种service的适配也不是很麻烦,只要在service的onStartCommand方法中调用startForeground方法,把Notifacation传入就可以了,这个我们下面分析的时候会说到。另外这个改动只是对于之前的startService来说的,bindService不受影响。
除了分析startForegroundService外,这篇文章准备说一说stop service,不过一般我们平时开发中特地去stop service的情况不多,既然service运行起来了,干嘛还干掉他,大多数情况下我们还巴不得service能一直活着呢,所以各种保活的手段以前大家也是研究了很多,虽然现在基本保活的漏洞都让谷歌给堵死了。不过如果是作为手机或者硬件厂商来说,为了能降低功耗或者省电的考虑,还是会尽量把那些不必要的后台服务给杀了的,所以我们最后还会分析下stop service的执行流程。
# startForegroundService
好了,这篇文章大约就介绍这两个和service相关的内容,我们就从startForegroundService开始。startForegroundService和startService大部分的代码都是共用的,只不过他们调用时候所带的参数不同,所以这里代码的分析不会从头到尾全部在重新走一遍,而是主要分析startForegroundService自己特殊处理的地方,我们还是从他的入口方法看起:
```java
public ComponentName startForegroundService(Intent service) {
warnIfCallingFromSystemProcess();
return startServiceCommon(service, true, mUser);
}
```
和其他service方法的入口一样,startForegroundService也是从ContextImpl中开始,这里和startService一样,也是调用的startServiceCommon,区别在于这里的第二个参数是true,表示的是启动一个前台的service,即调用startForegroundService,然后到startServiceCommon方法中:
```java
private ComponentName startServiceCommon(Intent service, boolean requireForeground,
UserHandle user) {
try {
validateServiceIntent(service);
service.prepareToLeaveProcess(this);
// AMS的startService
ComponentName cn = ActivityManager.getService().startService(
mMainThread.getApplicationThread(), service, service.resolveTypeIfNeeded(
getContentResolver()), requireForeground,
getOpPackageName(), user.getIdentifier());
if (cn != null) {
//包含"!"表示没有权限启动service
if (cn.getPackageName().equals("!")) {
throw new SecurityException(
"Not allowed to start service " + service
+ " without permission " + cn.getClassName());
} else if (cn.getPackageName().equals("!!")) {
throw new SecurityException(
"Unable to start service " + service
+ ": " + cn.getClassName());
} else if (cn.getPackageName().equals("?")) {
// 这里是不允许后台启动service
throw new IllegalStateException(
"Not allowed to start service " + service + ": " + cn.getClassName());
}
}
return cn;
} catch (RemoteException e) {
throw e.rethrowFromSystemServer();
}
}
```
这里其实和startService的调用完全一样,区别也是在于requireForeground这个参数,这个的值是true,然后执行流程就到了AMS中。在AMS中基本上调用的流程和startService都一样,我们不一一看代码了,不太熟悉的同学,可以看下前两篇的service分析文章。这里主要看下startForegroundService特殊处理的地方,我们看到sendServiceArgsLocked这个方法,之前其实也分析过,关于startForegroundService的处理之前分析的时候也提过一嘴,这里在重新看下:
```java
private final void sendServiceArgsLocked(ServiceRecord r, boolean execInFg,
boolean oomAdjusted) throws TransactionTooLargeException {
.............
if (r.fgRequired && !r.fgWaiting) {
// 当前没有在前台
if (!r.isForeground) {
if (DEBUG_BACKGROUND_CHECK) {
Slog.i(TAG, "Launched service must call startForeground() within timeout: " + r);
}
// startForgroundService启动后,需要在规定时间内调用startForground,否则ANR,这里是发生handler消息
scheduleServiceForegroundTransitionTimeoutLocked(r);
} else {
if (DEBUG_BACKGROUND_CHECK) {
Slog.i(TAG, "Service already foreground; no new timeout: " + r);
}
// 到这里service已经在前台了,所以不需要再进行前台处理,fgRequired置为false
r.fgRequired = false;
}
}
..............
}
```
这里可以看到fgRequired值为true,就是表示启动一个前台的service,fgWaiting表示false,表示还没有向Handler发送超时消息,所以这种情况下,接着会调用scheduleServiceForegroundTransitionTimeoutLocked方法,这个方法我们在第一篇的startService里面也分析过了,这里再简单看一眼:
```java
void scheduleServiceForegroundTransitionTimeoutLocked(ServiceRecord r) {
if (r.app.executingServices.size() == 0 || r.app.thread == null) {
return;
}
Message msg = mAm.mHandler.obtainMessage(
ActivityManagerService.SERVICE_FOREGROUND_TIMEOUT_MSG);
msg.obj = r;
r.fgWaiting = true;
// 5秒内要调用startForground
mAm.mHandler.sendMessageDelayed(msg, SERVICE_START_FOREGROUND_TIMEOUT);
}
```
其实这个方法就是向Handler发送超时消息,这里最后sendMessageDelayed方法中,第二个参数SERVICE_START_FOREGROUND_TIMEOUT是5秒,表示如果在service的onStartCommand方法中,5秒内没有调用startForeground方法的话就会发生ANR。我们看下Handler对这个消息的处理:
```java
case SERVICE_FOREGROUND_TIMEOUT_MSG: {
mServices.serviceForegroundTimeout((ServiceRecord)msg.obj);
} break;
```
继续会调用serviceForegroundTimeout方法:
```java
void serviceForegroundTimeout(ServiceRecord r) {
ProcessRecord app;
synchronized (mAm) {
if (!r.fgRequired || r.destroying) {
return;
}
if (DEBUG_BACKGROUND_CHECK) {
Slog.i(TAG, "Service foreground-required timeout for " + r);
}
app = r.app;
r.fgWaiting = false;
stopServiceLocked(r);
}
if (app != null) {
mAm.mAppErrors.appNotResponding(app, null, null, false,
"Context.startForegroundService() did not then call Service.startForeground()");
}
}
```
这个方法就是前台service超时的报错了,开始会做一些校验比如如果不是一个前台service,获取这个service将要被销毁,那么会退出。否则会调用stopService来停止service,这个方法我们下面会分析,最后会调用appNotResponding方法弹出我们经常看到的ANR的报错了。好了,那么这个ANR是怎么避免的呢。熟悉的同学都知道startForeground要求在service启动之后在onStartCommand中调用startForeground方法才能正常运行下去,我们看下平时在开发中一般的写法:
```java
@Override
public int onStartCommand(Intent intent, int flags, int startId) {
............
Notification notification = new NotificationCompat.Builder(this, "channelId")
.setContentTitle("xxx")
.setContentText("xxx")
.setSmallIcon(R.mipmap.ic_launcher)
.build();
startForeground(id, notification);
............
}
```
一般来说,service会在onStartCommand中创建一个Notification,然后会调用service的startForeground方法,这个方法里面会把前面发送给Handler的超时消息给取消掉,我们进入这个方法看看:
```java
// Service.java
public final void startForeground(int id, Notification notification) {
try {
mActivityManager.setServiceForeground(
new ComponentName(this, mClassName), mToken, id,
notification, 0);
} catch (RemoteException ex) {
}
}
```
这里会调用AMS的setServiceForeground方法:
```java
public void setServiceForeground(ComponentName className, IBinder token,
int id, Notification notification, int flags) {
synchronized(this) {
mServices.setServiceForegroundLocked(className, token, id, notification, flags);
}
}
```
继续调用调用ActiveServices中的setServiceForegroundLocked方法:
```java
public void setServiceForegroundLocked(ComponentName className, IBinder token,
int id, Notification notification, int flags) {
final int userId = UserHandle.getCallingUserId();
final long origId = Binder.clearCallingIdentity();
try {
ServiceRecord r = findServiceLocked(className, token, userId);
if (r != null) {
setServiceForegroundInnerLocked(r, id, notification, flags);
}
} finally {
Binder.restoreCallingIdentity(origId);
}
}
```
这个方法会先取出对应的ServiceRecord,这里className是个ComponentName,token是service进程那边保存的在AMS中的serviceRecord,调用findServiceLocked方法,对比下AMS中是否有和service进程那边传过来一样的ServiceRecord,有的话就返回这个serviceRecord,否则返回空。findServiceLocked方法就不跟进去看了,不难,都是一些我们之前已经遇到过的元素,有兴趣的同学可以自己跟进下。之后会继续调用setServiceForegroundInnerLocked方法,我们看这个方法:
```java
private void setServiceForegroundInnerLocked(ServiceRecord r, int id,
Notification notification, int flags) {
if (id != 0) {
if (notification == null) {
throw new IllegalArgumentException("null notification");
}
..........
if (r.fgRequired) {
if (DEBUG_SERVICE || DEBUG_BACKGROUND_CHECK) {
Slog.i(TAG, "Service called startForeground() as required: " + r);
}
r.fgRequired = false;
r.fgWaiting = false;
mAm.mHandler.removeMessages(
ActivityManagerService.SERVICE_FOREGROUND_TIMEOUT_MSG, r);
}
if (r.foregroundId != id) {
cancelForegroundNotificationLocked(r);
r.foregroundId = id;
}
notification.flags |= Notification.FLAG_FOREGROUND_SERVICE;
r.foregroundNoti = notification;
if (!r.isForeground) {
final ServiceMap smap = getServiceMapLocked(r.userId);
if (smap != null) {
ActiveForegroundApp active = smap.mActiveForegroundApps.get(r.packageName);
if (active == null) {
active = new ActiveForegroundApp();
active.mPackageName = r.packageName;
active.mUid = r.appInfo.uid;
active.mShownWhileScreenOn = mScreenOn;
if (r.app != null) {
active.mAppOnTop = active.mShownWhileTop =
r.app.uidRecord.curProcState
<= ActivityManager.PROCESS_STATE_TOP;
}
active.mStartTime = active.mStartVisibleTime
= SystemClock.elapsedRealtime();
smap.mActiveForegroundApps.put(r.packageName, active);
requestUpdateActiveForegroundAppsLocked(smap, 0);
}
active.mNumActive++;
}
r.isForeground = true;
}
r.postNotification();
if (r.app != null) {
updateServiceForegroundLocked(r.app, true);
}
getServiceMapLocked(r.userId).ensureNotStartingBackgroundLocked(r);
mAm.notifyPackageUse(r.serviceInfo.packageName,
PackageManager.NOTIFY_PACKAGE_USE_FOREGROUND_SERVICE);
}
.............
}
```
这个方法就是处理startForeground方法的最终地方了。我们看到这个方法里面如果fgRequired的值是true,会调用removeMessages方法,把之前发送给Handler的超时消息给撤销了,所以这里我们就看到了正常避免ANR原来是在这里处理的。
接着我们看到前面调用startForeground会传入一个id,这个是来区分不同的Notifacation的,这里如果当前serviceRecord的id和传入的不一样说明不是同一个Notifacation,所以会取消现在的Notifacation,然后把新的id保存下来。
之后如果这个service现在是后台service,那么由于现在是要启动前台servic,所以会变成一个前台运行的service,所以这里我们看到有一个类ActiveForegroundApp,这个类是代表一个前台应用,这里会把这个对象添加到mActiveForegroundApps这个map中,这个map保存了当前所有前台的应用,他的key是这个应用的包名,value就是一个ActiveForegroundApp。最后会更新下Notifacation后,就会弹出通知了,关于Notifacation的内容这里就不细说了,以后有机会再分析Notifacation的源码。
至此,我们就比较清楚一个startForeground是如何运行的了。特别要提一个,从android开始,要使用startForeground的话,需要在minifest中加入权限”
```java
<uses-permission android:name="android.permission.FOREGROUND_SERVICE" />
```
这个是和android 8的一个区别,大家注意下。好了,startForeground就说到这,可以看到绝大部分和startService的流程是重叠的,所以我们主要注意下有区别的地方就可以了,由于基本时序图也和startService一样,所以这里就不画startForeground的时序图了,大家可以参考下之前的startService的流程图,结合这里的代码分析看下。
# stopService入口
分析完了startForegroundService,下面我们在来看下stopService,还是从入口方法说起:
```java
// ContextImpl.java
public boolean stopService(Intent service) {
warnIfCallingFromSystemProcess();
return stopServiceCommon(service, mUser);
}
```
继续看stopServiceCommon方法:
```java
private boolean stopServiceCommon(Intent service, UserHandle user) {
try {
validateServiceIntent(service);
service.prepareToLeaveProcess(this);
int res = ActivityManager.getService().stopService(
mMainThread.getApplicationThread(), service,
service.resolveTypeIfNeeded(getContentResolver()), user.getIdentifier());
if (res < 0) {
throw new SecurityException(
"Not allowed to stop service " + service);
}
return res != 0;
} catch (RemoteException e) {
throw e.rethrowFromSystemServer();
}
}
```
这个也没啥好说的,去AMS继续看代码。
# stop service 进入AMS
```java
public int stopService(IApplicationThread caller, Intent service,
String resolvedType, int userId) {
enforceNotIsolatedCaller("stopService");
// Refuse possible leaked file descriptors
if (service != null && service.hasFileDescriptors() == true) {
throw new IllegalArgumentException("File descriptors passed in Intent");
}
synchronized(this) {
return mServices.stopServiceLocked(caller, service, resolvedType, userId);
}
}
```
继续看ActiveServices中的stopServiceLocked方法:
```java
int stopServiceLocked(IApplicationThread caller, Intent service,
String resolvedType, int userId) {
if (DEBUG_SERVICE) Slog.v(TAG_SERVICE, "stopService: " + service
+ " type=" + resolvedType);
// 获取调用者的ProcessRecord
final ProcessRecord callerApp = mAm.getRecordForAppLocked(caller);
// 调用者没在AMS中注册过,报错
if (caller != null && callerApp == null) {
throw new SecurityException(
"Unable to find app for caller " + caller
+ " (pid=" + Binder.getCallingPid()
+ ") when stopping service " + service);
}
// If this service is active, make sure it is stopped.
// 获取AMS中的这个Service
ServiceLookupResult r = retrieveServiceLocked(service, resolvedType, null,
Binder.getCallingPid(), Binder.getCallingUid(), userId, false, false, false);
if (r != null) {
if (r.record != null) {
final long origId = Binder.clearCallingIdentity();
try {
// 继续停止service
stopServiceLocked(r.record);
} finally {
Binder.restoreCallingIdentity(origId);
}
return 1;
}
return -1;
}
return 0;
}
```
这个方法首先获得一个ProcessRecord,正常的话下面会调用retrieveServiceLocked方法获取需要stop的ServiceLookupResult,这个对象上一篇文章也有介绍过,这里封装了ServiceRecord,所以下面取出ServiceRecord,如果非空,传入stopServiceLocked方法,继续调用:
```java
private void stopServiceLocked(ServiceRecord service) {
if (service.delayed) { // 由于service延迟了,还没启动,所以暂时也不stop
// If service isn't actually running, but is is being held in the
// delayed list, then we need to keep it started but note that it
// should be stopped once no longer delayed.
if (DEBUG_DELAYED_STARTS) Slog.v(TAG_SERVICE, "Delaying stop of pending: " + service);
service.delayedStop = true;
return;
}
synchronized (service.stats.getBatteryStats()) {
service.stats.stopRunningLocked();
}
service.startRequested = false;
if (service.tracker != null) {
// 跟踪器设置未开始
service.tracker.setStarted(false, mAm.mProcessStats.getMemFactorLocked(),
SystemClock.uptimeMillis());
}
service.callStart = false;
// stop service的核心方法
bringDownServiceIfNeededLocked(service, false, false);
}
```
这个方法首先如果这个service是延迟启动的,那么说明还没启动,所以会先标记下delayedStop这个变量会true,表示在延迟时间到后马上停止,然后就return了。之后设置一下相关状态后,把startRequested标记为false,表示没有启动。最后会调用bringDownServiceIfNeededLocked方法,这个是stop service的一个核心方法的入口,我们看下代码:
```java
private final void bringDownServiceIfNeededLocked(ServiceRecord r, boolean knowConn,
boolean hasConn) {
//Slog.i(TAG, "Bring down service:");
//r.dump(" ");
// 确定下这个service还需要用吗
if (isServiceNeededLocked(r, knowConn, hasConn)) {
return;
}
// Are we in the process of launching?
// 待启动的集合中有它,return
if (mPendingServices.contains(r)) {
return;
}
// 继续调用
bringDownServiceLocked(r);
}
```
这个方法里面首先调用了isServiceNeededLocked这个方法,这个方法会确认下这个要停止的service是否还有用,如果确实有用的话,那么就不能停止,所以return。如果确实可以停止的话,会在判断下这个service是否在待启动的集合mPendingServices中,如果在的话,说明还是需要被启动的,所以也不能停止,所以也return。最后调用的核心的stop方法bringDownServiceLocked。这个bringDownServiceLocked方法我们稍稍等下看,先看下上面说的isServiceNeededLocked方法:
```java
private final boolean isServiceNeededLocked(ServiceRecord r, boolean knowConn,
boolean hasConn) {
// Are we still explicitly being asked to run?
if (r.startRequested) { // 已经被要求启动,return
return true;
}
// Is someone still bound to us keeping us running?
if (!knowConn) {
// 看看是否有带BIND_AUTO_CREATE的,有的话说明还不能stop
hasConn = r.hasAutoCreateConnections();
}
if (hasConn) {
return true;
}
return false;
}
```
这个方法里面做了两个判断,第一个startRequested这个值是true,说明已经被要求启动了,那么就先不stop。之后会查看下是否有客户端已经绑定了他。这里knowConn是前面方法传过来的值,是false,所以会调用serviceRecord的hasAutoCreateConnections,这个方法判断是否有客户端已经绑定了这个service,我们看下这个方法:
```java
// 判断所有ConnectionRecord中,是否有带BIND_AUTO_CREATE的
public boolean hasAutoCreateConnections() {
// XXX should probably keep a count of the number of auto-create
// connections directly in the service.
// 遍历所有绑定这个service的链接,如果还有BIND_AUTO_CREATE的链接,说明自动被绑定了,目前没解绑不能销毁
for (int conni=connections.size()-1; conni>=0; conni--) {
ArrayList<ConnectionRecord> cr = connections.valueAt(conni);
for (int i=0; i<cr.size(); i++) {
if ((cr.get(i).flags&Context.BIND_AUTO_CREATE) != 0) {
return true;
}
}
}
return false;
}
```
这个方法可以看到,会遍历serviceRecord中的connections,connections是个map,在之前分析bind service的时候我们已经见过他了,他保存了客户端传过来的回调IBinder,用来返回数据给客户端进程。这个方法会遍历他,如果客户端传过来的参数带有BIND_AUTO_CREATE的话,说明是一个自动创建service的表示,所以这种service不能stop,这个问题我们之前在分析bind service的时候也有提及过,这里可以看到他的代码处理。我们回到前面的方法。
所以说在以上情况中的service都是不能被停止的,排除了以上的情况,接下去就继续停止service的流程,我们看bringDownServiceLocked方法:
```java
private final void bringDownServiceLocked(ServiceRecord r) {
//Slog.i(TAG, "Bring down service:");
//r.dump(" ");
// Report to all of the connections that the service is no longer
// available.
// 这里是结束客户端
// 遍历所有绑定这个service的客户端链接
for (int conni=r.connections.size()-1; conni>=0; conni--) {
ArrayList<ConnectionRecord> c = r.connections.valueAt(conni);
for (int i=0; i<c.size(); i++) {
ConnectionRecord cr = c.get(i);
// There is still a connection to the service that is
// being brought down. Mark it as dead.
cr.serviceDead = true; // 要stop了,所以dead说明要死了
try {
// stop前会再次调用客户端的connected,注意这里参数2和3分别是null和true,会让客户端结束死亡监听等
cr.conn.connected(r.name, null, true);
} catch (Exception e) {
Slog.w(TAG, "Failure disconnecting service " + r.name +
" to connection " + c.get(i).conn.asBinder() +
" (in " + c.get(i).binding.client.processName + ")", e);
}
}
}
// 这里是结束服务端
// Tell the service that it has been unbound.
if (r.app != null && r.app.thread != null) {
// 遍历所有被绑定的服务端的service,解绑他们
for (int i=r.bindings.size()-1; i>=0; i--) {
// 获取每个服务的service,即IntentBindRecord
IntentBindRecord ibr = r.bindings.valueAt(i);
if (DEBUG_SERVICE) Slog.v(TAG_SERVICE, "Bringing down binding " + ibr
+ ": hasBound=" + ibr.hasBound);
if (ibr.hasBound) {
try {
bumpServiceExecutingLocked(r, false, "bring down unbind");
mAm.updateOomAdjLocked(r.app, true);
ibr.hasBound = false;
ibr.requested = false;
// 调用服务端unbind
r.app.thread.scheduleUnbindService(r,
ibr.intent.getIntent());
} catch (Exception e) {
Slog.w(TAG, "Exception when unbinding service "
+ r.shortName, e);
serviceProcessGoneLocked(r);
}
}
}
}
// Check to see if the service had been started as foreground, but being
// brought down before actually showing a notification. That is not allowed.
if (r.fgRequired) { // 前台的服务,移除hander的消息
Slog.w(TAG_SERVICE, "Bringing down service while still waiting for start foreground: "
+ r);
r.fgRequired = false;
r.fgWaiting = false;
mAm.mHandler.removeMessages(
ActivityManagerService.SERVICE_FOREGROUND_TIMEOUT_MSG, r);
if (r.app != null) {
Message msg = mAm.mHandler.obtainMessage(
ActivityManagerService.SERVICE_FOREGROUND_CRASH_MSG);
msg.obj = r.app;
mAm.mHandler.sendMessage(msg);
}
}
if (DEBUG_SERVICE) {
RuntimeException here = new RuntimeException();
here.fillInStackTrace();
Slog.v(TAG_SERVICE, "Bringing down " + r + " " + r.intent, here);
}
r.destroyTime = SystemClock.uptimeMillis();
if (LOG_SERVICE_START_STOP) {
EventLogTags.writeAmDestroyService(
r.userId, System.identityHashCode(r), (r.app != null) ? r.app.pid : -1);
}
```
这个方法比较长,我们分段来看,这里是第一段。首先会遍历serviceRecord中保存的ConnectionRecord,这个是客户端的回调IBinder,前面说过了。首先把他的serviceDead字段置为true,表示要停止了。之后再调用这个客户端回调IBinder的connected方法,这里调用这个方法的时候,第二和第三个参数是null和true,会让客户端那边结束死亡监听等操作,这个方法我们前面在分析bind service的时候也分析过,不过那时候主要分析bind service的流程,这里stop流程由于第二个参数是null,第三个所以处理的流程稍有点不同,我们先稍微看下这段代码,后面就不在单独看了:
```java
public void doConnected(ComponentName name, IBinder service, boolean dead) {
..................
if (service != null) {
.................
} else {
// 到这里,说明这个要绑定的service为null,所以把old中这个intent一样的remove
// The named service is being disconnected... clean up.
mActiveConnections.remove(name);
}
..................
if (dead) { // 这个为true表示要stop了
mConnection.onBindingDied(name);
}
// If there is a new service, it is now connected.
if (service != null) { // 调用onServiceConnected
mConnection.onServiceConnected(name, service);
}
}
```
由于这个方法前面已经分析过了,这里只截出和stop流程相关的,这里看到当service参数是null的时候,会把绑定的service从mActiveConnections这个map中移除,同时会调用客户端的onBindingDied方法,由于service是null,所以最后就不会调用onServiceConnected方法了。好了,这个方法我们就补充下,回到前面的方法。
处理完客户端那边的情况后,接着开始要处理service进程这边。如果service进程存在的情况下,会遍历serviceRecord的bindings这个map,这个map中保存了和这个service有关的IntentBindRecord,这些对象概念都是和bind service有关的,具体他们所表示的内容可以参考service分析的第二篇文章中关于bind service的内容,那边有详细的分析,这里就不过多介绍。这个方法取出service对应的intent后,会跨进程调用scheduleUnbindService方法去解绑service进程,这个方法的执行就到service进程那边了,我们稍后分析,这边我们先接着看下去后面方法还做了些什么。
接着如果这个serviceRecord的fgRequired是true,表示是一个前台启动的service,既然要停止了,那么把fgRequired和fgWaiting都置为false,然后移除SERVICE_FOREGROUND_TIMEOUT_MSG这个消息。我们本篇文章的开头就分析了startForegroundService,所以上面这个的处理应该不难理解,之后我们看到了还发送了一个SERVICE_FOREGROUND_CRASH_MSG消息,这个消息的最终处理是会发生一个crash的,我们看一眼最终的这个方法:
```java
public void crashApplication(int uid, int initialPid, String packageName, int userId,
String message) {
if (checkCallingPermission(android.Manifest.permission.FORCE_STOP_PACKAGES)
!= PackageManager.PERMISSION_GRANTED) {
String msg = "Permission Denial: crashApplication() from pid="
+ Binder.getCallingPid()
+ ", uid=" + Binder.getCallingUid()
+ " requires " + android.Manifest.permission.FORCE_STOP_PACKAGES;
Slog.w(TAG, msg);
throw new SecurityException(msg);
}
synchronized(this) {
mAppErrors.scheduleAppCrashLocked(uid, initialPid, packageName, userId, message);
}
}
```
这个方法我们只要看一眼就行,可见是返回报错,我们回到前面。
这里是前台的service,为什么要报错呢?我们分析startForegroundService的时候知道,启动一个前台service的时候fgRequired的置是true,而且必须在5秒内在service中调用startForeground方法,这个方法一方面会取消启动时候发送的超时消息,另一方面会把fgRequired置为false。而这里stop service的时候fgRequired还是true,说明还没有执行startForeground方法,所以这里代码告诉我们的是如果启动一个startForegroundService后,没有调用startForeground前就stop service就会报错。好了,之后会更新下停止service的时间,这段代码就执行完了,我们看下一段代码:
```java
// 获取这个userId下的ServiceRecord的map
final ServiceMap smap = getServiceMapLocked(r.userId);
// 移除这个ServiceRecord
ServiceRecord found = smap.mServicesByName.remove(r.name);
// Note when this method is called by bringUpServiceLocked(), the service is not found
// in mServicesByName and found will be null.
if (found != null && found != r) { // ComponentName一样,但是不是这个service,报错
// This is not actually the service we think is running... this should not happen,
// but if it does, fail hard.
smap.mServicesByName.put(r.name, found);
throw new IllegalStateException("Bringing down " + r + " but actually running "
+ found);
}
// 同时移除mServicesByIntent这个集合中的serviceRecord
smap.mServicesByIntent.remove(r.intent);
r.totalRestartCount = 0;
// 从重启集合中移除这个ServiceRecord
unscheduleServiceRestartLocked(r, 0, true);
// Also make sure it is not on the pending list.
// 从待启动集合中移除这个serviceRecord
for (int i=mPendingServices.size()-1; i>=0; i--) {
if (mPendingServices.get(i) == r) {
mPendingServices.remove(i);
if (DEBUG_SERVICE) Slog.v(TAG_SERVICE, "Removed pending: " + r);
}
}
// 移除notifacation
cancelForegroundNotificationLocked(r);
if (r.isForeground) {
decActiveForegroundAppLocked(smap, r);
}
r.isForeground = false;
r.foregroundId = 0;
r.foregroundNoti = null;
// 移除启动项
// Clear start entries.
r.clearDeliveredStartsLocked();
r.pendingStarts.clear();
```
这里首先获取这个userId下的ServiceMap,ServiceMap这个类我们之前也介绍过,他的里面保存着这个userId下的所有运行的serviceRecord。这里既然要停止了,所以把这个service从ServiceMap中删除。之后还会从重启集合和带启动集合中把这个service移除。
如果是前台service的话,还会有Notifacation,所以如果有Notifacation的话也需要清楚,这个有关Notifacation的内容这里也不多说,以后有机会再分析Notifacation的内容。最后如果启动项中有这个service相关的内容也要清楚。好了,我们继续看下一段代码:
```java
if (r.app != null) { // 这个service的进程不为空
synchronized (r.stats.getBatteryStats()) {
r.stats.stopLaunchedLocked();
}
r.app.services.remove(r); // 从进程中移除这个service
if (r.whitelistManager) {
updateWhitelistManagerLocked(r.app);
}
if (r.app.thread != null) {
updateServiceForegroundLocked(r.app, false);
try {
// 加入hander超时消息
bumpServiceExecutingLocked(r, false, "destroy");
// 加入destory集合
mDestroyingServices.add(r);
// 表示正在销毁
r.destroying = true;
mAm.updateOomAdjLocked(r.app, true);
// 调用服务端的stop方法
r.app.thread.scheduleStopService(r);
} catch (Exception e) {
Slog.w(TAG, "Exception when destroying service "
+ r.shortName, e);
serviceProcessGoneLocked(r);
}
} else {
if (DEBUG_SERVICE) Slog.v(
TAG_SERVICE, "Removed service that has no process: " + r);
}
} else {
if (DEBUG_SERVICE) Slog.v(
TAG_SERVICE, "Removed service that is not running: " + r);
}
if (r.bindings.size() > 0) {
r.bindings.clear(); // 清楚这个
}
if (r.restarter instanceof ServiceRestarter) {
((ServiceRestarter)r.restarter).setService(null);
}
int memFactor = mAm.mProcessStats.getMemFactorLocked();
long now = SystemClock.uptimeMillis();
if (r.tracker != null) {
r.tracker.setStarted(false, memFactor, now);
r.tracker.setBound(false, memFactor, now);
if (r.executeNesting == 0) {
r.tracker.clearCurrentOwner(r, false);
r.tracker = null;
}
}
smap.ensureNotStartingBackgroundLocked(r);
```
这里是这个方法的最后一段代码。这里首先会从进程中保存的serviceRecord集合中移除这个service,之后如果这个service的whitelistManager是true,表示可以管理电源的省电模式的,当然之前也说过调用者需要时系统应用,否则没这个权限,由于现在这个service要被停止了,所以这个service的进程是否还有管理省电白名单的权限呢,那么调用updateWhitelistManagerLocked方法看看这个进程中是否还有其他service有这个权限,如果还有那么进程就有,如果没有了,进程也没这个权限了,我们扫一眼这个方法:
```java
private void updateWhitelistManagerLocked(ProcessRecord proc) {
proc.whitelistManager = false;
for (int i=proc.services.size()-1; i>=0; i--) {
ServiceRecord sr = proc.services.valueAt(i);
if (sr.whitelistManager) {
proc.whitelistManager = true;
break;
}
}
}
```
可以看到就是遍历进程的services集合,然后判断每个service是否有管理白名单的权限,有的话就break了。好了,我们回到前面。
之后就是更新优先级,发出Handler的超时消息,把这个service加入mDestroyingServices集合,这个集合表示目前正在被停止的service。最后就是跨进程的scheduleStopService方法了,这个我们后面也要跟进去看。
到这里基本AMS这边的处理就差不多了,在这个方法中我们遇到了两个跨进程的binder通信方法,一个是解绑的scheduleUnbindService,另一个是scheduleStopService。我们先看前一个方法。
# 客户端解绑方法scheduleStopService
```java
public final void scheduleUnbindService(IBinder token, Intent intent) {
BindServiceData s = new BindServiceData();
s.token = token; // ServiceRecord
s.intent = intent;
sendMessage(H.UNBIND_SERVICE, s);
}
```
继续跟进:
```java
case UNBIND_SERVICE:
Trace.traceBegin(Trace.TRACE_TAG_ACTIVITY_MANAGER, "serviceUnbind");
// unbind方法继续调用
handleUnbindService((BindServiceData)msg.obj);
Trace.traceEnd(Trace.TRACE_TAG_ACTIVITY_MANAGER);
break;
```
继续看handleUnbindService方法
```java
private void handleUnbindService(BindServiceData data) {
// 通过ServiceRecord获取Service
Service s = mServices.get(data.token);
if (s != null) {
try {
data.intent.setExtrasClassLoader(s.getClassLoader());
data.intent.prepareToEnterProcess();
// 调用service的onUnbind
boolean doRebind = s.onUnbind(data.intent);
try {
if (doRebind) { // true表示需要重新绑定
ActivityManager.getService().unbindFinished(
data.token, data.intent, doRebind);
} else {
ActivityManager.getService().serviceDoneExecuting(
data.token, SERVICE_DONE_EXECUTING_ANON, 0, 0);
}
} catch (RemoteException ex) {
throw ex.rethrowFromSystemServer();
}
} catch (Exception e) {
if (!mInstrumentation.onException(s, e)) {
throw new RuntimeException(
"Unable to unbind to service " + s
+ " with " + data.intent + ": " + e.toString(), e);
}
}
}
}
```
这个方法可以看到会调用service的onUnbind方法,返回结果为true表示需要重新绑定,并且会再次回到AMS调用unbindFinished方法。为false表示不需要重新绑定并且会调用AMS的serviceDoneExecuting,serviceDoneExecuting方法之前已经分析过了,这里就不分析了。下面我们就回到AMS中看下unbindFinished方法。
# unbindService从service进程回到AMS
```java
public void unbindFinished(IBinder token, Intent intent, boolean doRebind) {
// Refuse possible leaked file descriptors
if (intent != null && intent.hasFileDescriptors() == true) {
throw new IllegalArgumentException("File descriptors passed in Intent");
}
synchronized(this) {
// 继续调用
mServices.unbindFinishedLocked((ServiceRecord)token, intent, doRebind);
}
}
```
这里会继续调用ActiveServices的unbindFinishedLocked方法:
```java
void unbindFinishedLocked(ServiceRecord r, Intent intent, boolean doRebind) {
final long origId = Binder.clearCallingIdentity();
try {
if (r != null) {
Intent.FilterComparison filter
= new Intent.FilterComparison(intent);
// 获取服务端的IntentBindRecord
IntentBindRecord b = r.bindings.get(filter);
if (DEBUG_SERVICE) Slog.v(TAG_SERVICE, "unbindFinished in " + r
+ " at " + b + ": apps="
+ (b != null ? b.apps.size() : 0));
// 是否在销毁的集合中
boolean inDestroying = mDestroyingServices.contains(r);
if (b != null) {
// 如果有客户端在使用这个service并且这个service没有等待被销毁
// 那么下面会根据重新调用绑定方法requestServiceBindingLocked
// 否则就下次根据doRebind标志决定重新绑定
if (b.apps.size() > 0 && !inDestroying) {
// Applications have already bound since the last
// unbind, so just rebind right here.
boolean inFg = false;
for (int i=b.apps.size()-1; i>=0; i--) {
ProcessRecord client = b.apps.valueAt(i).client;
if (client != null && client.setSchedGroup
!= ProcessList.SCHED_GROUP_BACKGROUND) {
inFg = true;
break;
}
}
try {
// 重新绑定
requestServiceBindingLocked(r, b, inFg, true);
} catch (TransactionTooLargeException e) {
// Don't pass this back to ActivityThread, it's unrelated.
}
} else {
// Note to tell the service the next time there is
// a new client.
b.doRebind = true;
}
}
serviceDoneExecutingLocked(r, inDestroying, false);
}
} finally {
Binder.restoreCallingIdentity(origId);
}
}
```
这里可以看到,从serviceRecord中获得这个service intent对应的IntentBindRecord后,如果IntentBindRecord中有保存请求绑定这个service的调用进程的话,并且这个servie不是准备被销毁的,那么会重新请求绑定,绑定前会遍历所有请求这个客户端进程,看看是否有前台启动的,因为前台启动和后台启动的超时时间不一样,所以后面向Hander发送超时消息的时间也不一样,所以这里遍历时如果有前台的进程,那么就break了,下面调用requestServiceBindingLocked方法请求再次绑定,requestServiceBindingLocked方法前面在bind service分析过程中已经分析过了,这里就不多说了。
如果这个service当前还没有有客户端进程请求过,或者是一个即将要销毁的service,那么先标记下doRebind值为true,表示这是个要重新绑定的service,后面一旦再次有客户端请求绑定的时候会调用重新绑定的流程。
到这里的话,整个解绑的流程就说完了。前面我们从bringDownServiceLocked方法分析的过程中,除了scheduleUnbindService这个解绑的方法外,还有一个scheduleStopService方法,我们再看下一个方法。
# scheduleStopService方法执行到service进程中
```java
public final void scheduleStopService(IBinder token) {
sendMessage(H.STOP_SERVICE, token);
}
```
继续跟进:
```java
case STOP_SERVICE:
Trace.traceBegin(Trace.TRACE_TAG_ACTIVITY_MANAGER, "serviceStop");
// 继续stop方法调用
handleStopService((IBinder)msg.obj);
maybeSnapshot();
Trace.traceEnd(Trace.TRACE_TAG_ACTIVITY_MANAGER);
break;
```
我们继续看handleStopService方法:
```java
private void handleStopService(IBinder token) {
Service s = mServices.remove(token);
if (s != null) {
try {
if (localLOGV) Slog.v(TAG, "Destroying service " + s);
s.onDestroy(); // 调用ondestory方法
s.detachAndCleanUp();
Context context = s.getBaseContext();
if (context instanceof ContextImpl) {
final String who = s.getClassName();
((ContextImpl) context).scheduleFinalCleanup(who, "Service");
}
QueuedWork.waitToFinish();
try {
ActivityManager.getService().serviceDoneExecuting(
token, SERVICE_DONE_EXECUTING_STOP, 0, 0);
} catch (RemoteException e) {
throw e.rethrowFromSystemServer();
}
} catch (Exception e) {
if (!mInstrumentation.onException(s, e)) {
throw new RuntimeException(
"Unable to stop service " + s
+ ": " + e.toString(), e);
}
Slog.i(TAG, "handleStopService: exception for " + token, e);
}
} else {
Slog.i(TAG, "handleStopService: token=" + token + " not found.");
}
//Slog.i(TAG, "Running services: " + mServices);
}
```
这个方法的讨论和我们之前看到的几个方法差不多,也是最终会再次调用到AMS那边。这里在调用到service那边前还会调用Context的scheduleFinalCleanup方法,这个方法从命令看也是做清理工作的,他实际上会清理注册在这个Context下的Receiver以及绑定的service,我们稍稍看一眼代码:
```java
public void removeContextRegistrations(Context context,
String who, String what) {
final boolean reportRegistrationLeaks = StrictMode.vmRegistrationLeaksEnabled();
synchronized (mReceivers) {
ArrayMap<BroadcastReceiver, LoadedApk.ReceiverDispatcher> rmap =
mReceivers.remove(context);
if (rmap != null) {
for (int i = 0; i < rmap.size(); i++) {
LoadedApk.ReceiverDispatcher rd = rmap.valueAt(i);
IntentReceiverLeaked leak = new IntentReceiverLeaked(
what + " " + who + " has leaked IntentReceiver "
+ rd.getIntentReceiver() + " that was " +
"originally registered here. Are you missing a " +
"call to unregisterReceiver()?");
leak.setStackTrace(rd.getLocation().getStackTrace());
Slog.e(ActivityThread.TAG, leak.getMessage(), leak);
if (reportRegistrationLeaks) {
StrictMode.onIntentReceiverLeaked(leak);
}
try {
ActivityManager.getService().unregisterReceiver(
rd.getIIntentReceiver());
} catch (RemoteException e) {
throw e.rethrowFromSystemServer();
}
}
}
mUnregisteredReceivers.remove(context);
}
synchronized (mServices) {
//Slog.i(TAG, "Receiver registrations: " + mReceivers);
ArrayMap<ServiceConnection, LoadedApk.ServiceDispatcher> smap =
mServices.remove(context);
if (smap != null) {
for (int i = 0; i < smap.size(); i++) {
LoadedApk.ServiceDispatcher sd = smap.valueAt(i);
ServiceConnectionLeaked leak = new ServiceConnectionLeaked(
what + " " + who + " has leaked ServiceConnection "
+ sd.getServiceConnection() + " that was originally bound here");
leak.setStackTrace(sd.getLocation().getStackTrace());
Slog.e(ActivityThread.TAG, leak.getMessage(), leak);
if (reportRegistrationLeaks) {
StrictMode.onServiceConnectionLeaked(leak);
}
try {
ActivityManager.getService().unbindService(
sd.getIServiceConnection());
} catch (RemoteException e) {
throw e.rethrowFromSystemServer();
}
sd.doForget();
}
}
mUnboundServices.remove(context);
//Slog.i(TAG, "Service registrations: " + mServices);
}
}
```
最终scheduleFinalCleanup方法会调用到上面的removeContextRegistrations方法中。这个方法分为两部分,前半部分会从mReceivers这个map中取出这个context下注册的Receiver,这个属于广播当当内容,这里不展开讲,其实原理和service差不多后面有机会会写广播的源码分析。遍历这个map中的Receiver后,调用AMS的unregisterReceiver取消注册,是不是感觉和service的套路很像啊,这里就不展开了。
context中也可能绑定了别的service,所以后半部分取出这个context的回调IBinder,调用AMS的unbindService。这个unbindService方法前面没有看过,前面我们分析的unbind方法最后是调用AMS的unbindFinished方法,不要搞错了。我们看下这个参数是IServiceConnection的方法在AMS中的代码:
```java
public boolean unbindService(IServiceConnection connection) {
synchronized (this) {
return mServices.unbindServiceLocked(connection);
}
}
```
继续看unbindServiceLocked方法:
```java
boolean unbindServiceLocked(IServiceConnection connection) {
IBinder binder = connection.asBinder();
if (DEBUG_SERVICE) Slog.v(TAG_SERVICE, "unbindService: conn=" + binder);
ArrayList<ConnectionRecord> clist = mServiceConnections.get(binder);
if (clist == null) {
Slog.w(TAG, "Unbind failed: could not find connection for "
+ connection.asBinder());
return false;
}
final long origId = Binder.clearCallingIdentity();
try {
while (clist.size() > 0) {
ConnectionRecord r = clist.get(0);
removeConnectionLocked(r, null, null);
if (clist.size() > 0 && clist.get(0) == r) {
// In case it didn't get removed above, do it now.
Slog.wtf(TAG, "Connection " + r + " not removed for binder " + binder);
clist.remove(0);
}
if (r.binding.service.app != null) {
if (r.binding.service.app.whitelistManager) {
updateWhitelistManagerLocked(r.binding.service.app);
}
// This could have made the service less important.
if ((r.flags&Context.BIND_TREAT_LIKE_ACTIVITY) != 0) {
r.binding.service.app.treatLikeActivity = true;
mAm.updateLruProcessLocked(r.binding.service.app,
r.binding.service.app.hasClientActivities
|| r.binding.service.app.treatLikeActivity, null);
}
mAm.updateOomAdjLocked(r.binding.service.app, false);
}
}
mAm.updateOomAdjLocked();
} finally {
Binder.restoreCallingIdentity(origId);
}
return true;
}
```
这个方法首先从mServiceConnections这个map中获取回调进程IBinder对应的ConnectionRecord集合,遍历这个集合,调用removeConnectionLocked来清除和这个集合中每个ConnectionRecord相关元素,之后从这个集合中移除ConnectionRecord。我们看下removeConnectionLocked这个方法:
```java
// 1. 移除保存这个ConnectionRecord相关的地方,比如AppBindRecord中,ServiceRecord中,activity中
// ActiveServices中,ProcessRecord中
// 2. 如有没有客户端要绑定这个service了,那么解绑+stop
void removeConnectionLocked(
ConnectionRecord c, ProcessRecord skipApp, ActivityRecord skipAct) {
IBinder binder = c.conn.asBinder(); // 客户端的IBinder
AppBindRecord b = c.binding;
ServiceRecord s = b.service;
// 所以绑定这个service的客户端链接
ArrayList<ConnectionRecord> clist = s.connections.get(binder);
if (clist != null) {
clist.remove(c); // 从集合中移除传入的这个ConnectionRecord
// 如果这个集合空了,从这个serviceRecord的connections这个map中移除这个binder相关的项
if (clist.size() == 0) {
s.connections.remove(binder);
}
}
b.connections.remove(c); // 从AppBindRecord的ConnectionRecord集合中移除这个传入的ConnectionRecord
if (c.activity != null && c.activity != skipAct) {
if (c.activity.connections != null) {
c.activity.connections.remove(c); // 从Activity的ConnectionRecord集合中移除传入的这个ConnectionRecord项
}
}
if (b.client != skipApp) {
// 从进程中保存的ConnectionRecord集合中移除这个传入的ConnectionRecord
b.client.connections.remove(c);
if ((c.flags&Context.BIND_ABOVE_CLIENT) != 0) {
b.client.updateHasAboveClientLocked();
}
// If this connection requested whitelist management, see if we should
// now clear that state.
if ((c.flags&Context.BIND_ALLOW_WHITELIST_MANAGEMENT) != 0) {
s.updateWhitelistManager();
if (!s.whitelistManager && s.app != null) {
updateWhitelistManagerLocked(s.app);
}
}
if (s.app != null) {
updateServiceClientActivitiesLocked(s.app, c, true);
}
}
// ActiveServices.java中也保存了一份ConnectionRecord相关的内容,也和上面一样移除
clist = mServiceConnections.get(binder);
if (clist != null) {
clist.remove(c);
if (clist.size() == 0) {
mServiceConnections.remove(binder);
}
}
// 解除进程间的一些相互关联
mAm.stopAssociationLocked(b.client.uid, b.client.processName, s.appInfo.uid, s.name);
// 这个客户端进程已经没有要绑定的了,从IntentBindRecord中把和这个进程相关的移除
if (b.connections.size() == 0) {
b.intent.apps.remove(b.client);
```
这个方法逻辑上分两部分处理,我们分开看。前面一篇分析bind service的文章中我们有说过,一个客户端请求绑定service,会把回调的IBinder保存在AMS中,从前面文章分析来看,保存的地方也比较多,而且涉及到多个不同的类,比如AppBindRecord,ServiceRecord,Activity,ActiveServices,ProcessRecord等,那么同样的,这里也需要把当初保存的从这些地方移除掉,上面这段代码也就是从这些地方移除的处理。我们在看后半段代码:
```java
if (!c.serviceDead) { // 说明这个connection要绑定的service要停止了
if (DEBUG_SERVICE) Slog.v(TAG_SERVICE, "Disconnecting binding " + b.intent
+ ": shouldUnbind=" + b.intent.hasBound);
// 这个intent绑定的客户端为空,但是这个service已经被绑定过,那么要先解绑
if (s.app != null && s.app.thread != null && b.intent.apps.size() == 0
&& b.intent.hasBound) {
try {
bumpServiceExecutingLocked(s, false, "unbind");
if (b.client != s.app && (c.flags&Context.BIND_WAIVE_PRIORITY) == 0
&& s.app.setProcState <= ActivityManager.PROCESS_STATE_RECEIVER) {
// If this service's process is not already in the cached list,
// then update it in the LRU list here because this may be causing
// it to go down there and we want it to start out near the top.
mAm.updateLruProcessLocked(s.app, false, null);
}
mAm.updateOomAdjLocked(s.app, true);
b.intent.hasBound = false;
// Assume the client doesn't want to know about a rebind;
// we will deal with that later if it asks for one.
b.intent.doRebind = false;
s.app.thread.scheduleUnbindService(s, b.intent.intent.getIntent());
} catch (Exception e) {
Slog.w(TAG, "Exception when unbinding service " + s.shortName, e);
serviceProcessGoneLocked(s);
}
}
// If unbound while waiting to start, remove the pending service
mPendingServices.remove(s); // 如果这个service在待启动的集合中,那么移除
if ((c.flags&Context.BIND_AUTO_CREATE) != 0) {
boolean hasAutoCreate = s.hasAutoCreateConnections();
if (!hasAutoCreate) {
if (s.tracker != null) {
s.tracker.setBound(false, mAm.mProcessStats.getMemFactorLocked(),
SystemClock.uptimeMillis());
}
}
// 关闭这个service
bringDownServiceIfNeededLocked(s, true, hasAutoCreate);
}
}
```
前面在分析bringDownServiceLocked方法的时候,我们有提到过在停止一个service的时候,如果可以停止的话,会把和他相关的客户端的ConnectionRecord的serviceDead值置为true,说明这个客户端绑定的客户端要销毁了,反之如果为false就是正常的,所以上面这段代码在这个ConnectionRecord绑定的service进程存在的情况下,但是已经没有其他的客户端绑定这个service了,那么这个service也就没用了,所以会调用scheduleUnbindService方法来解绑。如果这个service将要被启动,既然没有客户端要使用它了,那么也不用启动了,从启动集合mPendingServices中移除。最后调用bringDownServiceIfNeededLocked关闭这个service。
说了那么多我们要回到service进程的handleStopService方法,前面是从这个方法的scheduleFinalCleanup中延伸过来的,主要是清理context相关的一些内容。之后就会回到AMS中执行serviceDoneExecuting方法了,这个方法也是说过多次了,但是stopService执行这个方法时候的参数有点不一样:
```java
ActivityManager.getService().serviceDoneExecuting(
token, SERVICE_DONE_EXECUTING_STOP, 0, 0);
```
可以看到第二个参数是SERVICE_DONE_EXECUTING_STOP,之前我们分析的几个方法的时候都是SERVICE_DONE_EXECUTING_ANON,所以我们到AMS中看下这个参数的处理。
# stopService回到AMS
```java
void serviceDoneExecutingLocked(ServiceRecord r, int type, int startId, int res) {
boolean inDestroying = mDestroyingServices.contains(r); // destory中是否有这service
if (r != null) {
..............
else if (type == ActivityThread.SERVICE_DONE_EXECUTING_STOP) {
// STOP Sservice会走到这里
// This is the final call from destroying the service... we should
// actually be getting rid of the service at this point. Do some
// validation of its state, and ensure it will be fully removed.
if (!inDestroying) {
// Not sure what else to do with this... if it is not actually in the
// destroying list, we don't need to make sure to remove it from it.
// If the app is null, then it was probably removed because the process died,
// otherwise wtf
if (r.app != null) {
Slog.w(TAG, "Service done with onDestroy, but not inDestroying: "
+ r + ", app=" + r.app);
}
} else if (r.executeNesting != 1) {
Slog.w(TAG, "Service done with onDestroy, but executeNesting="
+ r.executeNesting + ": " + r);
// Fake it to keep from ANR due to orphaned entry.
r.executeNesting = 1;
}
}
final long origId = Binder.clearCallingIdentity();
// 拆掉之前创建的Handler的消息
serviceDoneExecutingLocked(r, inDestroying, inDestroying);
Binder.restoreCallingIdentity(origId);
}
.........
```
我们前面在分析bringDownServiceLocked方法的时候在调用Service进程前把这个ServiceRecord添加到了mDestroyingServices集合中,所以这个方法正常的话,开始inDestroying的值为true。
之后执行到SERVICE_DONE_EXECUTING_STOP这个分支里面的时候,如果嵌套执行不是1的话置为1。最后调用serviceDoneExecutingLocked方法,后2个参数都是true,这个方法之前也分析过,但是最后两个参数都不是true的情况,我们在来看下最后两个参数是true的情况:
```java
private void serviceDoneExecutingLocked(ServiceRecord r, boolean inDestroying,
boolean finishing) {
...............
if (inDestroying) { // 如果这个service是要销毁的
if (DEBUG_SERVICE) Slog.v(TAG_SERVICE,
"doneExecuting remove destroying " + r);
mDestroyingServices.remove(r); // 从mDestroyingServices集合中移除他
r.bindings.clear(); // 清除创建时候的数据
}
..............
if (finishing) {
if (r.app != null && !r.app.persistent) {
// 如果进程非空,并且不是常驻的应用,从services集合中移除
r.app.services.remove(r);
// 由于whitelistManager为true,表示这个service所在的进程
// 可以临时绕过省电模式,现在他马上要结束了。看看剩下的service
// 中是否还有whitelistManager为true的
if (r.whitelistManager) {
updateWhitelistManagerLocked(r.app);
}
}
r.app = null;
}
}
```
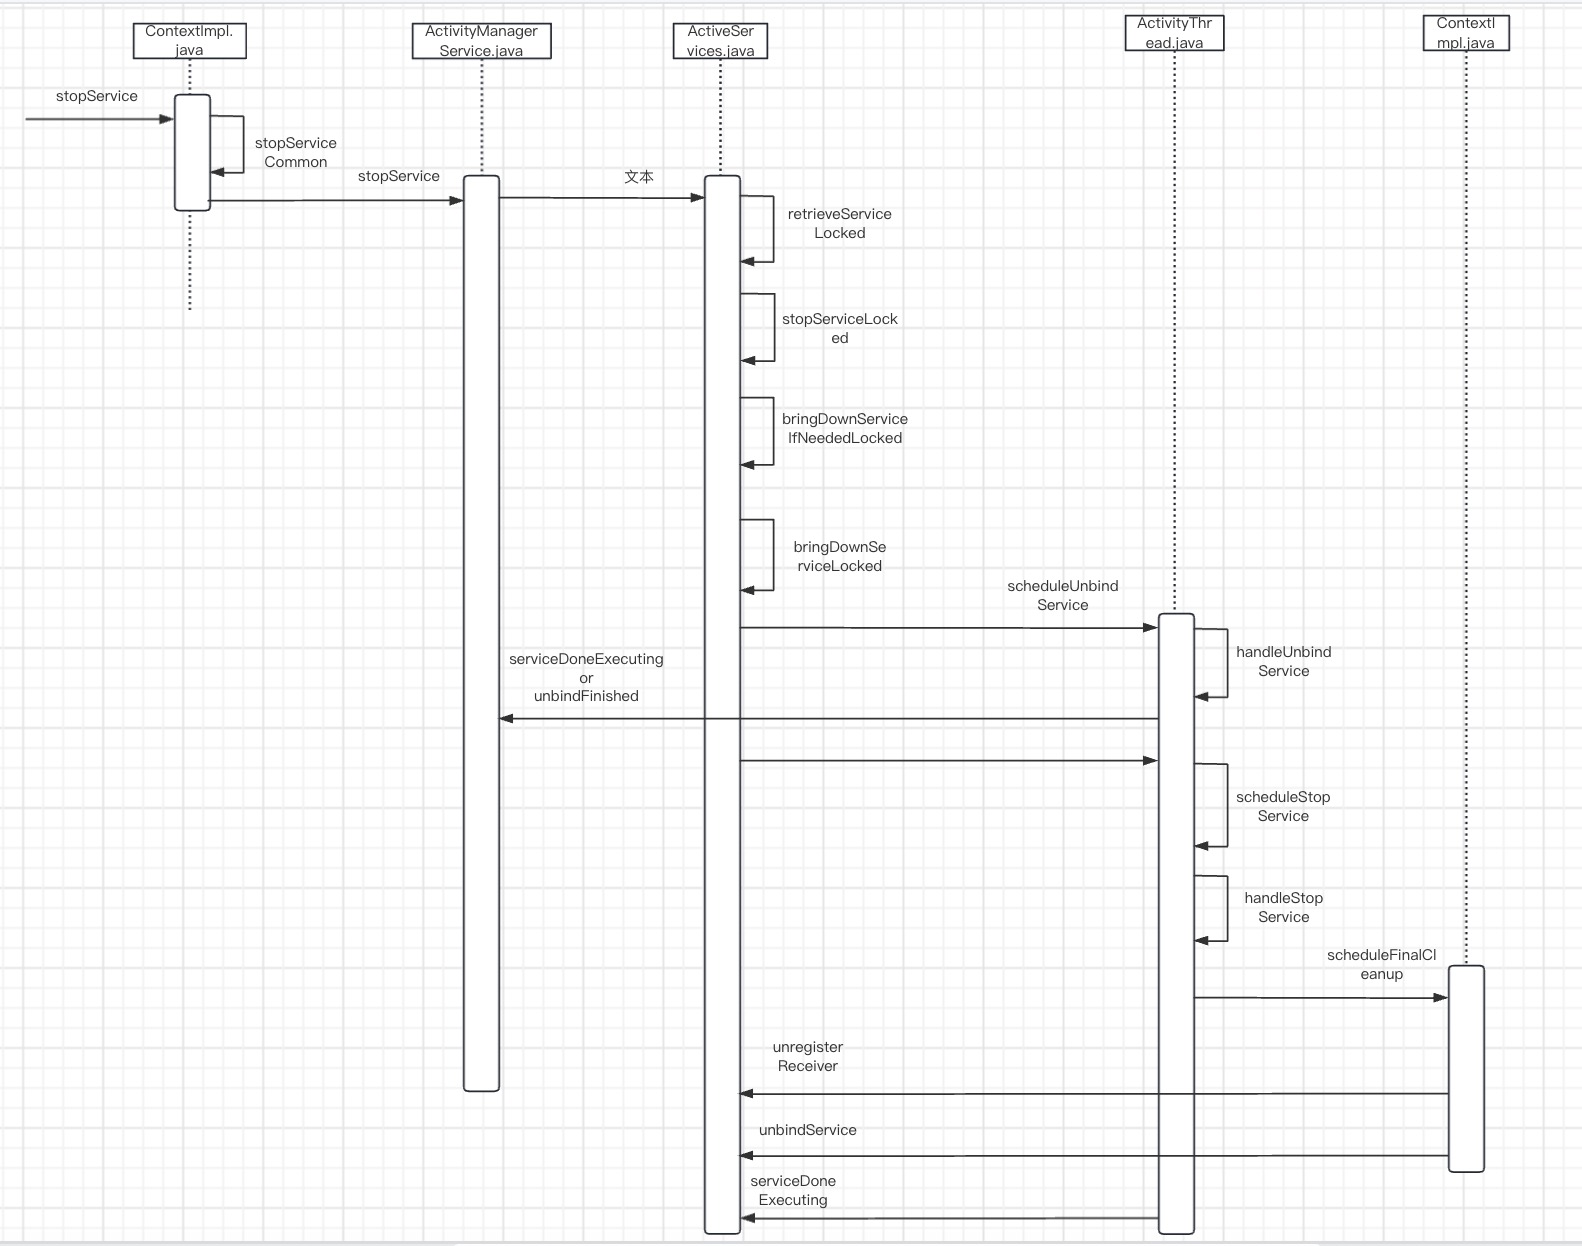
可以看到在最后两个参数是true的情况下,会把这个serviceRecord先从mDestroyingServices集合中移除,然后bindings这个map也是清空,这个map中是所有和这个servie有关的IntentBindRecord,最后还会从processRecord中移除这个serviceRecord。至此,整个stop service的流程就完成了。其实service相关的内容分析到这里,基本上这些内容都比较熟悉了,越到后面感觉都是差不多的东西了,我们把stop service的时序图在画一下。
经过三篇service相关的源码分析,我们平时开发的主要使用基本就这些了,后续有细节方面的再补充,service方面的分析暂时告一段落,后面我们新的文章再见了。

Service源码分析(三)