
前面第一篇service源码的分析文章我们分析了startService在一个service已经启动的情况下执行的整个流程,在分析的过程中我们还看到了在进程存在但是service还不存在以及进程也不存在的情况下的执行流程,我们这篇文章就来分析下这两种情况。首先分析了进程存在但是service还创建的情况。根据前一篇文章的分析,所有启动的情况都会在bringUpServiceLocked这个方法里面开始执行。我们看下这个方法里面进程存在情况下,创建一个service的流程。
```java
private String bringUpServiceLocked(ServiceRecord r, int intentFlags, boolean execInFg,
boolean whileRestarting, boolean permissionsReviewRequired)
throws TransactionTooLargeException {
..................
if (app != null && app.thread != null) { // 进程非空
try {
// 设置包名
app.addPackage(r.appInfo.packageName, r.appInfo.versionCode, mAm.mProcessStats);
// 继续启动
realStartServiceLocked(r, app, execInFg);
return null;
} catch (TransactionTooLargeException e) {
throw e;
} catch (RemoteException e) {
Slog.w(TAG, "Exception when starting service " + r.shortName, e);
}
// If a dead object exception was thrown -- fall through to
// restart the application.
}
..................
}
```
bringUpServiceLocked这个方法我们前面一篇文章已经详细介绍过了,这里我们截取和创建service有关的部分。从上面代码可以看出,如果进程存在的情况,会继续调用realStartServiceLocked方法,我们继续看这个方。
# 开始创建service
```java
private final void realStartServiceLocked(ServiceRecord r,
ProcessRecord app, boolean execInFg) throws RemoteException {
if (app.thread == null) {
throw new RemoteException();
}
if (DEBUG_MU)
Slog.v(TAG_MU, "realStartServiceLocked, ServiceRecord.uid = " + r.appInfo.uid
+ ", ProcessRecord.uid = " + app.uid);
r.app = app; // 设置service的进程
// 设置最后活动时间
r.restartTime = r.lastActivity = SystemClock.uptimeMillis();
// 把这个service添加进进程的services集合
final boolean newService = app.services.add(r);
// 添加启动service时候的超时
bumpServiceExecutingLocked(r, execInFg, "create");
// 以下是和优先级相关的处理
mAm.updateLruProcessLocked(app, false, null);
updateServiceForegroundLocked(r.app, /* oomAdj= */ false);
mAm.updateOomAdjLocked();
....................
```
这个方法也比较长,我们开段来讲。这里第一段比较简单,把进程赋值给serviceRecord的app字段,然后设置下启动的时间,之后把这个serviceRecord加入services集合中,表示这是正在运行的service。接着我们又看到了熟悉的bumpServiceExecutingLocked方法,这个方法是在启动service前给Handler发送超时消息,具体这个方法的分析我们在前一篇文章已经详细分析过了,可以去前面的文章看下。我们接着看下面一段代码:
```java
boolean created = false;
try {
if (LOG_SERVICE_START_STOP) {
String nameTerm;
int lastPeriod = r.shortName.lastIndexOf('.');
nameTerm = lastPeriod >= 0 ? r.shortName.substring(lastPeriod) : r.shortName;
EventLogTags.writeAmCreateService(
r.userId, System.identityHashCode(r), nameTerm, r.app.uid, r.app.pid);
}
synchronized (r.stats.getBatteryStats()) {
r.stats.startLaunchedLocked();
}
mAm.notifyPackageUse(r.serviceInfo.packageName,
PackageManager.NOTIFY_PACKAGE_USE_SERVICE);
// 设置当前进程状态
app.forceProcessStateUpTo(ActivityManager.PROCESS_STATE_SERVICE);
// binder调用创建service
app.thread.scheduleCreateService(r, r.serviceInfo,
mAm.compatibilityInfoForPackageLocked(r.serviceInfo.applicationInfo),
app.repProcState);
r.postNotification();
created = true;
} catch (DeadObjectException e) {
Slog.w(TAG, "Application dead when creating service " + r);
mAm.appDiedLocked(app);
throw e;
} finally {
if (!created) { // 进入这里说明创建进程失败了
// Keep the executeNesting count accurate.
// mDestroyingServices集合中是否包含ServiceRecord
final boolean inDestroying = mDestroyingServices.contains(r);
// 扫尾工作
serviceDoneExecutingLocked(r, inDestroying, inDestroying);
// Cleanup.
if (newService) { // 如果加入了services集合
app.services.remove(r); // 从services集合中移除
r.app = null; // serviceRecord的app置为null
}
// Retry.
if (!inDestroying) { // 如果mDestroyingServices集合中不包含这个serviceRcord
// 那么重启这个service
scheduleServiceRestartLocked(r, false);
}
}
}
```
这里的第二段代码也就是和创建service有关的了。这段代码开始进行一些进程的状态设置等,接着我们就发现了跨进程的调用scheduleCreateService来创建service,如果创建成功会把这里的变量created设置为true。所以这里我们后面会接着看scheduleCreateService这个方法,但是我们稍等会再看,先把这个方法看完在到service进程那边看。
这段代码最后如果创建失败了,还会做一些事情。比如我们又看到了serviceDoneExecutingLocked这个方法,这个是启动service结束时候的方法,比如把前面发送的超时消息取消等,这个在之前也分析过了,不多说了。之后还会从进程的运行service集合中移除这个serviceReord,最后如果不要求销毁的话,还会调用scheduleServiceRestartLocked这个方法来重启,这个方法我们也放到后面来看。这个第二段代码我们知道了,主要就是创建一个service,也是我们本节主要分析的内容,稍等下再回来。先来看完这个方法最后一部分内容:
```java
if (r.whitelistManager) { // 如果这个service是可以绕过省电白名单的话
app.whitelistManager = true; // 把这个进程也设置为允许绕过省电白名单
}
// bind service流程开始
requestServiceBindingsLocked(r, execInFg);
// 根据当前bind的Activity是否活动,会处理下优先级
updateServiceClientActivitiesLocked(app, null, true);
// If the service is in the started state, and there are no
// pending arguments, then fake up one so its onStartCommand() will
// be called.
// 如果这个service已经处于start状态了,并且还没有被分发过,把这个service加入pendingStarts集合
if (r.startRequested && r.callStart && r.pendingStarts.size() == 0) {
r.pendingStarts.add(new ServiceRecord.StartItem(r, false, r.makeNextStartId(),
null, null, 0));
}
// 开始分发处理这个service
sendServiceArgsLocked(r, execInFg, true);
if (r.delayed) { // 到这里已经可以不延迟了,所以从mDelayedStartList集合中删除并且置delayed为false
if (DEBUG_DELAYED_STARTS) Slog.v(TAG_SERVICE, "REM FR DELAY LIST (new proc): " + r);
getServiceMapLocked(r.userId).mDelayedStartList.remove(r);
r.delayed = false;
}
if (r.delayedStop) { // 要求停止,但是由于延迟启动了,等启动了会停止
// Oh and hey we've already been asked to stop!
r.delayedStop = false;
if (r.startRequested) { // 启动了
if (DEBUG_DELAYED_STARTS) Slog.v(TAG_SERVICE,
"Applying delayed stop (from start): " + r);
// 停止service
stopServiceLocked(r);
}
}
```
最后一部分代码,开始其实是和bind service相关的whitelistManager表示bind service的进程可以管理省电方面的白名单,但是需要的是系统应用,这块也没怎么用过,所以了解一下就好。requestServiceBindingsLocked方法是开始bind service的流程,这个我们在后面bind service的时候会说,这个先知道下。之后处理的进程的优先级方面的事情。接着我们可以看到会把这个serviceRecord加入pendingStarts这个集合,这个集合我们在前面分析startService时候说过,这个是初次获得一个将要启动的service启动项,后面真正启动一个service的时候还会把这个集合的启动项拿出来再过滤,如果确实可以启动的话会放入deliveredStarts集合,这个集合就是真正要启动的service,前面都有过分析,这里就不多说了。
之后我们看到又调用了sendServiceArgsLocked这个方法,这个就是第一篇文章分析过的,在一个service已经创建的情况下启动service了,从这里就和前面一篇文章的流程一样了,我们已经分析过了。最后如果这个service是延迟执行的,到这里就不延迟了,把他从延迟执行的集合中移除。然后如果这个service是要求停止的,那么最后会调用stopServiceLocked,这个方法会在后面专门讲stop service的时候分析。
到这里以上realStartServiceLocked这个方法其实也没做多少事情,很多的方法我们之前也分析过了,这里最主要的是调用到service进程来创建service,我们跟过去看看。
# 调用service所在进程的scheduleCreateService
```java
public final void scheduleCreateService(IBinder token,
ServiceInfo info, CompatibilityInfo compatInfo, int processState) {
updateProcessState(processState, false);
CreateServiceData s = new CreateServiceData();
s.token = token; // serviceRecord
s.info = info; // service的minifes
s.compatInfo = compatInfo; // intent
sendMessage(H.CREATE_SERVICE, s);
}
```
老样子我们到Handler去看:
```java
case CREATE_SERVICE:
Trace.traceBegin(Trace.TRACE_TAG_ACTIVITY_MANAGER, ("serviceCreate: " + String.valueOf(msg.obj)));
handleCreateService((CreateServiceData)msg.obj); // 创建service
Trace.traceEnd(Trace.TRACE_TAG_ACTIVITY_MANAGER);
break;
```
继续跟到handleBindService方法:
```java
private void handleCreateService(CreateServiceData data) {
// If we are getting ready to gc after going to the background, well
// we are back active so skip it.
unscheduleGcIdler();
// 获得LoadApk
LoadedApk packageInfo = getPackageInfoNoCheck(
data.info.applicationInfo, data.compatInfo);
Service service = null;
try {
java.lang.ClassLoader cl = packageInfo.getClassLoader();
// 反射创建类
service = (Service) cl.loadClass(data.info.name).newInstance();
} catch (Exception e) {
if (!mInstrumentation.onException(service, e)) {
throw new RuntimeException(
"Unable to instantiate service " + data.info.name
+ ": " + e.toString(), e);
}
}
try {
if (localLOGV) Slog.v(TAG, "Creating service " + data.info.name);
// 创建context
ContextImpl context = ContextImpl.createAppContext(this, packageInfo);
// 把service设置给context
context.setOuterContext(service);
// 获取Application
Application app = packageInfo.makeApplication(false, mInstrumentation);
// 调用service的attach
service.attach(context, this, data.info.name, data.token, app,
ActivityManager.getService());
// 调用service的onCreate
service.onCreate();
// 把ServiceRecord和service存入mServices中
mServices.put(data.token, service);
try {
// 通知AMS
ActivityManager.getService().serviceDoneExecuting(
data.token, SERVICE_DONE_EXECUTING_ANON, 0, 0);
} catch (RemoteException e) {
throw e.rethrowFromSystemServer();
}
} catch (Exception e) {
if (!mInstrumentation.onException(service, e)) {
throw new RuntimeException(
"Unable to create service " + data.info.name
+ ": " + e.toString(), e);
}
}
}
```
这个方法可以看到,首先获取这个进程的LoadApk,这个在之前分析AMS的文章中有过分析,可以去那里看看。从LoadApk中可以得到类加载器,通过类加载器就可以通过反射来创建这个service了。
在创建service后,接着和之前AMS中创建Activity一样,还需要创建Context,然后把Context持有这个service,同时调用service的attach和onCreate方法,最后还记得在前一篇文章里面说过了,每个service所在的进程会有一个mServices的map,这个map以serviceRecord为key,Service为value保存着这个进程中所有创建的service,然后就把创建的这个service保存在这个map中。最后还要调用serviceDoneExecuting通知AMS,serviceDoneExecuting这个方法和前面分析已经存在service的情况完全一样,都是同样的处理,这个就不多说了,然后根据前面的分析,创建完之后,后面的流程就和之前分析的service已经存在的情况意义了,这样从service创建到service启动就串起来了,整个流程也就分析完了。
这里有个小的注意点,我们看到在创建service的时候调用的scheduleCreateService是一个异步方法:
```java
@Override public void scheduleCreateService(android.os.IBinder token, android.content.pm.ServiceInfo info, android.content.res.CompatibilityInfo compatInfo, int processState) throws android.os.RemoteException
{
android.os.Parcel _data = android.os.Parcel.obtain();
try {
_data.writeInterfaceToken(DESCRIPTOR);
_data.writeStrongBinder(token);
if ((info!=null)) {
_data.writeInt(1);
info.writeToParcel(_data, 0);
}
else {
_data.writeInt(0);
}
if ((compatInfo!=null)) {
_data.writeInt(1);
compatInfo.writeToParcel(_data, 0);
}
else {
_data.writeInt(0);
}
_data.writeInt(processState);
mRemote.transact(Stub.TRANSACTION_scheduleCreateService, _data, null, android.os.IBinder.FLAG_ONEWAY);
}
finally {
_data.recycle();
}
```
可以看到最后transact的参数是FLAG_ONEWAY的,所以当他调用后,里面会返回realStartServiceLocked方法,继续执行后面的方法,如果一切正常的话,会调用到后面的sendServiceArgsLocked方法,这个是在service已经创建的时候调用的方法。有的同学会有疑虑,可能创建service都没有完成,就调用的启动service,会有问题吗?
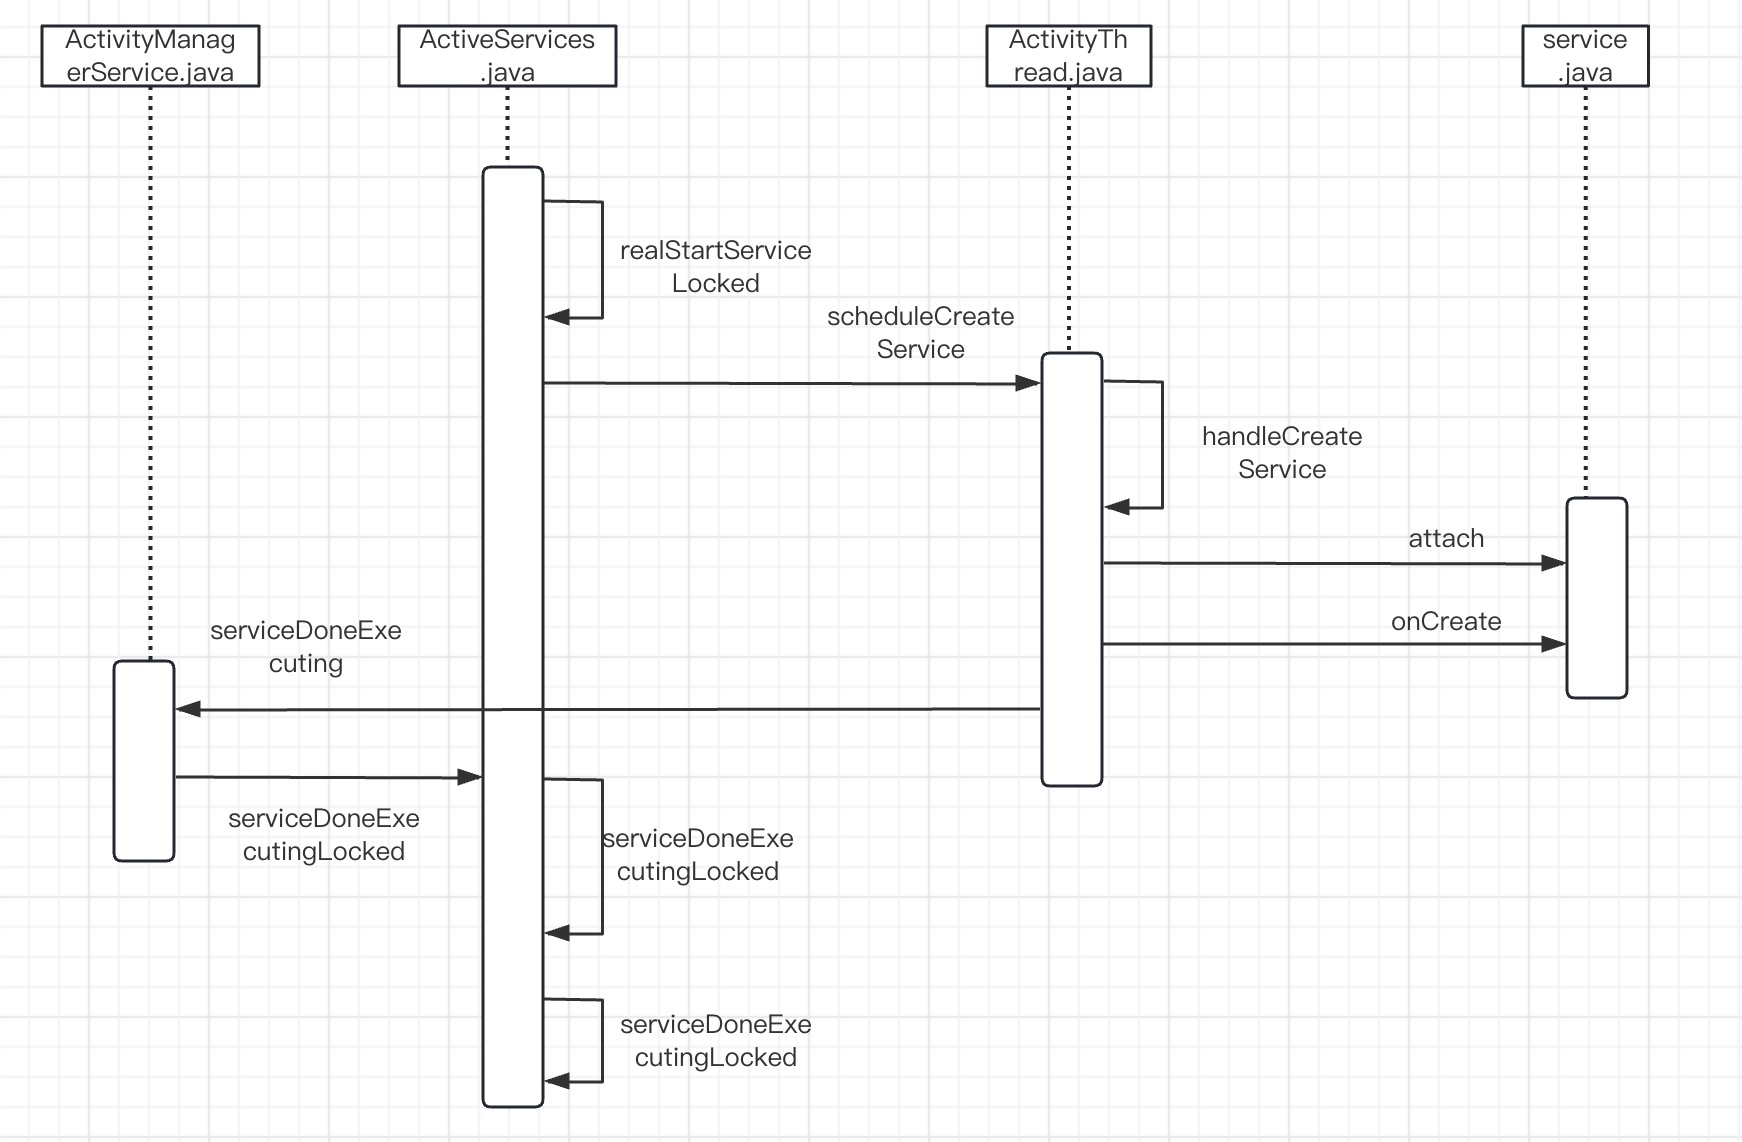
根据前一篇文章和这篇文章的分析,我们可以看到这2个方法都是通过bind调用到service的进程中的,而在那边都是通过Handler来处理的,Handler处理会根据发送消息的顺序保证他们的有序性,所以在service进程那边是可以保证他们的先后顺序的,而他们执行完后都是会重新返回到AMS的serviceDoneExecuting方法中,这个方法又是一个线程安全的方法,所以也是会按照先后顺序来执行。所以从这里我们可以看到虽然这个创建和启动分别是两个不同的方法,并且他们执行的内容其实也都是挺复杂的,所以开发一个这么复杂的系统的话,为了保证功能的稳定性,同步方法确实不容易出错,但是由于这里为了考虑性能问题,如果都用同步的话,比如给用户的体验带来不好的感受,所以谷歌充分利用bind,Handler,线程同步他们的一些特性,最大限度的让系统能够并发执行,从而在用户体验上尽量让人觉得流畅,学习完源码后,确实感觉很多东西是值得我们学习的。好了,我们先把创建service的时序图画一下。
# 启动一个未创建进程的service
说完了创建一个service,我们还有个启动一个连进程都没有的service的流程还没有说,现在开始说这个流程。这个流程同样还是从bringUpServiceLocked这个方法开始的,我们看下这部分相关的代码:
```java
private String bringUpServiceLocked(ServiceRecord r, int intentFlags, boolean execInFg,
boolean whileRestarting, boolean permissionsReviewRequired)
throws TransactionTooLargeException {
..................
if (app == null && !permissionsReviewRequired) {
// 启动一个进程
if ((app=mAm.startProcessLocked(procName, r.appInfo, true, intentFlags,
hostingType, r.name, false, isolated, false)) == null) {
String msg = "Unable to launch app "
+ r.appInfo.packageName + "/"
+ r.appInfo.uid + " for service "
+ r.intent.getIntent() + ": process is bad";
Slog.w(TAG, msg);
// 如果启动失败的话,调用bringDownServiceLocked
bringDownServiceLocked(r);
return msg;
}
if (isolated) { // 隔离进程
r.isolatedProc = app;
}
}
..................
}
```
这个方法我们看到会从AMS的启动一个进程开始,startProcessLocked方法我们在AMS的分析中有讲过,我们这里简单的过一下从启动完进程后,从进程那边返回到AMS的几个方法,详细的可以去看下AMS那里的文章,这里简单提一个是为了文章描述的连贯性。android系统通过fork zygote进程来创建一个新进程,这个过程后面会有专门的文章来描述,我们从创建完一个进程后,进程的main方法开始过一下:
```java
// ActivityThread.java
public static void main(String[] args) {
...........
thread.attach(false);
...........
}
private void attach(boolean system) {
............
final IActivityManager mgr = ActivityManager.getService();
try {
// 这个方法里面可以研究的也挺多,Instrment就是在这里走下去创建的
mgr.attachApplication(mAppThread);
} catch (RemoteException ex) {
throw ex.rethrowFromSystemServer();
}
............
}
```
这里从ActivityThread的main方法开始最终会回到AMS的attachApplication方法:
```java
public final void attachApplication(IApplicationThread thread) {
synchronized (this) {
int callingPid = Binder.getCallingPid();
final long origId = Binder.clearCallingIdentity();
attachApplicationLocked(thread, callingPid); // AMS启动的thread组件
Binder.restoreCallingIdentity(origId);
}
}
```
在AMS中会继续调用attachApplicationLocked方法,这个方法在分析AMS的文章里也做了分析,但是当然没有说和service相关的代码,这里就截取下和service相关的部分:
```java
private final boolean attachApplicationLocked(IApplicationThread thread,
int pid) {
..............
if (!badApp) {
try {
// 这里是启动一个service
didSomething |= mServices.attachApplicationLocked(app, processName);
checkTime(startTime, "attachApplicationLocked: after mServices.attachApplicationLocked");
} catch (Exception e) {
Slog.wtf(TAG, "Exception thrown starting services in " + app, e);
badApp = true;
}
}
...............
}
```
这里可以看到会继续调用attachApplicationLocked方法:
```java
boolean attachApplicationLocked(ProcessRecord proc, String processName)
throws RemoteException {
boolean didSomething = false;
// Collect any services that are waiting for this process to come up.
if (mPendingServices.size() > 0) {
ServiceRecord sr = null;
try {
for (int i=0; i<mPendingServices.size(); i++) {
sr = mPendingServices.get(i);
if (proc != sr.isolatedProc && (proc.uid != sr.appInfo.uid
|| !processName.equals(sr.processName))) {
continue;
}
mPendingServices.remove(i);
i--;
proc.addPackage(sr.appInfo.packageName, sr.appInfo.versionCode,
mAm.mProcessStats);
realStartServiceLocked(sr, proc, sr.createdFromFg);
didSomething = true;
if (!isServiceNeededLocked(sr, false, false)) {
// We were waiting for this service to start, but it is actually no
// longer needed. This could happen because bringDownServiceIfNeeded
// won't bring down a service that is pending... so now the pending
// is done, so let's drop it.
bringDownServiceLocked(sr);
}
}
} catch (RemoteException e) {
Slog.w(TAG, "Exception in new application when starting service "
+ sr.shortName, e);
throw e;
}
}
// Also, if there are any services that are waiting to restart and
// would run in this process, now is a good time to start them. It would
// be weird to bring up the process but arbitrarily not let the services
// run at this point just because their restart time hasn't come up.
if (mRestartingServices.size() > 0) {
ServiceRecord sr;
for (int i=0; i<mRestartingServices.size(); i++) {
sr = mRestartingServices.get(i);
if (proc != sr.isolatedProc && (proc.uid != sr.appInfo.uid
|| !processName.equals(sr.processName))) {
continue;
}
mAm.mHandler.removeCallbacks(sr.restarter);
mAm.mHandler.post(sr.restarter);
}
}
return didSomething;
}
```
这个方法就是在创建完进程后,要创建一个service的地方了。这个方法分为两部分,前半部分就是创建一个Service的流程,后半部分是如果有需要重启的service这里也会重启,关于重启我们在后面再说。这里还是先看前半部分的创建service。
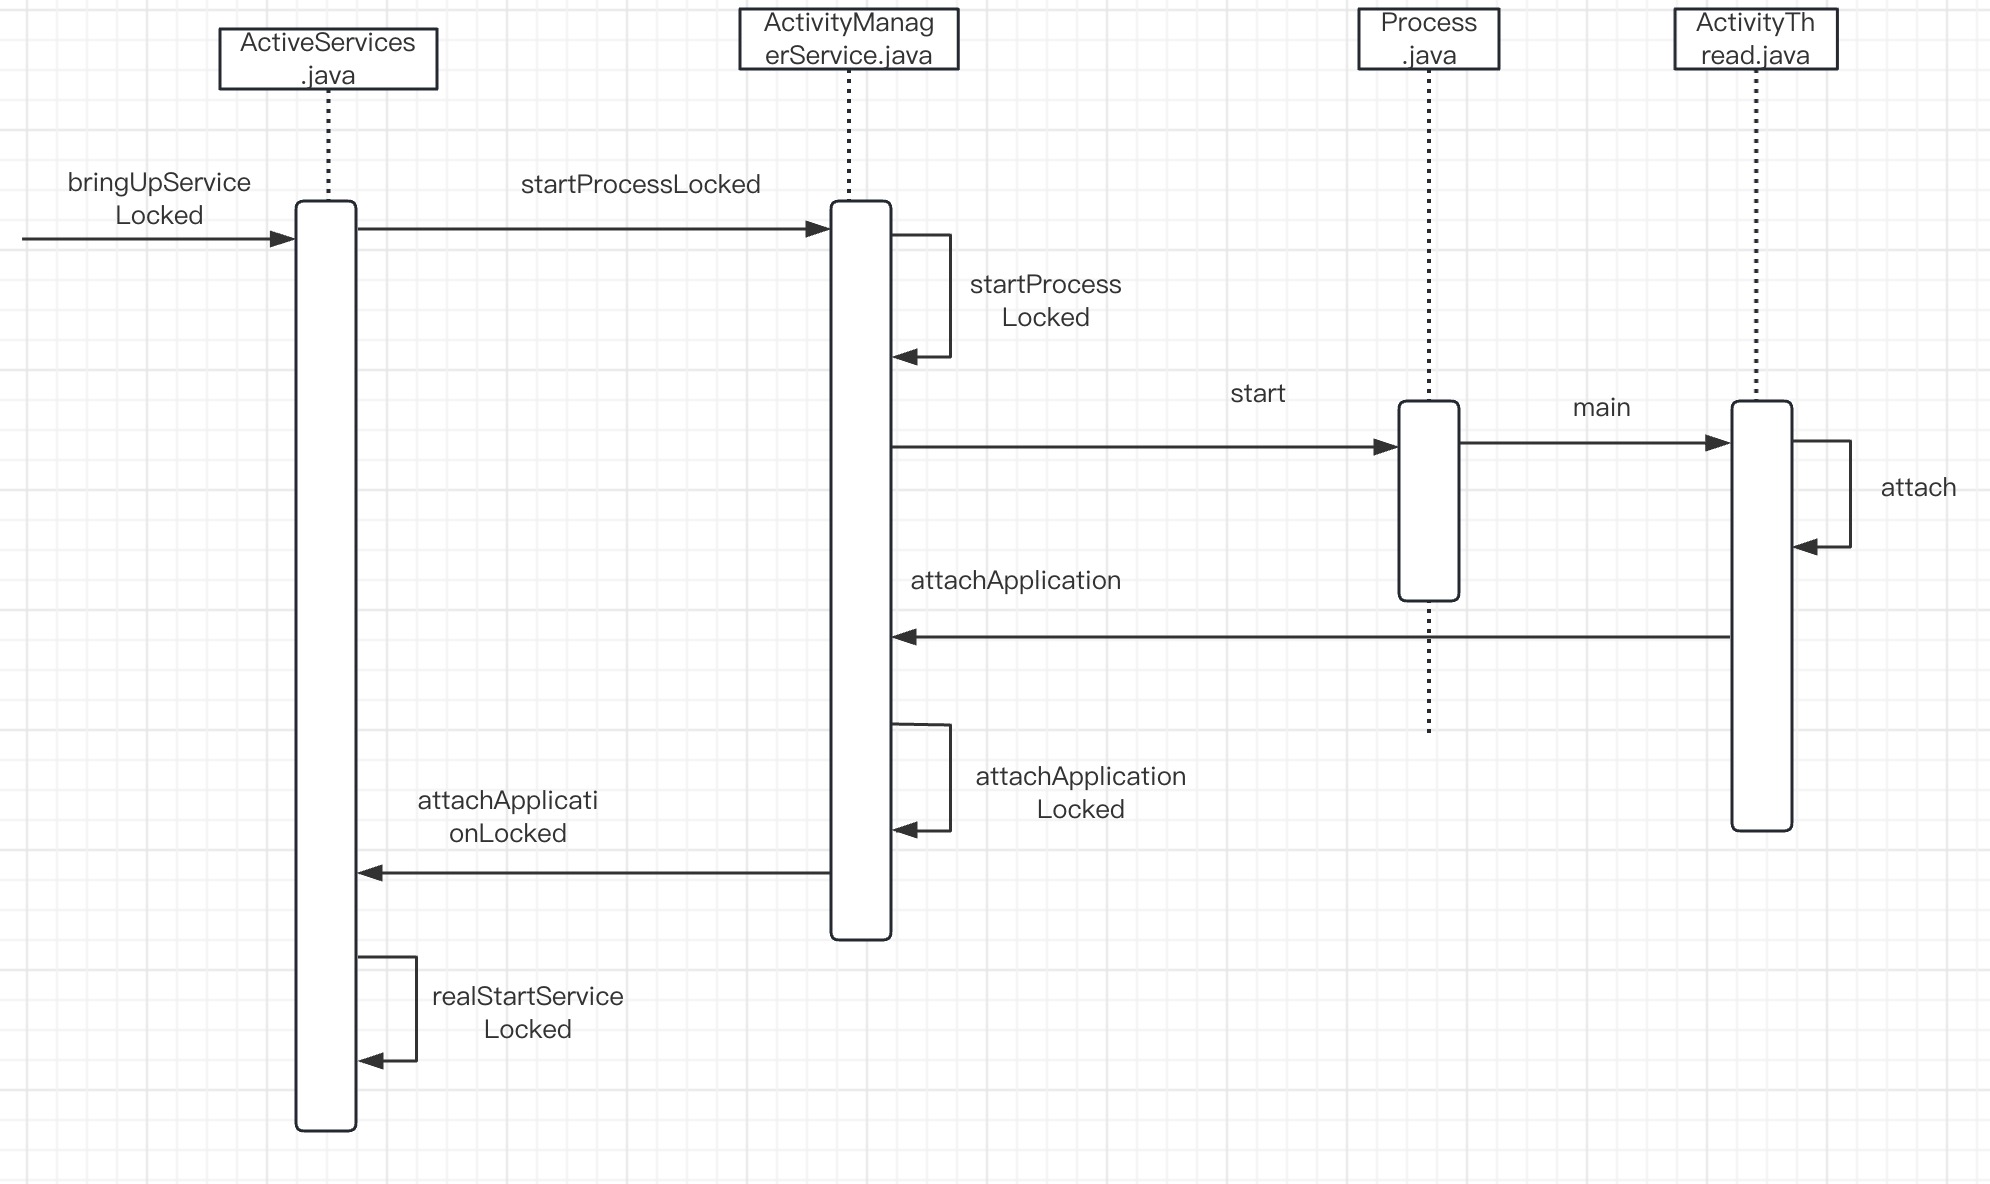
经过前面一些列service代码的的分析,看到这里应该觉得已经很熟悉了。首先如果mPendingServices这个集合非空的话,会变量这个集合,这个集合不用多说了,就是带启动的service,把他取出后判断下是否和创建的进程是一样的,如果不一样就跳过,否则先把他从mPendingServices集合中移除,然后就调用realStartServiceLocked方法开始创建service了,这样就回到了本文开头讲的流程了,这里也不多说。到这里的话,那么我们从创建进程,创建service,再到启动service的流程就都讲完了,其实这么一步一步的过来,service相对Activity来说,还是稍微容易一些,不想Activity里面有各种任务栈等等的东西比较复杂,我们最后在把创建进程开始service启动流程给下时序图。
# bind service
前面的文章我们把start service分析完毕了,除了start service外,还有一种启动service的方法bind service。我们知道start service一旦启动后,具体的事情就是在service里面处理了,处理完毕后也不会返回给调用者数据,但是在实际情况中,我们可能会需要service处理完任务后返回给调用者处理的结果,那么通过bind service就可以在service处理完任务后返回给调用者处理结果。我们接着就开始分析bind service相关的流程。
首先我们看下一般开放中是如何调用bind service的:
```java
private MyAidl myAidl;
private ServiceConnection connection = new ServiceConnection() {
@Override
public void onServiceConnected(ComponentName name, IBinder service) {
myAidl = MyAidl.Stub.asInterface(service);
}
@Override
public void onServiceDisconnected(ComponentName name) {
myAidl = null;
}
};
Intent intent = new Intent();
intent.setComponent(new ComponentName("com.xx.my_service", "com.xx.my_service.MyAidlService"));
bindService(intent, connection, Context.BIND_AUTO_CREATE);
```
可以看到,这里最后调用bindService来绑定一个service。我们看下这个方法的参数,第一个和startService一样是启动的service的intent,这个不用多解释。第二个参数是一个ServiceConnection类,这个类是一个客户端的回调接口,我们知道bind service是可以接受服务端返回的数据的,一旦数据返回后最终就是通过这个接口里面的函数回调给客户端,随着我们下面的分析深入,就可以看到他的使用了。最后一个参数BIND_AUTO_CREATE表示会自动创建要绑定的service,后面我们还会分析stop service,在那里还可以看到如果是带BIND_AUTO_CREATE标志的service,调用stop service是不起作用的,可见只要这个service被别人绑定着,是不会停止的,这是后话了,我们再看下上面ServiceConnection这个方法的实现,里面有两个方法,第一个方法onServiceConnected会得到一个IBinder,之后会调用aidl的asInterface方法获得一个代理类。这个asInterface之前分析bind和aidl的时候也是看到很多了,通过他客户端就可以和对方进程通信了。而另一个方法onServiceDisconnected则是把aidl置空。熟悉binder的同学,一看这个方法就知道是典型的一个binder间通信,可见binder真的是无所不在啊。好了,这里应用层的分析就到这,大家应该知道怎么用了,下面我们从bindService的源码开始分析。
```java
public boolean bindService(Intent service, ServiceConnection conn,
int flags) {
warnIfCallingFromSystemProcess();
return bindServiceCommon(service, conn, flags, mMainThread.getHandler(),
Process.myUserHandle());
}
```
继续调用bindServiceCommon方法:
```java
private boolean bindServiceCommon(Intent service, ServiceConnection conn, int flags, Handler
handler, UserHandle user) {
// Keep this in sync with DevicePolicyManager.bindDeviceAdminServiceAsUser.
IServiceConnection sd;
if (conn == null) { // 回调的connect为null,报错
throw new IllegalArgumentException("connection is null");
}
if (mPackageInfo != null) { // 如果LoadApk不为null
// 把回调函数ServiceConnection封装为sd,sd是一个IServiceConnection,这个是个aidl
// 转为java理解可以理解成下面这样的接口
// *******************
// interface IServiceConnection {
// void connected(in ComponentName name, IBinder service);
// }
// **********************
// 参数一: 即回调接口
// 参数二:即当前用到的环境,比如一个activity就是activity,service就是service
// 参数三:Handler
// 参数四: 启动类型
// 获取IServiceConnectio,即ServiceDispatcher.InnerConnection
sd = mPackageInfo.getServiceDispatcher(conn, getOuterContext(), handler, flags);
} else {
throw new RuntimeException("Not supported in system context");
}
validateServiceIntent(service);
try {
IBinder token = getActivityToken(); // 调用者所在的ActivityRecord的appToken
if (token == null && (flags&BIND_AUTO_CREATE) == 0 && mPackageInfo != null
&& mPackageInfo.getApplicationInfo().targetSdkVersion
< android.os.Build.VERSION_CODES.ICE_CREAM_SANDWICH) {
flags |= BIND_WAIVE_PRIORITY;
}
service.prepareToLeaveProcess(this);
// 参数一: ApplicationThread
// 参数二: AMS中的ActivityRecord
// 参数三: service启动的Intent
// 参数四: URI的类型
// 参数五: 回调的connection
// 启动service的类型
int res = ActivityManager.getService().bindService(
mMainThread.getApplicationThread(), getActivityToken(), service,
service.resolveTypeIfNeeded(getContentResolver()),
sd, flags, getOpPackageName(), user.getIdentifier());
if (res < 0) {
throw new SecurityException(
"Not allowed to bind to service " + service);
}
return res != 0;
} catch (RemoteException e) {
throw e.rethrowFromSystemServer();
}
}
```
这个方法开头有个IServiceConnection变量,这是一个aidl,从这里我们可以看到他会负责进程间通信的工作,并且他会保存在AMS中,之后只要客户端绑定上了一个service,那么后面和这个service的通信就都通过这个aidl来进行了,我们往后分析就会逐渐清晰了。
在进行了一些校验后,如果LoadApk不为空,调用它的getServiceDispatcher方法来获取前面这个IServiceConnection实例,getServiceDispatcher这个方法我们稍后分析,我们先看这里后面的代码。最后我们又看到了熟悉的调用AMS方法进行通信了,这里调用了AMS的bindService方法,接着执行流程就转到AMS中了,这个方法我们接下去会分析,先回头看下这里的getServiceDispatcher方法:
```java
// 是否有这个ServiceConnection,有就取出Dispatcher,没有就创建一个ServiceDispatcher
// 最后返回ServiceDispatcher的InnerConnection对象,这个是一个stub,即binder
public final IServiceConnection getServiceDispatcher(ServiceConnection c,
Context context, Handler handler, int flags) {
synchronized (mServices) {
LoadedApk.ServiceDispatcher sd = null;
// 根据当前Activity或者servie获得当前这个context中绑定的所有ServiceConnection
ArrayMap<ServiceConnection, LoadedApk.ServiceDispatcher> map = mServices.get(context);
if (map != null) { // 非空
if (DEBUG) Slog.d(TAG, "Returning existing dispatcher " + sd + " for conn " + c);
sd = map.get(c); // 取出ServiceDispatcher
}
if (sd == null) { // 是null的话
// 创建一个ServiceDispatcher
sd = new ServiceDispatcher(c, context, handler, flags);
if (DEBUG) Slog.d(TAG, "Creating new dispatcher " + sd + " for conn " + c);
if (map == null) {
map = new ArrayMap<>();
mServices.put(context, map);
}
map.put(c, sd);
} else {
sd.validate(context, handler);
}
return sd.getIServiceConnection();
}
}
```
这个方法中,我们看到使用了一个mServices的map,这个map的key是某个Context,代表着一个比如Activty这样的调用者,他的value也是一个map,这个map的key是前面介绍的客户端的那个回调的类ServiceConnection,value是一个ServiceDispatcher类,ServiceDispatcher中封装了这个bind service相关的一些信息,包括了ServiceConnection这个客户端回调的类以及IServiceConnection这个进程间通信的类,我们看下这个类的部分内容:
```java
static final class ServiceDispatcher {
...........................
private static class InnerConnection extends IServiceConnection.Stub {
final WeakReference<LoadedApk.ServiceDispatcher> mDispatcher;
InnerConnection(LoadedApk.ServiceDispatcher sd) {
mDispatcher = new WeakReference<LoadedApk.ServiceDispatcher>(sd);
}
public void connected(ComponentName name, IBinder service, boolean dead)
throws RemoteException {
LoadedApk.ServiceDispatcher sd = mDispatcher.get();
if (sd != null) {
sd.connected(name, service, dead);
}
}
}
..................
ServiceDispatcher(ServiceConnection conn,
Context context, Handler activityThread, int flags) {
mIServiceConnection = new InnerConnection(this);
mConnection = conn;
mContext = context;
mActivityThread = activityThread;
mLocation = new ServiceConnectionLeaked(null);
mLocation.fillInStackTrace();
mFlags = flags;
}
.....................
}
```
我们看到这个方法的构造函数中初始化了一些变量,其实会new一个InnerConnection,而InnerConnection他就是IServiceConnection.Stub的子类,也就是说他是负责进程间通信的,前面我们看到后面会调用AMS的bindService方法,方法中的参数有一个就是他,所以之后客户端和service之间数据传递就是这个类来实现的。我们看到这个类,持有一个他的外部类ServiceDispatcher的弱引用实例,并且实现了IServiceConnection的connected方法,这个方法里面会调用外部类ServiceDispatcher的connected方法,这个方法最终会调用到我们前面应用开发中ServiceConnection的onServiceConnected方法,从把service的代理传给客户端进程。后面的流程我们这里就先不说了,等到分析到流程的时候我们在接着这里的内容说。现在我们返回主线流程,开始说执行到AMS的bindService方法。
# bind service 进入AMS
```java
public int bindService(IApplicationThread caller, IBinder token, Intent service,
String resolvedType, IServiceConnection connection, int flags, String callingPackage,
int userId) throws TransactionTooLargeException {
enforceNotIsolatedCaller("bindService");
// Refuse possible leaked file descriptors
if (service != null && service.hasFileDescriptors() == true) {
throw new IllegalArgumentException("File descriptors passed in Intent");
}
if (callingPackage == null) {
throw new IllegalArgumentException("callingPackage cannot be null");
}
synchronized(this) {
// 继续调用
return mServices.bindServiceLocked(caller, token, service,
resolvedType, connection, flags, callingPackage, userId);
}
}
```
这里bindService方法做了一些校验之后,继续调用ActiveServices的bindServiceLocked方法:
```java
int bindServiceLocked(IApplicationThread caller, IBinder token, Intent service,
String resolvedType, final IServiceConnection connection, int flags,
String callingPackage, final int userId) throws TransactionTooLargeException {
if (DEBUG_SERVICE) Slog.v(TAG_SERVICE, "bindService: " + service
+ " type=" + resolvedType + " conn=" + connection.asBinder()
+ " flags=0x" + Integer.toHexString(flags));
// 获取调用者的ProcessRecord
final ProcessRecord callerApp = mAm.getRecordForAppLocked(caller);
if (callerApp == null) {
throw new SecurityException(
"Unable to find app for caller " + caller
+ " (pid=" + Binder.getCallingPid()
+ ") when binding service " + service);
}
ActivityRecord activity = null;
if (token != null) { // 客户端所在的ActivityRecord的变量appToken非空
activity = ActivityRecord.isInStackLocked(token);// 获取ActivityRecord
if (activity == null) { // 调用者的Activity不存在,那也没法绑定了,所以return
Slog.w(TAG, "Binding with unknown activity: " + token);
return 0;
}
}
int clientLabel = 0;
PendingIntent clientIntent = null;
final boolean isCallerSystem = callerApp.info.uid == Process.SYSTEM_UID;
if (isCallerSystem) {
// Hacky kind of thing -- allow system stuff to tell us
// what they are, so we can report this elsewhere for
// others to know why certain services are running.
service.setDefusable(true);
clientIntent = service.getParcelableExtra(Intent.EXTRA_CLIENT_INTENT);
if (clientIntent != null) {
clientLabel = service.getIntExtra(Intent.EXTRA_CLIENT_LABEL, 0);
if (clientLabel != 0) {
// There are no useful extras in the intent, trash them.
// System code calling with this stuff just needs to know
// this will happen.
service = service.cloneFilter();
}
}
}
if ((flags&Context.BIND_TREAT_LIKE_ACTIVITY) != 0) {
mAm.enforceCallingPermission(android.Manifest.permission.MANAGE_ACTIVITY_STACKS,
"BIND_TREAT_LIKE_ACTIVITY");
}
// 如果非系统调用者,要求白名单管理,报错
if ((flags & Context.BIND_ALLOW_WHITELIST_MANAGEMENT) != 0 && !isCallerSystem) {
throw new SecurityException(
"Non-system caller " + caller + " (pid=" + Binder.getCallingPid()
+ ") set BIND_ALLOW_WHITELIST_MANAGEMENT when binding service " + service);
}
// 调用者是否是前台的
final boolean callerFg = callerApp.setSchedGroup != ProcessList.SCHED_GROUP_BACKGROUND;
// 是否启动的service是要运行在调用者进程内的,即包名要用调用者的包名
final boolean isBindExternal = (flags & Context.BIND_EXTERNAL_SERVICE) != 0;
// 获取是否有这个要调用的service
ServiceLookupResult res =
retrieveServiceLocked(service, resolvedType, callingPackage, Binder.getCallingPid(),
Binder.getCallingUid(), userId, true, callerFg, isBindExternal);
if (res == null) {
return 0;
}
if (res.record == null) {
return -1;
}
ServiceRecord s = res.record; // 获得调用service的ServiceRecord
```
这个方法是比较长的,我们分段来看,这里第一段开头做了一些相关的校验,比如获取调用者的ProcessRecord和ActivityRecord,然后会调用retrieveServiceLocked这个方法来获取这个service的ServiceLookupResult对象,如果获取不到说明系统里面没有这个service那就返回。否则取出ServiceRecord对象。retrieveServiceLocked这个方法获取ServiceLookupResult的过程,在前面分析startService的时候已经有过分析了,需要在看下的同学可以去前面文章看看。这段代码除了做了一些校验之外,主要就是获取ServiceRecord,我们看下面一段:
```java
boolean permissionsReviewRequired = false;
// If permissions need a review before any of the app components can run,
// we schedule binding to the service but do not start its process, then
// we launch a review activity to which is passed a callback to invoke
// when done to start the bound service's process to completing the binding.
if (mAm.mPermissionReviewRequired) { // 需不需要权限的review
// 如果要权限review后面会启动一个review的Activity
if (mAm.getPackageManagerInternalLocked().isPermissionsReviewRequired(
s.packageName, s.userId)) {
permissionsReviewRequired = true;
// Show a permission review UI only for binding from a foreground app
// 既然要启动一个review的Activity,那么肯定需要前台进程,非前台return
if (!callerFg) {
Slog.w(TAG, "u" + s.userId + " Binding to a service in package"
+ s.packageName + " requires a permissions review");
return 0;
}
final ServiceRecord serviceRecord = s;
final Intent serviceIntent = service;
// 这里是如果启动一个review activity后的回调
RemoteCallback callback = new RemoteCallback(
new RemoteCallback.OnResultListener() {
@Override
public void onResult(Bundle result) {
synchronized(mAm) {
final long identity = Binder.clearCallingIdentity();
try {
// 回调后下一步应该会启动一个service
// 如果待启动的service中没有serviceRecord,那么return
if (!mPendingServices.contains(serviceRecord)) {
return;
}
// If there is still a pending record, then the service
// binding request is still valid, so hook them up. We
// proceed only if the caller cleared the review requirement
// otherwise we unbind because the user didn't approve.
if (!mAm.getPackageManagerInternalLocked()
.isPermissionsReviewRequired(
serviceRecord.packageName,
serviceRecord.userId)) {
try {
// 继续启动service
bringUpServiceLocked(serviceRecord,
serviceIntent.getFlags(),
callerFg, false, false);
} catch (RemoteException e) {
/* ignore - local call */
}
} else {
// 到这里说明还是没有权限,那么解绑
unbindServiceLocked(connection);
}
} finally {
Binder.restoreCallingIdentity(identity);
}
}
}
});
// 启动Review Activity的Intent
final Intent intent = new Intent(Intent.ACTION_REVIEW_PERMISSIONS);
intent.addFlags(Intent.FLAG_ACTIVITY_NEW_TASK
| Intent.FLAG_ACTIVITY_EXCLUDE_FROM_RECENTS);
intent.putExtra(Intent.EXTRA_PACKAGE_NAME, s.packageName);
intent.putExtra(Intent.EXTRA_REMOTE_CALLBACK, callback);
if (DEBUG_PERMISSIONS_REVIEW) {
Slog.i(TAG, "u" + s.userId + " Launching permission review for package "
+ s.packageName);
}
mAm.mHandler.post(new Runnable() {
@Override
public void run() {
mAm.mContext.startActivityAsUser(intent, new UserHandle(userId));
}
});
}
}
final long origId = Binder.clearCallingIdentity();
try {
// 取消重启,如果有延迟重启的话,需要把他从重启的集合中移除
if (unscheduleServiceRestartLocked(s, callerApp.info.uid, false)) {
if (DEBUG_SERVICE) Slog.v(TAG_SERVICE, "BIND SERVICE WHILE RESTART PENDING: "
+ s);
}
if ((flags&Context.BIND_AUTO_CREATE) != 0) {
s.lastActivity = SystemClock.uptimeMillis();
if (!s.hasAutoCreateConnections()) {
// This is the first binding, let the tracker know.
ServiceState stracker = s.getTracker();
if (stracker != null) {
// 追踪器设置下当前状态
stracker.setBound(true, mAm.mProcessStats.getMemFactorLocked(),
s.lastActivity);
}
}
}
mAm.startAssociationLocked(callerApp.uid, callerApp.processName, callerApp.curProcState,
s.appInfo.uid, s.name, s.processName);
// Once the apps have become associated, if one of them is caller is ephemeral
// the target app should now be able to see the calling app
mAm.grantEphemeralAccessLocked(callerApp.userId, service,
s.appInfo.uid, UserHandle.getAppId(callerApp.uid));
```
这里第二段代码。我们平时打开某个app的时候,如果没有授权的话,会弹出授权的页面让你确认,这里绑定service也是一样的,首先会判断是否有权限,如果没有的话,会调用系统的授权页面Intent让用户确认,如果有权限后会继续调用bringUpServiceLocked方法进行后续的执行,bringUpServiceLocked这个方法在前面启动service的时候我们已经详细分析过了,当初分析的时候还记不记得有个绑定service的方法没有讲,后面会分析那个方法,回到这个方法来。如果没有授权的话会调用unbindServiceLocked方法解绑service,这个方法我们在这里暂时不分析后面再分析。
之后会看下如果当前这个service在重启的集合里我们把他移除掉,因为现在要执行bind service的流程,所以也会有启动的流程,不需要重启了。
接在这设定下当然这个service是绑定的状态,然后建立调用者和被调用者之间的关系。到这里一些前期的准备工作就做完了。下面会保存一些重要的数据在AMS中,以便后面可以直接使用。再继续分析下面的代码前,我们先插播一些内容,先介绍几个类,IntentBindRecord,AppBindRecord,ConnectionRecord这三个类都和bind service有关。再说这三个类之前我们先看ServiceRecord类中有一个变量bindings,他的定义如下:
```java
final ArrayMap<Intent.FilterComparison, IntentBindRecord> bindings
= new ArrayMap<Intent.FilterComparison, IntentBindRecord>();
```
FilterComparison封装了一个Intent,所以可以把他理解为Intent,bindings保存的是这个Service所使用的Intent的所有关联IntentBindRecord,而IntentBindRecord的定义如下:
```java
final class IntentBindRecord {
/** The running service. */
final ServiceRecord service;
/** The intent that is bound.*/
final Intent.FilterComparison intent;
/** All apps that have bound to this Intent. */
// 所有绑定这个Intent的的客户端
final ArrayMap<ProcessRecord, AppBindRecord> apps
= new ArrayMap<ProcessRecord, AppBindRecord>();
/** Binder published from service. */
// 即服务端service的代理,一般我们开发service都是用aidl,aidl也就是个stub,这个就是aidl的代理
IBinder binder;
// 关于下面两个参数,由于每次binder一个Service的时候,会向server端请求返回一个本地service
// 然后会保存在AMS中。第一次的话肯定是没有的所以requested为false就表示AMS还没有请求保存过这个service
// 一旦请求了就会将requested设置为true,然后最终从server返回后保存完了,就将received也置为true
// 这样下次再有请求就不要去服务端拿了
/** Set when we have initiated a request for this binder. */
boolean requested;
/** Set when we have received the requested binder. */
// true表示绑定成功
boolean received;
/** Set when we still need to tell the service all clients are unbound. */
boolean hasBound;
/** Set when the service's onUnbind() has asked to be told about new clients. */
boolean doRebind;
.............
}
```
从名字就可以看出这个类中保存的内容主要是有这个service的Intent相关的。的确根据前面serviceRecord的bindings的定义,我们通过一个intent就可以获得一个
IntentBindRecord,而IntentBindRecord类表示的是这个被intent绑定的客户端进程相关的信息。由于一个Intent代表了一个service,所以这个类中自然也有关于service的一些信息,比如ServiceRecord,FilterComparison等。但是这个类主要的作用是可以通过调用者的ProcessRecord找到和绑定service相关的回调binder,从和客户端通信。这里我们看到有个apps变量,他也是一个map,key就是ProcessRecord,value是AppBindRecord,那么我们可以猜测如果有了调用者的ProcessRecord那么就可以找到AppBindRecord这个类了,这个类中是否有调用者的回调binder呢?我们看看AppBindRecord这个类:
```java
final class AppBindRecord {
final ServiceRecord service; // The running service.
final IntentBindRecord intent; // The intent we are bound to.
final ProcessRecord client; // Who has started/bound the service.
final ArraySet<ConnectionRecord> connections = new ArraySet<>();
// All ConnectionRecord for this client.
.............
}
```
确实这里有个集合,是ConnectionRecord类,我们看下这个类:
```java
final class ConnectionRecord {
final AppBindRecord binding; // The application/service binding.
final ActivityRecord activity; // If non-null, the owning activity.
final IServiceConnection conn;
..........
}
```
可以看到这个类中IServiceConnection,这下我们应该清除了,bind service的过程中,会把客户端的IServiceConnection传给AMS,AMS保存后,之后通过intent可以从serviceRecord中获取IntentBindRecord类,再从IntentBindRecord中获取AppBindRecord,最后从AppBindRecord获得客户端进程的IServiceConnection,从而回调给客户端。理解了这个过程,我们回到前面的bindServiceLocked方法,继续看后面的代码:
```java
// 获取被该进程绑定的service的关系对象AppBindRecord
AppBindRecord b = s.retrieveAppBindingLocked(service, callerApp);
// 结合AppBindRecord(有ProcessRecord和ServiceRecord),Activity,IServiceConnection
// 这些封装为ConnectionRecord
// 相同的InnerConnection对应的ConnectionRecord放在一个集合中
// 如果用同一个ServiceConnection(即回调的类),多次
// 调用bind service的话,那么这里得到的InnerConnection会是同一个
// 下面的clist会是同一个回调类的多个不同ConnectionRecord实例
ConnectionRecord c = new ConnectionRecord(b, activity,
connection, flags, clientLabel, clientIntent);
// 理解为InnerConnection
IBinder binder = connection.asBinder();
// service的connections的map
ArrayList<ConnectionRecord> clist = s.connections.get(binder);
if (clist == null) {
clist = new ArrayList<ConnectionRecord>();
s.connections.put(binder, clist); // 这个servieRecord的connections
}
clist.add(c);
b.connections.add(c); // AppBindRecord的set集合
// 把ConnectionRecord添加到Activity的ConnectionRecord集合中
if (activity != null) {
if (activity.connections == null) {
activity.connections = new HashSet<ConnectionRecord>();
}
// activity的connections,是set的
activity.connections.add(c);
}
b.client.connections.add(c); // ProcessRecord的connections集合,也是set的
if ((c.flags&Context.BIND_ABOVE_CLIENT) != 0) {
b.client.hasAboveClient = true;
}
if ((c.flags&Context.BIND_ALLOW_WHITELIST_MANAGEMENT) != 0) {
s.whitelistManager = true;
}
if (s.app != null) {
updateServiceClientActivitiesLocked(s.app, c, true);
}
// 上面是serviceRecord中保存了ConnectionRecord,这里开始
// 是把这个保存在ActiveServices中,和serviceRecord保留同样的一份
clist = mServiceConnections.get(binder);
if (clist == null) {
clist = new ArrayList<ConnectionRecord>();
mServiceConnections.put(binder, clist);
}
clist.add(c);
```
这段代码首先调用了serviceRecord的retrieveAppBindingLocked方法,从他的返回结果看是创建了AppBindRecord,我们跟进去看看细节:
```java
public AppBindRecord retrieveAppBindingLocked(Intent intent,
ProcessRecord app) {
// 把启动的service的Intent封装为FilterComparison
Intent.FilterComparison filter = new Intent.FilterComparison(intent);
// 如果bindings集合中没有这个FilterComparison,添加之。
// key是FilterComparison,value是IntentBindRecord,IntentBindRecord封装了serviceRecod和FilterComparison
// 这里FilterComparison和IntentBindRecord都是属于某个serviceRecord的
IntentBindRecord i = bindings.get(filter);
if (i == null) {
i = new IntentBindRecord(this, filter);
bindings.put(filter, i);
}
// AppBindRecord可以理解为属于上面的IntentBindRecord
// key是processRecord,value是AppBindRecord
AppBindRecord a = i.apps.get(app);
if (a != null) {
return a;
}
a = new AppBindRecord(this, i, app);
i.apps.put(app, a);
return a;
}
```
首先创了一个FilterComparison类,这个类是封装了intent,简单可以理解成就是一个intent。之后从serviceRecord的bindings中看看有没有这个intent对应的IntentBindRecord,如果没有的话就创建后把保存在里面。
然后根据前面我们说的IntentBindRecord的apps变量是一个客户端processRecord为key,AppBindRecord为value的map,所以我们看看这个里面有没有这个调用者processRecord对应的AppBindRecord,有的话就返回,没有的话就创建后保存再返回。这个方法的思路和我们前面介绍的一模一样,所以理解起来不难。我们回到前面bindServiceLocked方法继续往下看。
得到了AppBindRecord对象后,创建一个ConnectionRecord对象,这个就是封装了客户端回调binder的对象。
之后我们看到在serviceRecord类中还有一个变量connections,他是个map,保存了所有以客户端回调binder对象为key,ConnectionRecord对象集合为value的数据。这里前面创建的ConnectionRecord会先保存在这里,但是这个map里保存的包含了所有不同客户端的数据,其实如果需要精确的寻找并不是很方便,所以接下来我们看到还要把这个ConnectionRecord保存在前面我们说的AppBindRecord的集合中,这样就比较精确的把每个进程自己的ConnectionRecord保存起来了。
之后还会把这个ConnectionRecord保存到客户端的Activity和ProcessRecord,以及ActiveServices这个类中方便以后使用。好了,我们看下一段代码:
```java
// bringUpServiceLocked方法会启动service并绑定service
// 从这里可以看出BIND_AUTO_CREATE会启动service并绑定
// 如果没有这个标志,后面会调用requestServiceBindingLocked
// 只有绑定service,不会启动
if ((flags&Context.BIND_AUTO_CREATE) != 0) {
s.lastActivity = SystemClock.uptimeMillis();
// 继续启动service,这里是先启动service,不过里面有bind的操作
if (bringUpServiceLocked(s, service.getFlags(), callerFg, false,
permissionsReviewRequired) != null) {
// 返回不空表示报错
return 0;
}
}
if (s.app != null) {
if ((flags&Context.BIND_TREAT_LIKE_ACTIVITY) != 0) {
s.app.treatLikeActivity = true;
}
if (s.whitelistManager) {
s.app.whitelistManager = true;
}
// This could have made the service more important.
mAm.updateLruProcessLocked(s.app, s.app.hasClientActivities
|| s.app.treatLikeActivity, b.client);
mAm.updateOomAdjLocked(s.app, true);
}
if (DEBUG_SERVICE) Slog.v(TAG_SERVICE, "Bind " + s + " with " + b
+ ": received=" + b.intent.received
+ " apps=" + b.intent.apps.size()
+ " doRebind=" + b.intent.doRebind);
if (s.app != null && b.intent.received) { // 绑定成功
// Service is already running, so we can immediately
// publish the connection.
try {
// 到这里说明启动一个bind service成功了,回调客户端的connected
c.conn.connected(s.name, b.intent.binder, false);
} catch (Exception e) {
Slog.w(TAG, "Failure sending service " + s.shortName
+ " to connection " + c.conn.asBinder()
+ " (in " + c.binding.client.processName + ")", e);
}
// If this is the first app connected back to this binding,
// and the service had previously asked to be told when
// rebound, then do so.
// 到这里说明前面被unbind过,所以service还会存在并且received是true
// 这里要求重新绑定所以调用requestServiceBindingLocked,并且重新绑定的参数是true
if (b.intent.apps.size() == 1 && b.intent.doRebind) {
requestServiceBindingLocked(s, b.intent, callerFg, true);
}
} else if (!b.intent.requested) {
// 到这里说明service还没有绑定过,开始绑定
// 如果bind service的参数不是BIND_AUTO_CREATE,大部分情况会走到这里
requestServiceBindingLocked(s, b.intent, callerFg, false);
}
getServiceMapLocked(s.userId).ensureNotStartingBackgroundLocked(s);
} finally {
Binder.restoreCallingIdentity(origId);
}
return 1;
```
经过前面的准备和初始化后,开始要启动service了。由于绑定service并不是启动service,所以这里会根据调用时候的flag参数BIND_AUTO_CREATE来决定是否要自动启动一个service。如果要启动的话,会调用bringUpServiceLocked,这个方法里面既有启动service,又有绑定service。启动的流程我们已经讲过了,绑定的流程在下面分析。如果执行到这里面一切顺利的话,那么就继续会执行后面的代码。否则如果没有要求自动启动service的话,那么会跳过这么,也会继续执行后面的代码,我们继续看后面的代码。
后面会判断如果这个service已经启动了并且已经绑定了,那么就会调用客户端IServiceConnection回调的函数connected,这个函数我们后面再来看。
这里有个场景,当解绑一个service的时候,如果不销毁service并且要解绑,只有在IntentBindRecord的apps数量为0是,才会把doRebind置为true,这个在后面我们分析解绑相关代码时可以看到。所以,这里当要绑定一个service的时候,并且IntentBindRecord数量是1的且要求重新绑定的时候,会调用requestServiceBindingLocked这个方法来绑定,最后一个参数true的话表示重新绑定。
最后如果这个service没有启动过的话,就执行第一次绑定的流程,同样调用requestServiceBindingLocked这个方法。这样接下去我们就跟着requestServiceBindingLocked这个方法走就可以了。
```java
private final boolean requestServiceBindingLocked(ServiceRecord r, IntentBindRecord i,
boolean execInFg, boolean rebind) throws TransactionTooLargeException {
// 进程相关对象都是null,return
if (r.app == null || r.app.thread == null) {
// If service is not currently running, can't yet bind.
return false;
}
if (DEBUG_SERVICE) Slog.d(TAG_SERVICE, "requestBind " + i + ": requested=" + i.requested
+ " rebind=" + rebind);
if ((!i.requested || rebind) && i.apps.size() > 0) {
try {
// 设置handler超时
bumpServiceExecutingLocked(r, execInFg, "bind");
// 设置进程状态
r.app.forceProcessStateUpTo(ActivityManager.PROCESS_STATE_SERVICE);
// 跨进程bind service
r.app.thread.scheduleBindService(r, i.intent.getIntent(), rebind,
r.app.repProcState);
if (!rebind) {
i.requested = true;
}
i.hasBound = true; // 已经被绑定了
i.doRebind = false;
} catch (TransactionTooLargeException e) {
// Keep the executeNesting count accurate.
if (DEBUG_SERVICE) Slog.v(TAG_SERVICE, "Crashed while binding " + r, e);
final boolean inDestroying = mDestroyingServices.contains(r);
serviceDoneExecutingLocked(r, inDestroying, inDestroying);
throw e;
} catch (RemoteException e) {
if (DEBUG_SERVICE) Slog.v(TAG_SERVICE, "Crashed while binding " + r);
// Keep the executeNesting count accurate.
final boolean inDestroying = mDestroyingServices.contains(r);
serviceDoneExecutingLocked(r, inDestroying, inDestroying);
return false;
}
}
return true;
}
```
这个方法里面开始向service所在进程请求bind了。方法开始判断下是否service进程存在,一切正常的话,下面先向Handler发送超时消息,之后调用scheduleBindService方法进行进程间通信,我们到service进程这边继续看。
# 向service进程请求bind
```java
public final void scheduleBindService(IBinder token, Intent intent,
boolean rebind, int processState) {
updateProcessState(processState, false);
BindServiceData s = new BindServiceData();
s.token = token; // ActivityRecord的appToken
s.intent = intent;
s.rebind = rebind;
if (DEBUG_SERVICE)
Slog.v(TAG, "scheduleBindService token=" + token + " intent=" + intent + " uid="
+ Binder.getCallingUid() + " pid=" + Binder.getCallingPid());
sendMessage(H.BIND_SERVICE, s);
}
```
继续看Handler这边的代码:
```java
case BIND_SERVICE:
Trace.traceBegin(Trace.TRACE_TAG_ACTIVITY_MANAGER, "serviceBind");
// bind service继续调用
handleBindService((BindServiceData)msg.obj);
Trace.traceEnd(Trace.TRACE_TAG_ACTIVITY_MANAGER);
break;
```
继续看handleBindService方法:
```java
private void handleBindService(BindServiceData data) {
Service s = mServices.get(data.token);
if (DEBUG_SERVICE)
Slog.v(TAG, "handleBindService s=" + s + " rebind=" + data.rebind);
if (s != null) {
try {
data.intent.setExtrasClassLoader(s.getClassLoader());
data.intent.prepareToEnterProcess();
try {
if (!data.rebind) {
// 调用servie的onBind
IBinder binder = s.onBind(data.intent);
// 通知AMS,这里主要是把上面客户端获取的binder返回给AMS保存
// binder是个stub其实就是把binder代理给AMS保存,之后再调用
// 的时候AMS就可以直接获取了,不需要进程跨进程来获取了
ActivityManager.getService().publishService(
data.token, data.intent, binder);
} else {
// 调用service的onRebind
s.onRebind(data.intent);
// 通知AMS
ActivityManager.getService().serviceDoneExecuting(
data.token, SERVICE_DONE_EXECUTING_ANON, 0, 0);
}
ensureJitEnabled();
} catch (RemoteException ex) {
throw ex.rethrowFromSystemServer();
}
} catch (Exception e) {
if (!mInstrumentation.onException(s, e)) {
throw new RuntimeException(
"Unable to bind to service " + s
+ " with " + data.intent + ": " + e.toString(), e);
}
}
}
}
```
这个方法可以看到如果是不需要重新绑定的,获取service端的一个IBinder正常情况下,一般都用AIDL开发,这个IBinder就是Aidl的XXX.Stub这个类,这个类其实就是一个代理会保存在AMS中,之后客户端有请求的话,AMS会用这个类来想service请求,获取数据后通过客户端保存在AMS中的IServcieConnention来发给客户端,这里流程我们分析到这里,相信大家也都比较清楚了。
获取了这个IBinder后,会再次调用AMS的publishService把IBinder发送给AMS。如果是需要重新绑定的话,说明AMS中已经有了这个service的IBinder了,所以只要调用service的onRebind方法就可以了。最后还会调用AMS的serviceDoneExecuting方法作为最后的通知,这个方法在之前我们也分析过了,也就不多说了。现在我们回到AMS,看看publishService这个方法。
# bind service进程方法执行完毕,再通知AMS
```java
public void publishService(IBinder token, Intent intent, IBinder service) {
// Refuse possible leaked file descriptors
if (intent != null && intent.hasFileDescriptors() == true) {
throw new IllegalArgumentException("File descriptors passed in Intent");
}
synchronized(this) {
if (!(token instanceof ServiceRecord)) {
throw new IllegalArgumentException("Invalid service token");
}
// 继续调用
mServices.publishServiceLocked((ServiceRecord)token, intent, service);
}
}
```
这个方法继续调用ActiveServices中的publishServiceLocked方法:
```java
// bind service后服务端会通知AMS,会调到这里
// 这里service理解为服务端那边的aidl的stub,会再传给客户端供其使用
void publishServiceLocked(ServiceRecord r, Intent intent, IBinder service) {
final long origId = Binder.clearCallingIdentity();
try {
if (DEBUG_SERVICE) Slog.v(TAG_SERVICE, "PUBLISHING " + r
+ " " + intent + ": " + service);
if (r != null) {
Intent.FilterComparison filter
= new Intent.FilterComparison(intent);
// 获取启动service的IntentBindRecord
IntentBindRecord b = r.bindings.get(filter);
// 如果获取到了,并且received为false表示还没被bind成功过
if (b != null && !b.received) {
b.binder = service; // 获取客户端service的代理
b.requested = true; // 调用请求成功了
b.received = true; // 表示bind成功了
// 遍历这个serviceRecord的所有bind的客户端链接connection,如果
// Intent相同,就调用connected回调到客户端
for (int conni=r.connections.size()-1; conni>=0; conni--) {
ArrayList<ConnectionRecord> clist = r.connections.valueAt(conni);
for (int i=0; i<clist.size(); i++) {
ConnectionRecord c = clist.get(i);
if (!filter.equals(c.binding.intent.intent)) {
if (DEBUG_SERVICE) Slog.v(
TAG_SERVICE, "Not publishing to: " + c);
if (DEBUG_SERVICE) Slog.v(
TAG_SERVICE, "Bound intent: " + c.binding.intent.intent);
if (DEBUG_SERVICE) Slog.v(
TAG_SERVICE, "Published intent: " + intent);
continue;
}
if (DEBUG_SERVICE) Slog.v(TAG_SERVICE, "Publishing to: " + c);
try {
// 回调客户端
c.conn.connected(r.name, service, false);
} catch (Exception e) {
Slog.w(TAG, "Failure sending service " + r.name +
" to connection " + c.conn.asBinder() +
" (in " + c.binding.client.processName + ")", e);
}
}
}
}
serviceDoneExecutingLocked(r, mDestroyingServices.contains(r), false);
}
} finally {
Binder.restoreCallingIdentity(origId);
}
}
```
这个方法就比较简单了,首先取出这个intent的IntentBindRecord对象,如果不为空的话,把service进程返回的IBinder对象保存在这个对象中,以后如果在用的话就不需要到service进程那边去拿了,AMS直接获取就可以了。之后requested和received这两个变量都置为true,表示请求和绑定都成功了。最后遍历这个serviceRecord中的ConnectionRecord集合,取出目前请求的那个Intent对应的ConnectionRecord,调用它的IServiceConnection对象的connected方法,就回到了客户端进程中了。
# 绑定成功后回到客户端
文章开头我们已经有分析过客户端IServiceConnection的实现类,我们在看下代码:
```java
static final class ServiceDispatcher {
.............
private static class InnerConnection extends IServiceConnection.Stub {
final WeakReference<LoadedApk.ServiceDispatcher> mDispatcher;
InnerConnection(LoadedApk.ServiceDispatcher sd) {
mDispatcher = new WeakReference<LoadedApk.ServiceDispatcher>(sd);
}
public void connected(ComponentName name, IBinder service, boolean dead)
throws RemoteException {
LoadedApk.ServiceDispatcher sd = mDispatcher.get();
if (sd != null) {
sd.connected(name, service, dead);
}
}
}
...............
public void connected(ComponentName name, IBinder service, boolean dead) {
if (mActivityThread != null) { // handler非空走这里
mActivityThread.post(new RunConnection(name, service, 0, dead));
} else {
doConnected(name, service, dead);
}
}
................
private final class RunConnection implements Runnable {
RunConnection(ComponentName name, IBinder service, int command, boolean dead) {
mName = name;
mService = service;
mCommand = command;
mDead = dead;
}
public void run() {
if (mCommand == 0) { // 正常绑定回调走这里
doConnected(mName, mService, mDead);
} else if (mCommand == 1) {
doDeath(mName, mService);
}
}
final ComponentName mName;
final IBinder mService;
final int mCommand;
final boolean mDead;
}
...............
}
```
这个方法我们前面已经分析过一部分了,但是设计回调的没有分析,这里我们主要看看回调时候的代码。首先回调的这个类就是这里的InnerConnection,他继承了IServiceConnection.Stub,他持有他外部类ServiceDispatcher的一个实例,他的connected方法会继续调用外部类ServiceDispatcher的connected方法。
外部类会持有一个Handler,如果Handler不为空会调用RunConnection来执行一个Runnable,否则调用doConnected。不管是调用RunConnection还是直接调用doConnected最终都会是调用doConnected方法,所以我们直接看doConnected方法就可以了。当然这里稍微提一下,RunConnection类的参数command值为0的时候才会调用doConnected方法,否则为1会调用doDeath方法。command值为1是通过stop service时候才会触发了,我们后面分析stop service的试试再看,这里我们继续看doConnected这个方法:
```java
// 绑定成功后,会把绑定的service类名为key,Ibinder为value的放入这个map,可以理解为所有已经成功绑定的map
private final ArrayMap<ComponentName, ServiceDispatcher.ConnectionInfo> mActiveConnections
= new ArrayMap<ComponentName, ServiceDispatcher.ConnectionInfo>();
public void doConnected(ComponentName name, IBinder service, boolean dead) {
ServiceDispatcher.ConnectionInfo old;
ServiceDispatcher.ConnectionInfo info;
synchronized (this) {
if (mForgotten) { // 已经调用unbind后会置为true,return
// We unbound before receiving the connection; ignore
// any connection received.
return;
}
// 看看是否已经有了,有了的话就return
old = mActiveConnections.get(name);
if (old != null && old.binder == service) {
// Huh, already have this one. Oh well!
return;
}
if (service != null) {
// A new service is being connected... set it all up.
// 把这个service封装为ConnectionInfo
info = new ConnectionInfo();
info.binder = service;
info.deathMonitor = new DeathMonitor(name, service);
try {
service.linkToDeath(info.deathMonitor, 0);
mActiveConnections.put(name, info);
} catch (RemoteException e) {
// This service was dead before we got it... just
// don't do anything with it.
mActiveConnections.remove(name);
return;
}
} else {
// 到这里,说明这个要绑定的service为null,所以把old中这个intent一样的remove
// The named service is being disconnected... clean up.
mActiveConnections.remove(name);
}
if (old != null) {
old.binder.unlinkToDeath(old.deathMonitor, 0);
}
}
// If there was an old service, it is now disconnected.
if (old != null) {
mConnection.onServiceDisconnected(name);
}
if (dead) { // 这个为true表示要stop了
mConnection.onBindingDied(name);
}
// If there is a new service, it is now connected.
if (service != null) { // 调用onServiceConnected
mConnection.onServiceConnected(name, service);
}
}
```
这个方法中有些unbind和stop service相关的部分我们先不关心。这里有个mActiveConnections变量,他是一个map,key是一个ComponentName,value是一个ConnectionInfo对象,我们看下这个类:
```java
private static class ConnectionInfo {
IBinder binder;
IBinder.DeathRecipient deathMonitor;
}
```
这个类很简单,里面有service的IBinder和死亡监听器,可以知道客户端就是通过他和service进程通信的,我们回去前面方法。
首先看下mActiveConnections这个map中有没有当前绑定的这个service,如果有的话就退出了,已经获得了。否则就创建一个ConnectionInfo,放入mActiveConnections中,最后就调用了onServiceConnected方法,这个方法就是我们在bind service中最终回调的方法了。
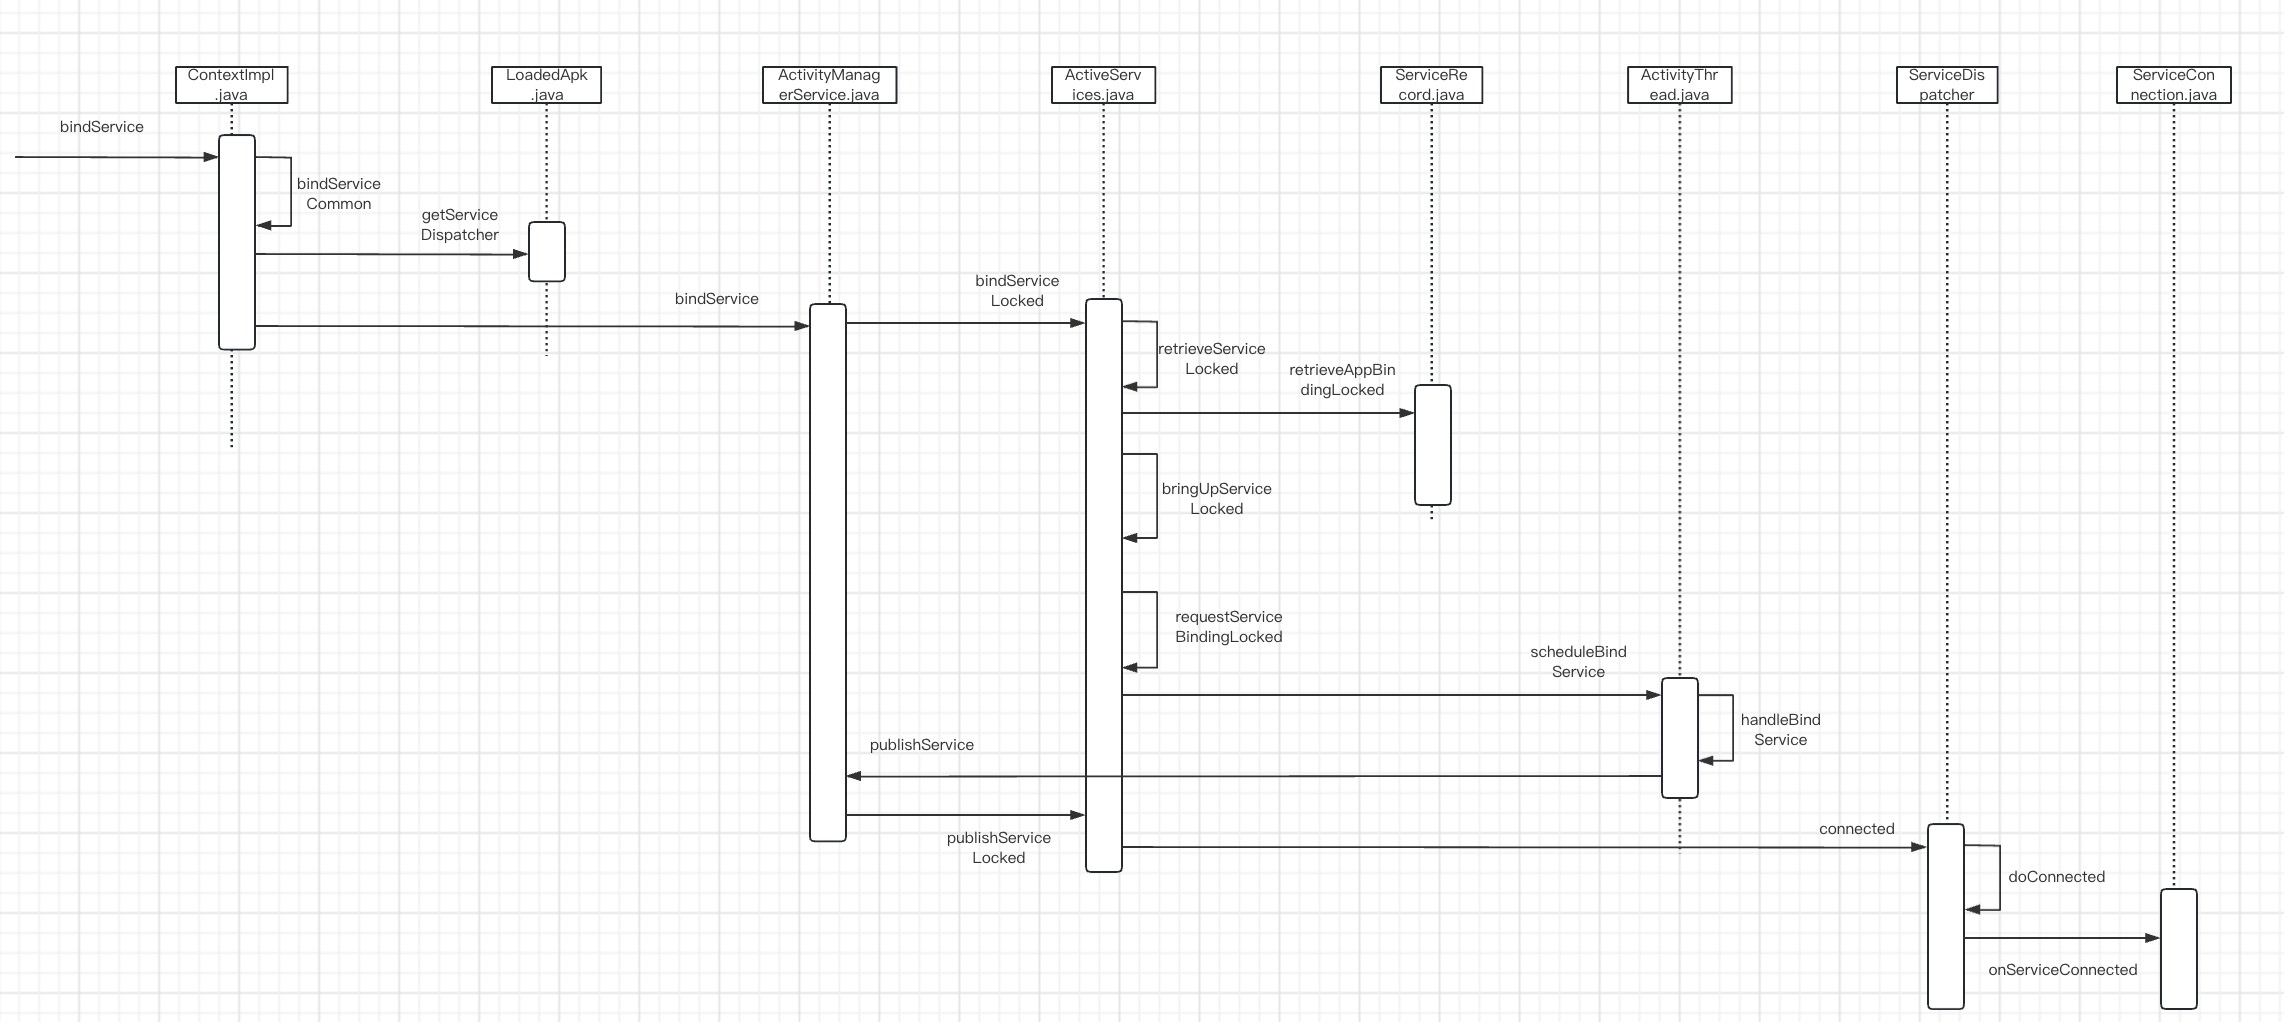
至此整个bind service的流程也分析完了,整体来说bind service相比start service除了要启动之外,多了一些步骤。首先一般我们在调用bind service的时候都会把一个IServiceConnection对象保存在AMS中,然后如果是自动创建service的话,在创建完service之后,接着就会继续去从service进程中获取一个service的IBinder,然后返回给AMS,AMS得到了这个IBinder后在通过客户端保存在AMS中的IServiceConnection对象回调给客户端,最后客户端获得了service的IBinder后保存在本地,之后就可以通过他来和service进程进行通信了。好了,bind service就分析到这里了,我们画下时序图,下篇文章我们会再看下startForegroundService和stopService。

Service源码分析(二)