
在第一篇WMS系列文章中,我们大致介绍了一下和WMS中有关系的一系列类和数据结构,从这篇文章开始我们就开始WMS添加窗口的流程,经过第一篇文章对于WMS中涉及到的各种类和数据结构的大致介绍,我们多少了解了些WMS中的一些概念,这篇文章就准备讲一下到底一个窗口启动过程中WMS做了哪些事情,讲窗口启动不能和第一篇文章那样就光讲概念,还是需要以一个实际的窗口启动流程来作为分析带你,这样才能更好的理解WMS的窗口启动过程。在所有的窗口中,最重要的也是大家最熟悉的就是Activity了,所以这里准备以一个Activity的启动过程为实例,来分析WMS的执行流程,同时也可以结合AMS的启动过程,更好的从整体上了解Activity,之前我们有分析过Activity在AMS启动过程中的流程,那篇文章重点在于AMS,所以对于WMS的内容没什么涉及,这篇文章我们的重点是WMS,所以会从WMS的角度来看启动流程。我们分析Activity中的WMS不会机械的从头到尾就这样刷一遍,这样的话一遍下来也抓不住重点,回头再想想WMS还是会觉得很模糊,所以我们下面的分析是有一个主线的。第一篇分析WMS的文章中,我们有说过在AMS中有三个类是和WMS中对应的,即AMS中的ActivityStack对应AMS中的TaskStack,AMS中的TaskRecord对应WMS中的Task,AMS中的ActivityRecord对应WMS中AppWindowToken,上一篇文章最后还用UML表示了出来,所以我们回到AMS中分析Actvity创建的过程重点就从这3组类入手,从这3组类中寻找线索 ,然后一步步走到最后的创建完成。好了,我们下面就回到AMS中开始看看WMS相关的流程部分。
# AMS启动Activity
关于启动Activity的主要流程,我们之前已经专门有分析过,所以这里不会详细分析AMS的流程。从一个客户端启动Activity后,客户端部分我们就不讨论了,我们从进入AMS开始,为了保证流程的完整性,方便看文章的时候知道是从哪里到哪里的,这里快速的把遇到的流程都贴一下,我们不解释和AMS相关的部分,这里重点还是关注WMS的部分。
```java
public final int startActivity(IApplicationThread caller, String callingPackage,
Intent intent, String resolvedType, IBinder resultTo, String resultWho, int requestCode,
int startFlags, ProfilerInfo profilerInfo, Bundle bOptions) {
return startActivityAsUser(caller, callingPackage, intent, resolvedType, resultTo,
resultWho, requestCode, startFlags, profilerInfo, bOptions,
UserHandle.getCallingUserId());
```
这里继续调用startActivityAsUser方法:
```java
final int startActivity(Intent intent, ActivityStackSupervisor.ActivityContainer container) {
enforceNotIsolatedCaller("ActivityContainer.startActivity");
final int userId = mUserController.handleIncomingUser(Binder.getCallingPid(),
Binder.getCallingUid(), mStackSupervisor.mCurrentUser, false,
ActivityManagerService.ALLOW_FULL_ONLY, "ActivityContainer", null);
// TODO: Switch to user app stacks here.
String mimeType = intent.getType();
final Uri data = intent.getData();
if (mimeType == null && data != null && "content".equals(data.getScheme())) {
mimeType = getProviderMimeType(data, userId);
}
container.checkEmbeddedAllowedInner(userId, intent, mimeType);
intent.addFlags(FORCE_NEW_TASK_FLAGS);
return mActivityStarter.startActivityMayWait(null, -1, null, intent, mimeType, null, null,
null, null, 0, 0, null, null, null, null, false, userId, container, null,
"startActivity");
}
```
这里继续调用ActivityStarter的startActivityMayWait方法:
```java
final int startActivityMayWait(IApplicationThread caller, int callingUid,
String callingPackage, Intent intent, String resolvedType,
IVoiceInteractionSession voiceSession, IVoiceInteractor voiceInteractor,
IBinder resultTo, String resultWho, int requestCode, int startFlags,
ProfilerInfo profilerInfo, WaitResult outResult,
Configuration globalConfig, Bundle bOptions, boolean ignoreTargetSecurity, int userId,
IActivityContainer iContainer, TaskRecord inTask, String reason) {
..............
int res = startActivityLocked(caller, intent, ephemeralIntent, resolvedType,
aInfo, rInfo, voiceSession, voiceInteractor,
resultTo, resultWho, requestCode, callingPid,
callingUid, callingPackage, realCallingPid, realCallingUid, startFlags,
options, ignoreTargetSecurity, componentSpecified, outRecord, container,
inTask, reason);
...............
}
```
这里省略了大部分的代码,这部分都和WMS没有关系,只截取了调用下一个方法的代码,继续看startActivityLocked方法:
```java
int startActivityLocked(IApplicationThread caller, Intent intent, Intent ephemeralIntent,
String resolvedType, ActivityInfo aInfo, ResolveInfo rInfo,
IVoiceInteractionSession voiceSession, IVoiceInteractor voiceInteractor,
IBinder resultTo, String resultWho, int requestCode, int callingPid, int callingUid,
String callingPackage, int realCallingPid, int realCallingUid, int startFlags,
ActivityOptions options, boolean ignoreTargetSecurity, boolean componentSpecified,
ActivityRecord[] outActivity, ActivityStackSupervisor.ActivityContainer container,
TaskRecord inTask, String reason) {
............
mLastStartActivityResult = startActivity(caller, intent, ephemeralIntent, resolvedType,
aInfo, rInfo, voiceSession, voiceInteractor, resultTo, resultWho, requestCode,
callingPid, callingUid, callingPackage, realCallingPid, realCallingUid, startFlags,
options, ignoreTargetSecurity, componentSpecified, mLastStartActivityRecord,
container, inTask);
...........
}
```
继续调用startActivity方法:
```java
private int startActivity(IApplicationThread caller, Intent intent, Intent ephemeralIntent,
String resolvedType, ActivityInfo aInfo, ResolveInfo rInfo,
IVoiceInteractionSession voiceSession, IVoiceInteractor voiceInteractor,
IBinder resultTo, String resultWho, int requestCode, int callingPid, int callingUid,
String callingPackage, int realCallingPid, int realCallingUid, int startFlags,
ActivityOptions options, boolean ignoreTargetSecurity, boolean componentSpecified,
ActivityRecord[] outActivity, ActivityStackSupervisor.ActivityContainer container,
TaskRecord inTask) {
................
// 这里r是创建一个目标的ActivityRecord
ActivityRecord r = new ActivityRecord(mService, callerApp, callingPid, callingUid,
callingPackage, intent, resolvedType, aInfo, mService.getGlobalConfiguration(),
resultRecord, resultWho, requestCode, componentSpecified, voiceSession != null,
mSupervisor, container, options, sourceRecord);
...............
return startActivity(r, sourceRecord, voiceSession, voiceInteractor, startFlags, true,
options, inTask, outActivity);
}
```
这个方法中,我们看到了会创建ActivityRecord对象,这个是AMS中描述客户端Activity的数据结构。这个对象对应WMS来说最重要的就是前面我们之前提到过的token,我们稍稍看下他的构造方法:
```java
ActivityRecord(ActivityManagerService _service, ProcessRecord _caller, int _launchedFromPid,
int _launchedFromUid, String _launchedFromPackage, Intent _intent, String _resolvedType,
ActivityInfo aInfo, Configuration _configuration,
ActivityRecord _resultTo, String _resultWho, int _reqCode,
boolean _componentSpecified, boolean _rootVoiceInteraction,
ActivityStackSupervisor supervisor,
ActivityContainer container, ActivityOptions options, ActivityRecord sourceRecord) {
service = _service; // AMS
appToken = new Token(this); // 创建这个ActivityRecord的IApplicationToken
..............
}
static class Token extends IApplicationToken.Stub {
...............
}
```
我们看到这里的appToken是new了一个Token对象,而Token是一个IApplicationToken,也就是Binder。这个我们看一下就好,确认下心里放心。我们回到AMS中,继续看后面的方法,后面会调用ActivityStarter的startActivity方法:
```java
private int startActivity(final ActivityRecord r, ActivityRecord sourceRecord,
IVoiceInteractionSession voiceSession, IVoiceInteractor voiceInteractor,
int startFlags, boolean doResume, ActivityOptions options, TaskRecord inTask,
ActivityRecord[] outActivity) {
..........
result = startActivityUnchecked(r, sourceRecord, voiceSession, voiceInteractor,
startFlags, doResume, options, inTask, outActivity);
..........
}
```
这里继续调用startActivityUnchecked方法:
```java
private int startActivityUnchecked(final ActivityRecord r, ActivityRecord sourceRecord,
IVoiceInteractionSession voiceSession, IVoiceInteractor voiceInteractor,
int startFlags, boolean doResume, ActivityOptions options, TaskRecord inTask,
ActivityRecord[] outActivity) {
..............
if (mStartActivity.resultTo == null && mInTask == null && !mAddingToTask
&& (mLaunchFlags & FLAG_ACTIVITY_NEW_TASK) != 0) {
newTask = true;
// 没有复用task就创建task
// 把activity加入到task中
// 设置ActivityStack为焦点
result = setTaskFromReuseOrCreateNewTask(
taskToAffiliate, preferredLaunchStackId, topStack);
}
...........
mTargetStack.startActivityLocked(mStartActivity, topFocused, newTask, mKeepCurTransition,
mOptions);
.............
}
```
这个方法是AMS中很重要的一个方法,里面处理了很多的逻辑,之前我们在分析AMS中的时候,这个方法分析的东西非常的多,也很复杂,这里不再过多分析细节,简单的说,启动一个Activity后,会寻找一个合适的ActivityStack和TaskRecord把这个Activity插入进入,这里一般来说如果启动Activity的调用方本身就存在一个任务栈中的,对启动的Activity也没有特殊的要求,比如要求在一个新栈等等,那么就会复用这个调用者的任务栈,否则会根据特殊要求寻找一个任务栈,最终没有找到的话就创建一个新的,我们这里主要就看创建新的是怎么创建的。这里setTaskFromReuseOrCreateNewTask方法就是寻找ActivityStack和TaskRecord的方法,我们之前分析AMS时候看过了,现在分析WMS我们在看下和WMS相关的部分:
```java
private int setTaskFromReuseOrCreateNewTask(
TaskRecord taskToAffiliate, int preferredLaunchStackId, ActivityStack topStack) {
// 获取一个要加入的ActivityStack
mTargetStack = computeStackFocus(
mStartActivity, true, mLaunchBounds, mLaunchFlags, mOptions);
// Do no move the target stack to front yet, as we might bail if
// isLockTaskModeViolation fails below.
if (mReuseTask == null) { // 如果没有复用的TaskRecord进这里
// 创建一个TaskRecord。当然会进而创建TaskWindowContainerController等等
final TaskRecord task = mTargetStack.createTaskRecord(
mSupervisor.getNextTaskIdForUserLocked(mStartActivity.userId),
mNewTaskInfo != null ? mNewTaskInfo : mStartActivity.info,
mNewTaskIntent != null ? mNewTaskIntent : mIntent, mVoiceSession,
mVoiceInteractor, !mLaunchTaskBehind /* toTop */, mStartActivity.mActivityType);
// 把Activity加入到对应的taskRecord中,或者Activity重新加入到一个其他taskRecord中
addOrReparentStartingActivity(task, "setTaskFromReuseOrCreateNewTask - mReuseTask");
............
}
```
我们这里截取前面一部分,这里就涉及到了ActivityStack和TaskRecord相关的部分。首先开始computeStackFocus这个方法就是计算一个目标ActivityStack,最终会返回一个ActivityStack,下面如果mReuseTask为null,表示没有复用的TaskRecord,就会调用前面获取的ActivityStack的createTaskRecord方法来创建TaskRecord。我们先看下computeStackFocus这个方法:
# AMS的ActivityStack和WMS的TaskStack的创建
```java
private ActivityStack computeStackFocus(ActivityRecord r, boolean newTask, Rect bounds,
int launchFlags, ActivityOptions aOptions) {
// 获取这个Activity的TaskRecord
final TaskRecord task = r.getTask();
// 获取启动的ActivityStack
ActivityStack stack = getLaunchStack(r, launchFlags, task, aOptions);
if (stack != null) {
return stack;
}
..........
}
```
这里会继续调用getLaunchStack方法:
```java
private ActivityStack getLaunchStack(ActivityRecord r, int launchFlags, TaskRecord task,
ActivityOptions aOptions) {
............
if (isValidLaunchStackId(launchStackId, launchDisplayId, r)) {
return mSupervisor.getStack(launchStackId, CREATE_IF_NEEDED, ON_TOP);
}
...............
}
```
这里我们截取的获得ActivityStack的核心部分。这里显示验证下这个启动的ActivtyStackId是否是有效的,如果有效的话,就会调用ActivityStackSupervisor的getStack方法,我们看下这个方法:
```java
protected <T extends ActivityStack> T getStack(int stackId, boolean createStaticStackIfNeeded,
boolean createOnTop) {
// 在当前ActivityContainer集合中看看有没有stackId一样的,有就返回,没有下面创建
// ActivityContainer就是一个ActivityStack的封装,这里就是获取一个ActivityStack
final ActivityContainer activityContainer = mActivityContainers.get(stackId);
// 如果有的话,返回对应的ActivityStack
if (activityContainer != null) {
return (T) activityContainer.mStack;
}
if (!createStaticStackIfNeeded || !StackId.isStaticStack(stackId)) {
return null;
}
if (stackId == DOCKED_STACK_ID) {
// Make sure recents stack exist when creating a dock stack as it normally need to be on
// the other side of the docked stack and we make visibility decisions based on that.
getStack(RECENTS_STACK_ID, CREATE_IF_NEEDED, createOnTop);
}
// 创建ActivityStack返回
return (T) createStackOnDisplay(stackId, DEFAULT_DISPLAY, createOnTop);
}
```
这个方法首先会从mActivityContainers这个字段中获取所有的当前存在的ActivityContainer,ActivityContainer是对于ActivityStack的封装,里面除了ActivityStack外,还有保存了一些和这个ActivityStack相关的数据,我们看一眼这个类:
```java
class ActivityContainer extends android.app.IActivityContainer.Stub {
final static int FORCE_NEW_TASK_FLAGS = FLAG_ACTIVITY_NEW_TASK |
FLAG_ACTIVITY_MULTIPLE_TASK | Intent.FLAG_ACTIVITY_NO_ANIMATION;
final int mStackId;
IActivityContainerCallback mCallback = null;
ActivityStack mStack;
ActivityRecord mParentActivity = null;
String mIdString;
boolean mVisible = true;
/** Display this ActivityStack is currently on. Null if not attached to a Display. */
ActivityDisplay mActivityDisplay; // 这个Activity所在的屏幕
...............
}
```
这个类里面我们看到除了ActivityStack外,还有其他的一些属性,比如是否可以显示,属于哪个屏幕等等,所以我们这里就把这个类理解为一个ActivityStack就可以,我们回到上面getStack方法。
已经一些验证后,如果已经存在这个ActivityStack了就返回,否则会调用createStackOnDisplay方法创建ActivityStack,我们继续跟进这个方法:
```java
ActivityStack createStackOnDisplay(int stackId, int displayId, boolean onTop) {
// 根据displayId来获取一个屏幕的描述,即ActivityDisplay
// 如果是空,就return
final ActivityDisplay activityDisplay = getActivityDisplayOrCreateLocked(displayId);
if (activityDisplay == null) {
return null;
}
// 创建ActivityContainer和ActivityStack
final ActivityContainer activityContainer =
new ActivityContainer(stackId, activityDisplay, onTop);
return activityContainer.mStack;
}
```
这个方法首先会获得一个ActivityDisplay,这个ActivityDisplay其实是对应于WMS中的DisplayContent,可以把他理解为在AMS中描述一个屏幕的数据结构,我们看一下这个类中的元素:
```java
class ActivityDisplay extends ConfigurationContainer {
/** Actual Display this object tracks. */
int mDisplayId; // 这个屏幕的id
Display mDisplay;
/** All of the stacks on this display. Order matters, topmost stack is in front of all other
* stacks, bottommost behind. Accessed directly by ActivityManager package classes */
// 这个屏幕包含的所有ActivityStack
// 对应于DisplayContent中的mTaskStackContainers
final ArrayList<ActivityStack> mStacks = new ArrayList<>();
............
}
```
可以看到他里面有一个Display,这个是代码一个屏幕的基础信息,然后有个集合mStacks,里面保存了这个屏幕里面所有的ActivityStack,这个就是类似于WMS中的DisplayContent,我们理解了这个后面的代码就好理解了,我们回到createStackOnDisplay方法继续往下看。
createStackOnDisplay方法中,获取了ActivityDisplay后,就会创建一个ActivityContainer对象了,我们看下ActivityContainer的构造方法:
```java
ActivityContainer(int stackId, ActivityDisplay activityDisplay, boolean onTop) {
synchronized (mService) {
mStackId = stackId;
mActivityDisplay = activityDisplay;
mIdString = "ActivtyContainer{" + mStackId + "}";
createStack(stackId, onTop);
if (DEBUG_STACK) Slog.d(TAG_STACK, "Creating " + this);
}
}
```
这里保存了StackId和ActivityDisplay后会继续调研createStack方法:
```java
protected void createStack(int stackId, boolean onTop) {
switch (stackId) {
case PINNED_STACK_ID:
new PinnedActivityStack(this, mRecentTasks, onTop);
break;
default:
new ActivityStack(this, mRecentTasks, onTop);
break;
}
}
```
这个方法会创建ActivityStack,其中会对画中画单独创建一个PinnedActivityStack类型的ActivityStack,这个我们先不管,我们只看ActivityStack的创建:
```java
ActivityStack(ActivityStackSupervisor.ActivityContainer activityContainer,
RecentTasks recentTasks, boolean onTop) {
mActivityContainer = activityContainer;
mStackSupervisor = activityContainer.getOuter();
mService = mStackSupervisor.mService; // AMS
mHandler = new ActivityStackHandler(mService.mHandler.getLooper());
mWindowManager = mService.mWindowManager; // WMS
mStackId = activityContainer.mStackId;
mCurrentUser = mService.mUserController.getCurrentUserIdLocked();
mRecentTasks = recentTasks;
// 如果是自由模式,会设置这个窗口初始位置的工具类LaunchingTaskPositioner。否则是null
mTaskPositioner = mStackId == FREEFORM_WORKSPACE_STACK_ID
? new LaunchingTaskPositioner() : null;
final ActivityStackSupervisor.ActivityDisplay display = mActivityContainer.mActivityDisplay;
mTmpRect2.setEmpty();
// 创建StackWindowController,ActivityStack对应WMS的TaskStack,也对应StackWindowController
mWindowContainerController = createStackWindowController(display.mDisplayId, onTop,
mTmpRect2);
activityContainer.mStack = this; // 把当前这个ActivityStack赋值给ActivityContainer
// 把AMS中的ActivityContainer(即ActivityStack的封装)put到ActivityStackSupervisor的mActivityContainers中
mStackSupervisor.mActivityContainers.put(mStackId, activityContainer);
// 这个方法会先把ActivityDisplay中保留的所有这个屏幕下的Stack赋值给这个stack
// 然后把这个ActivityStack加入到ActivityDisplay的stack集合中
postAddToDisplay(display, mTmpRect2.isEmpty() ? null : mTmpRect2, onTop);
}
```
这个方法开始是保存一些必要的数据,之后我们看到createStackWindowController这个方法,这个方法会创建一个StackWindowController,这个我们在第一篇的WMS文章中已经看到过了,他会创建一个WMS中的TaskStack,然后会保存到DisplayContent中,这个过程我们已经在第一篇文章中分析过了,这里不跟进了,既然在WMS中已经在DisplayContent中添加了一个TaskStack,那么在AMS中也做同样的处理,所以在方法最后先会把这个ActivityContainer保存到mActivityContainers这个集合中,这个是封装了ActivityStack的类,先把他放到mActivityContainers,最后又调用了postAddToDisplay方法,这个就是做对应于WMS那里把TaskStack保存到DisplayContent中的动作,我们看下这个方法:
```java
private void postAddToDisplay(ActivityStackSupervisor.ActivityDisplay activityDisplay,
Rect bounds, boolean onTop) {
mDisplayId = activityDisplay.mDisplayId;
// 这个屏幕下的所有ActivityStack
mStacks = activityDisplay.mStacks;
// 这个ActivityStack的Rect
mBounds = bounds != null ? new Rect(bounds) : null;
// 是否全屏幕
mFullscreen = mBounds == null;
// 初始化窗口时候的位置工具栏,一般只有自由模式才会非null
if (mTaskPositioner != null) {
mTaskPositioner.setDisplay(activityDisplay.mDisplay);
mTaskPositioner.configure(mBounds);
}
// 更新自己的config,集合父元素的,不变的会延用父元素的,否则用自己特有的config
onParentChanged();
// 把当前ActivityStack加入到ActivityDisplay的ActivityStack集合中
activityDisplay.attachStack(this, findStackInsertIndex(onTop));
// 如果是分屏模式,设置分屏模式的大小
if (mStackId == DOCKED_STACK_ID) {
// If we created a docked stack we want to resize it so it resizes all other stacks
// in the system.
mStackSupervisor.resizeDockedStackLocked(
mBounds, null, null, null, null, PRESERVE_WINDOWS);
}
}
```
这个方法主要是把ActivityStack保存到ActivityDisplay中,主要的代码就是这里activityDisplay.attachStack这句:
```java
void attachStack(ActivityStack stack, int position) {
if (DEBUG_STACK) Slog.v(TAG_STACK, "attachStack: attaching " + stack
+ " to displayId=" + mDisplayId + " position=" + position);
mStacks.add(position, stack);
}
```
这里可以看到把一个ActivityStack保存到mStacks这个集合中,也就和WMS那边的操作对应了。
经过上面一连串代码,我们看到了AMS和WMS中创建ActivityStack的过程,这里最后会返回一个ActivityStack到前面,我们回到前面调用的地方setTaskFromReuseOrCreateNewTask方法,我们再贴一下代码:
```java
private int setTaskFromReuseOrCreateNewTask(
TaskRecord taskToAffiliate, int preferredLaunchStackId, ActivityStack topStack) {
// 获取一个要加入的ActivityStack
mTargetStack = computeStackFocus(
mStartActivity, true, mLaunchBounds, mLaunchFlags, mOptions);
// Do no move the target stack to front yet, as we might bail if
// isLockTaskModeViolation fails below.
if (mReuseTask == null) { // 如果没有复用的TaskRecord进这里
// 创建一个TaskRecord。当然会进而创建TaskWindowContainerController等等
final TaskRecord task = mTargetStack.createTaskRecord(
mSupervisor.getNextTaskIdForUserLocked(mStartActivity.userId),
mNewTaskInfo != null ? mNewTaskInfo : mStartActivity.info,
mNewTaskIntent != null ? mNewTaskIntent : mIntent, mVoiceSession,
mVoiceInteractor, !mLaunchTaskBehind /* toTop */, mStartActivity.mActivityType);
// 把Activity加入到对应的taskRecord中,或者Activity重新加入到一个其他taskRecord中
addOrReparentStartingActivity(task, "setTaskFromReuseOrCreateNewTask - mReuseTask");
..............
}
```
# AMS的TaskRecord和WMS的Task的创建
这里mTargetStack就是前面返回的一个启动ActivityStack,接着这里如果没有可以复用的TaskRecord,会调用ActivityStack的createTaskRecord方法来创建TaskRecord,我们看下这个方法:
```java
TaskRecord createTaskRecord(int taskId, ActivityInfo info, Intent intent,
IVoiceInteractionSession voiceSession, IVoiceInteractor voiceInteractor,
boolean toTop, int type) {
// 创建一个TaskRecord
TaskRecord task = new TaskRecord(mService, taskId, info, intent, voiceSession,
voiceInteractor, type);
// add the task to stack first, mTaskPositioner might need the stack association
// 把taskRecord插入ActivityStack的task集合中
addTask(task, toTop, "createTaskRecord");
// 是否锁屏
final boolean isLockscreenShown =
mService.mStackSupervisor.mKeyguardController.isKeyguardShowing();
// 如果是自由模式,并且这个taskRecord有具体的rect,并且是可以改变大小的
if (!layoutTaskInStack(task, info.windowLayout) && mBounds != null && task.isResizeable()
&& !isLockscreenShown) {
// 更新下taskRecord的config。包括保存下这个mBounds。进入这里主要是自由模式。
// 自由模式会有给的的mBounds,所以这里会保存下这个rect,下面创建TaskWindowController的
// 时候需要取出rect作为参数
task.updateOverrideConfiguration(mBounds);
}
// 更新这个taskRecord的config(createWindowContainer方法会再次调用到updateOverrideConfiguration方法,
// 在自由模式的情况下,感觉这里的代码会有重复执行,虽然没什么问题),最后创建TaskWindowContainerController,设置给taskRecord
task.createWindowContainer(toTop, (info.flags & FLAG_SHOW_FOR_ALL_USERS) != 0);
return task;
}
```
这个方法开始就new了一个TaskRecord,然后调用addTask方法,这个方法是把他添加到ActivityStack中,而最后会调用TaskRecord的createWindowContainer方法会对应于WMS中的把Task添加到TaskStack中。我们先看下addTask方法:
```java
void addTask(final TaskRecord task, final boolean toTop, String reason) {
// 把task加入到这个ActivityStack中,同时设置下这个task的返回类型
addTask(task, toTop ? MAX_VALUE : 0, true /* schedulePictureInPictureModeChange */, reason);
if (toTop) { // 如果添加到这个ActivityStack最上面一个的话
// TODO: figure-out a way to remove this call.
// 这里是操作对应WMS中task,把他插入到taskStack中
mWindowContainerController.positionChildAtTop(task.getWindowContainerController(),
true /* includingParents */);
}
}
```
这里首先调用addTask方法把TaskRecord插入到ActvityStack中,这个是AMS中的数据结构处理,如果这里的TaskRecord是要插入ActivityStack顶部的话,说明是需要被显示的,所以这里下面调用StackWindowController的positionChildAtTop方法会调整这个Task在WMS中的位置,当然如果这个Task是复用的才能说调整,我们这里是新创建的,由于这里TaskRecord中还没有TaskWindowContainerController,所以这里不会进行下去,最后会创建TaskWindowContainerController,我们等到后面再说,这里先跟进addTask方法看下,AMS中把这个TaskRecord加入到ActvityStack的操作。
```java
void addTask(final TaskRecord task, int position, boolean schedulePictureInPictureModeChange,
String reason) {
// TODO: Is this remove really needed? Need to look into the call path for the other addTask
// 如果之前已经添加过了这个task,先移除
mTaskHistory.remove(task);
// 找到插入的合适位置
position = getAdjustedPositionForTask(task, position, null /* starting */);
// 是否是最后一个
final boolean toTop = position >= mTaskHistory.size();
// 如果这个task已经有属于一个ActivityStack了,那么从中移除他
final ActivityStack prevStack = preAddTask(task, reason, toTop);
//把task加入到mTaskHistory集合
mTaskHistory.add(position, task);
//把当前ActivityStack设置到task中
task.setStack(this);
if (toTop) {
// 如果是加入到这个ActivityStack顶部的,设置下这个task返回的类型
updateTaskReturnToForTopInsertion(task);
}
// 更新下task移动的时间,设置刷新标志
updateTaskMovement(task, toTop);
// 画中画相关的处理
postAddTask(task, prevStack, schedulePictureInPictureModeChange);
}
```
这里保存TaskRecord的是mTaskHistory集合,这里在添加前会做一些处理,比如先从mTaskHistory集合中移除掉这个taskRecord(如果有的话),如果这个TaskRecord已经属于一个ActivityStack了,那么也会从那个ActivityStack中移除掉这个taskRecord,最后再把这个taskRecord添加到mTaskHistory中。AMS中ActivityStack的添加还是比较容易得。我们回到createTaskRecord方法,在ActivityStack中添加完taskRecord后,最后会调用TaskRecord的createWindowContainer方法,这里是处理WMS这边的逻辑了:
```java
void createWindowContainer(boolean onTop, boolean showForAllUsers) {
// 已经存在了报错
if (mWindowContainerController != null) {
throw new IllegalArgumentException("Window container=" + mWindowContainerController
+ " already created for task=" + this);
}
// 更新这个TaskRecord的几个config以及他子元素的config,和他的bound,返回bound
final Rect bounds = updateOverrideConfigurationFromLaunchBounds();
// 获得这个taskRecord的config
final Configuration overrideConfig = getOverrideConfiguration();
// 把创建的TaskWindowContainerController设置给taskRecord
setWindowContainerController(new TaskWindowContainerController(taskId, this,
getStack().getWindowContainerController(), userId, bounds, overrideConfig,
mResizeMode, mSupportsPictureInPicture, isHomeTask(), onTop, showForAllUsers,
lastTaskDescription));
}
```
这里会调用setWindowContainerController方法,这个方法很简单,就是把一个TaskWindowContainerController赋值给taskRecord,这里今后一旦AMS中taskRecord的位置有调整,可以同步的调整WMS中的Task的位置,代码如下:
```java
protected void setWindowContainerController(TaskWindowContainerController controller) {
if (mWindowContainerController != null) {
throw new IllegalArgumentException("Window container=" + mWindowContainerController
+ " already created for task=" + this);
}
mWindowContainerController = controller;
}
```
这段代码看一眼就可以,不多解释。而TaskWindowContainerController的创建,在第一篇文章中也已经分析过了,主要就是创建Task,然后把Task添加到TaskStack中,这里也不多说了。好了,TaskRecord和Task的创建也说完了,接着想必大家也猜到了,ActivityRecord在WMS中对应的是AppWindowToken,让我们回到ActivityStarter类的startActivityUnchecked方法,前面我们从这个方法中的setTaskFromReuseOrCreateNewTask方法引申进去分析了关于WMS中TaskStack和Task的创建,现在在获取到了启动的ActivityStack后,这个方法里面会调用ActivityStack的startActivityLocked方法开始启动一个Activity了。
```java
// 参数一 r是新创建的Activity
// 参数二 focusedTopActivity是当前正在显示的Activity
// 参数三 newTask表示是否是一个新的taskRecord
final void startActivityLocked(ActivityRecord r, ActivityRecord focusedTopActivity,
boolean newTask, boolean keepCurTransition, ActivityOptions options) {
.........
if (r.getWindowContainerController() == null) {
r.createWindowContainer();
}
..........
}
```
这个方法我们后面还要细说,这仅仅看下一下关于AppWindowToken的创建,这个方法的第一个参数就是要启动的ActivityRecord,这里会判断这个ActivityRecord是否有AppWindowContainerController,如果没有的话就调用他的createWindowContainer方法:
```java
void createWindowContainer() {
// 如果已经有了AppWindowContainerController,报错
if (mWindowContainerController != null) {
throw new IllegalArgumentException("Window container=" + mWindowContainerController
+ " already created for r=" + this);
}
// 表示要加入的task已经存在
inHistory = true;
// 获取TaskWindowContainerController
final TaskWindowContainerController taskController = task.getWindowContainerController();
// TODO(b/36505427): Maybe this call should be moved inside updateOverrideConfiguration()
// 更新下这个taskRecord的config等
task.updateOverrideConfigurationFromLaunchBounds();
// Make sure override configuration is up-to-date before using to create window controller.
updateOverrideConfiguration();
// 创建Activity的AppWindowContainerController
mWindowContainerController = new AppWindowContainerController(taskController, appToken,
this, Integer.MAX_VALUE /* add on top */, info.screenOrientation, fullscreen,
(info.flags & FLAG_SHOW_FOR_ALL_USERS) != 0, info.configChanges,
task.voiceSession != null, mLaunchTaskBehind, isAlwaysFocusable(),
appInfo.targetSdkVersion, mRotationAnimationHint,
ActivityManagerService.getInputDispatchingTimeoutLocked(this) * 1000000L,
getOverrideConfiguration(), mBounds);
// 把当前这个ActivityRecord添加到taskRecord中
task.addActivityToTop(this);
// When an activity is started directly into a split-screen fullscreen stack, we need to
// update the initial multi-window modes so that the callbacks are scheduled correctly when
// the user leaves that mode.
mLastReportedMultiWindowMode = !task.mFullscreen;
mLastReportedPictureInPictureMode = (task.getStackId() == PINNED_STACK_ID);
onOverrideConfigurationSent();
}
```
这个方我们看到了里面会new一个AppWindowContainerController,这个方法我们在第一篇文章已经分析过了,他会创建一个和ActivityRecord对应的AppWindowToken,添加到Task中。
分析到这里,我们对于启动Activity过程中AMS中的ActivityStack,TaskRecord,ActivityRecord理解是不是感觉又有了更深一步的体会,这个三个数据结构不仅在AMS中,存在在WMS中也都有对应的对象,即TaskStack,Task,AppWindowToken,而WMS中的三个对象都有由三个Controller对象来创建的,而这三个Controller对象都是被AMS中三个对象持有,并且由这三个对象来操作的,所以这种设计模式的目的就是尽量让不同职责的模块能相对独立,模块之间的耦合尽量降低,所以虽然AMS和WMS都是在systemServer进程中的,但是还是把他们区分开发,这也是我们学习软件工程设计模式的一种思路。
上面说了这么多,对于启动Activity流程来说,我们已经有了一个要启动的ActivityRecord了,并且他所在的TaskRecord和ActivityStack也都有了,下面准备要启动这个Actvity了。我们还是回到上面startActivityLocked方法,这个方法在创建完一个AppWindowToken后,就开始准备启动的工作了:
# 添加启动窗口
```java
final void startActivityLocked(ActivityRecord r, ActivityRecord focusedTopActivity,
boolean newTask, boolean keepCurTransition, ActivityOptions options) {
...............
// 这个字段表示启动这个Activity的时候是否要启动一个预览窗口
// 所谓预览窗口就是比如从桌面启动一个Activity的时候,一般在我们第一个app
// 启动之前会有一个启动的窗口,一般是在一个新task中会启动,下面就是处理
// 启动窗口的逻辑
boolean doShow = true;
if (newTask) {
// Even though this activity is starting fresh, we still need
// to reset it to make sure we apply affinities to move any
// existing activities from other tasks in to it.
// If the caller has requested that the target task be
// reset, then do so.
// 进入到这里说明是一个新的task,如果这个启动的Activity带这个flag,说明这个Actvity肯定是
// 显示在最上面的,并且当前ActivityStack中最上面一个Activity就是这个,那么doshow置为true
if ((r.intent.getFlags() & Intent.FLAG_ACTIVITY_RESET_TASK_IF_NEEDED) != 0) {
resetTaskIfNeededLocked(r, r);
// 如果这个task中最上面的Activity就是现在要启动的这个,那么doShow置为true
doShow = topRunningNonDelayedActivityLocked(null) == r;
}
} else if (options != null && options.getAnimationType()
== ActivityOptions.ANIM_SCENE_TRANSITION) {
// 进入到这里说明不是新task,并且有动画的话,那么不要预览窗口
doShow = false;
}
if (r.mLaunchTaskBehind) { // 后台启动的,,不需要预览窗口
// Don't do a starting window for mLaunchTaskBehind. More importantly make sure we
// tell WindowManager that r is visible even though it is at the back of the stack.
r.setVisibility(true); // visible还是要设置的
ensureActivitiesVisibleLocked(null, 0, !PRESERVE_WINDOWS);
} else if (SHOW_APP_STARTING_PREVIEW && doShow) {
// 到这里说明这个启动的Activity需要有预览窗口
// Figure out if we are transitioning from another activity that is
// "has the same starting icon" as the next one. This allows the
// window manager to keep the previous window it had previously
// created, if it still had one.
// 获取启动Activty的TaskRecord
TaskRecord prevTask = r.getTask();
// 获取已经添加过预览窗口的Activity
ActivityRecord prev = prevTask.topRunningActivityWithStartingWindowLocked();
// prev说明这个task中已经有其他Activity添加过预览窗口了
if (prev != null) {
// We don't want to reuse the previous starting preview if:
// (1) The current activity is in a different task.
// 下面两种情况,不要复用之前的预览窗口
// 如果这个添加过预览窗口的task和启动Activity的task不是一个task
if (prev.getTask() != prevTask) {
prev = null;
}
// (2) The current activity is already displayed.
else if (prev.nowVisible) {
// 预览窗口的Activity现在正在显示
prev = null;
}
}
// 添加启动界面
r.showStartingWindow(prev, newTask, isTaskSwitch(r, focusedTopActivity));
}
.............
}
```
我们平台在开发中肯定遇到过,如果一个App的主界面加载内容过多,通常会有一个白屏,然后过一会才会显示出需要的内容,其实这个白屏也是一个窗口,上面这段代码就是在启动一个Activity前,先启动一个白屏的地方。
从上面的代码逻辑中可以看出,一般白屏会在一个新TaskRecord中才会添加。上面代码中doShow默认为true,如果是一个新的任务栈,并且栈顶要启动的就是当前这个Activity,那么doShow还是为ture,否则的话如果窗口有转场动画的话,那么doShow为false,默认一般我们打开一个Activity的时候都有默认的窗口转场动画,所以我们一般只会在启动一个新进程的时候看到白屏现象,一旦进入app后就不太看到了,所以下面我们看下白屏的启动窗口是怎么添加的。
如果是同一个TaskRecord的话,之前已经有启动窗口了,是可以复用的,但是根据上面的代码,有两种情况是不会复用的。一种是这个TaskRecord中最上面运行的Activity所在的TaskRecord和现在启动的这个TaskRecord不是一个,不过我想想好像也太可能,从一个TaskRecord中取出的启动窗口不属于这个TaskRecord,可能有场景会这样吧,不过一般不太可能,反正加了这个限制也没问题,不影响。第二种情况是这个启动窗口当前正在运行中,所以不可以复用。
最后调用要启动Activity的showStartingWindow方法来启动这个启动窗口,最终会调用到下面这个方法:
```java
// 添加启动界面
void showStartingWindow(ActivityRecord prev, boolean newTask, boolean taskSwitch,
boolean fromRecents) {
// 如果这个Activity没有Controller,退出
if (mWindowContainerController == null) {
return;
}
// 总是显示在最上面的Activity,不要启动界面
if (mTaskOverlay) {
// We don't show starting window for overlay activities.
return;
}
// app的兼容信息
final CompatibilityInfo compatInfo =
service.compatibilityInfoForPackageLocked(info.applicationInfo);
// 添加启动界面
final boolean shown = mWindowContainerController.addStartingWindow(packageName, theme,
compatInfo, nonLocalizedLabel, labelRes, icon, logo, windowFlags,
prev != null ? prev.appToken : null, newTask, taskSwitch, isProcessRunning(),
allowTaskSnapshot(),
state.ordinal() >= RESUMED.ordinal() && state.ordinal() <= STOPPED.ordinal(),
fromRecents);
if (shown) {
// 标记是否正在开始启动界面
mStartingWindowState = STARTING_WINDOW_SHOWN;
}
}
```
这个方法中,开始做一些检查。一切顺利后,会调用AppWindowContainerController的addStartingWindow方法,我们看下这个方法:
```java
// 添加启动界面
// 参数表示这个IBinder代表一个Activity,并且这个Activity就是比如同一个task中的预览窗口
public boolean addStartingWindow(String pkg, int theme, CompatibilityInfo compatInfo,
CharSequence nonLocalizedLabel, int labelRes, int icon, int logo, int windowFlags,
IBinder transferFrom, boolean newTask, boolean taskSwitch, boolean processRunning,
boolean allowTaskSnapshot, boolean activityCreated, boolean fromRecents) {
synchronized(mWindowMap) {
if (DEBUG_STARTING_WINDOW) Slog.v(TAG_WM, "setAppStartingWindow: token=" + mToken
+ " pkg=" + pkg + " transferFrom=" + transferFrom + " newTask=" + newTask
+ " taskSwitch=" + taskSwitch + " processRunning=" + processRunning
+ " allowTaskSnapshot=" + allowTaskSnapshot);
// 没有对应的AppWindowContainer
if (mContainer == null) {
Slog.w(TAG_WM, "Attempted to set icon of non-existing app token: " + mToken);
return false;
}
// If the display is frozen, we won't do anything until the actual window is
// displayed so there is no reason to put in the starting window.
// 屏幕被冻结了,return false
if (!mService.okToDisplay()) {
return false;
}
// 如果已经有了启动窗口的数据,那么说明已经启动过了,return
if (mContainer.startingData != null) {
return false;
}
// 寻找TYPE_BASE_APPLICATION和TYPE_APPLICATION_STRING类型的窗口
final WindowState mainWin = mContainer.findMainWindow();
// 这两种类型的窗口是可以显示启动窗口的,如果有了并且可见的,那么就不用在创建启动窗口了
if (mainWin != null && mainWin.isVisible() && mainWin.isDrawnLw()) {
// App already has a visible window that is drawn...why would you want a starting
// window?
return false;
}
// 获取这个界面的快照,其实就是把Task之前离开屏幕前的一帧内容记录到缓存从,必要时可以拿出来显示
final TaskSnapshot snapshot = mService.mTaskSnapshotController.getSnapshot(
mContainer.getTask().mTaskId, mContainer.getTask().mUserId,
false /* restoreFromDisk */, false /* reducedResolution */);
// 获取是否需要启动窗口,如果需要的话,用快照还是启动窗口
final int type = getStartingWindowType(newTask, taskSwitch, processRunning,
allowTaskSnapshot, activityCreated, fromRecents, snapshot);
// 如果是用快照的话,用前面获取的快照来替代启动窗口
if (type == STARTING_WINDOW_TYPE_SNAPSHOT) {
// 把快照添加作为启动窗口
return createSnapshot(snapshot);
}
```
这个方法比较长,我们分两部分来看,以上是第一部分。这里开始做一些检查,如果出现一些异常情况的话,会返回false表示不需要启动窗口。
关于启动窗口,其实就是在显示用户自己的界面前先给个预览窗口,好让用户视觉上感受好一些,这里启动窗口有2种,一种就是我们会定义在样式文件里面的比如windowBackground这个属性,这里可以给一个图片来显示。另一种是把这个任务栈之前的最后一帧缓存起来,之后需要的时候来显示,上面这个第一段代码就是处理缓存的,我们来看一下。
# 添加快照类型的启动窗口
这里会调用WMS的TaskSnapshotController中的getSnapshot来获取,由于这里设计到Surface等更进一步的知识,我们这里不深入大致看一下他的含义,了解代码在做什么就可以,后面如果分析Surface模块的话,等熟悉Surface了,会回头来看这块的详细代码。我们先看下TaskSnapshot这个类:
```java
public static class TaskSnapshot implements Parcelable {
private final GraphicBuffer mSnapshot;
private final int mOrientation;
private final Rect mContentInsets;
private final boolean mReducedResolution;
private final float mScale;
..............
}
```
这个类我们只要知道第一个变量GraphicBuffer是一个图元,具体Surface用来渲染的就是这个对象,所以保存TaskRecord中最后一帧的信息就会保存在图元中。我们大致了解一下这个类就可以了。我们再去TaskSnapshotController的getSnapshot方法看下:
```java
private final TaskSnapshotCache mCache;
@Nullable TaskSnapshot getSnapshot(int taskId, int userId, boolean restoreFromDisk,
boolean reducedResolution) {
return mCache.getSnapshot(taskId, userId, restoreFromDisk, reducedResolution);
}
```
这个就一行代码,我们直接上就可以理解为从TaskSnapshotCache中获取一个参数指定的TaskSnapshot。我们稍稍跟进下TaskSnapshotCache的getSnapshot方法:
```java
private static final class CacheEntry {
/** The snapshot. */
final TaskSnapshot snapshot; // 快照保存的地方
/** The app token that was on top of the task when the snapshot was taken */
final AppWindowToken topApp;
CacheEntry(TaskSnapshot snapshot, AppWindowToken topApp) {
this.snapshot = snapshot;
this.topApp = topApp;
}
}
private final ArrayMap<Integer, CacheEntry> mRunningCache = new ArrayMap<>();
@Nullable TaskSnapshot getSnapshot(int taskId, int userId, boolean restoreFromDisk,
boolean reducedResolution) {
synchronized (mService.mWindowMap) {
// Try the running cache.
// 获取快照的封装类
final CacheEntry entry = mRunningCache.get(taskId);
if (entry != null) {
return entry.snapshot;
}
}
// Try to restore from disk if asked.
// 是否从磁盘获取快照,false的话就直接return
if (!restoreFromDisk) {
return null;
}
// 从磁盘文件获取快照
return tryRestoreFromDisk(taskId, userId, reducedResolution);
}
```
这里有个CacheEntry类,我们看到他里面有2个字段,一个是前面介绍的TaskSnapshot,另一个是AppWindowToken。而这里有个字段mRunningCache是一个Map,key是一个TaskRecordId,value是一个CacheEntry。
所以getSnapshot方法会根据给定的参数TaskId从mRunningCache中获取一个CacheEntry,如果非空的话,就会返回他的TaskSnapshot。否则如果要尝试从磁盘获取的话会调用tryRestoreFromDisk方法从磁盘获取,我们在看下这个方法:
```java
private final TaskSnapshotLoader mLoader;
private TaskSnapshot tryRestoreFromDisk(int taskId, int userId, boolean reducedResolution) {
final TaskSnapshot snapshot = mLoader.loadTask(taskId, userId, reducedResolution);
if (snapshot == null) {
return null;
}
return snapshot;
}
```
这个方法我们就不继续跟进了,实在太深了,不过我们大致可以理解会调用TaskSnapshotLoader这个类的loadTask方法从磁盘获取TaskSnapshot。好了,虽然没有完全深入的分析,但是对于我们理解从缓存获取启动窗口缓存数据应该是没问题的,我们回到前面addStartingWindow方法。
除了获取缓存数据TaskSnapshot外,还会调用TaskSnapshot方法来判断是否要使用缓存数据,我们看看这个方法:
```java
// 参数taskSwitch表示这个Activity所在的task是否和启动他的task是一个task
// 参数processRunning表示这个Activity所在进程还没有运行
// 参数allowTaskSnapshot是否允许使用快照
// 参数activityCreated表示是否这个Activity已经创建了
private int getStartingWindowType(boolean newTask, boolean taskSwitch, boolean processRunning,
boolean allowTaskSnapshot, boolean activityCreated, boolean fromRecents,
TaskSnapshot snapshot) {
// 当前的转场动画是来自分屏最近任务的,不需要启动窗口
if (mService.mAppTransition.getAppTransition() == TRANSIT_DOCK_TASK_FROM_RECENTS) {
// TODO(b/34099271): Remove this statement to add back the starting window and figure
// out why it causes flickering, the starting window appears over the thumbnail while
// the docked from recents transition occurs
return STARTING_WINDOW_TYPE_NONE;
// 如果是一个新task,或者这个Activity所在的进程还没有运行,或者这个Activity还没有创建
// 那么就需要一个启动窗口
} else if (newTask || !processRunning || (taskSwitch && !activityCreated)) {
return STARTING_WINDOW_TYPE_SPLASH_SCREEN;
} else if (taskSwitch && allowTaskSnapshot) {
// 进入到这里表示当前Activity的task和启动这个Activity的task不是同一个,并且运行使用快照
// 没有快照的话就不用启动窗口了
// 如果有快照,快照和这个Activity所在task方向一样或者启动这个Activity是来自最近任务,就用快照。否则就用启动窗口
return snapshot == null ? STARTING_WINDOW_TYPE_NONE
: snapshotOrientationSameAsTask(snapshot) || fromRecents
? STARTING_WINDOW_TYPE_SNAPSHOT : STARTING_WINDOW_TYPE_SPLASH_SCREEN;
} else {
// 到这里就不用启动窗口了
return STARTING_WINDOW_TYPE_NONE;
}
}
```
这个方法的作用是返回使用什么类型的启动窗口,缓存快照,还是一个真正的启动窗口,或者不需要启动窗口。
首先如果这个任务栈是从最近任务中切换的,那么不需要启动窗口。接着如果是一个新任务栈,或者启动的Activity进程还没运行,或者是需要切换不同的任务栈同时Activity也没创建过,那么就是我们平常最常见的情况,需要启动一个正常的启动窗口。
然后如果是任务栈的切换同时运行使用缓冲快照的话,会看一下缓存快照snapshot是否为null,为null的话就不需要启动窗口了,不为null的话,会调用snapshotOrientationSameAsTask方法来判断缓存快照的横竖方向和当然任务栈方向是否一致,如果一致的话就会使用缓存快照,或者来自最近任务的任务栈切换,也会使用缓存快照,否则会使用正常的启动窗口。
以上条件都不符合的话,就不用启动窗口了。我们回到前面AppWindowContainerController的addStartingWindow方法,如果是缓存的快照类型的启动窗口,会调用createSnapshot方法创建快照的窗口:
```java
private boolean createSnapshot(TaskSnapshot snapshot) {
if (snapshot == null) {
return false;
}
if (DEBUG_STARTING_WINDOW) Slog.v(TAG_WM, "Creating SnapshotStartingData");
// 创建这个Activity的启动窗口快照封装类
mContainer.startingData = new SnapshotStartingData(mService, snapshot);
// 添加启动窗口
scheduleAddStartingWindow();
return true;
}
```
这个方法很简单,首先创建一个SnapshotStartingData对象给mContainer,注意这里的mContainer是当前AppWindowContainerController控制的对象,即一个AppWindowToken,即启动的Activity。然后调用scheduleAddStartingWindow继续启动快照窗口。这里我们先看一下SnapshotStartingData是什么:
```java
class SnapshotStartingData extends StartingData {
private final WindowManagerService mService;
private final TaskSnapshot mSnapshot;
SnapshotStartingData(WindowManagerService service, TaskSnapshot snapshot) {
super(service);
mService = service;
mSnapshot = snapshot;
}
@Override
StartingSurface createStartingSurface(AppWindowToken atoken) {
return mService.mTaskSnapshotController.createStartingSurface(atoken, mSnapshot);
}
}
public abstract class StartingData {
protected final WindowManagerService mService;
protected StartingData(WindowManagerService service) {
mService = service;
}
abstract StartingSurface createStartingSurface(AppWindowToken atoken);
}
```
这里可以看到SnapshotStartingData是StartingData的子类。StartingData是一个抽象类,里面持有一个WindowManagerService,而SnapshotStartingData继承了StartingData,里面又多了一个TaskSnapshot,所以和他的名字一样,就是提供显示的数据类。我们接着回去看下scheduleAddStartingWindow方法:
```java
// 想WMS的动画Handler发送一个消息,来处理启动窗口,消息被插入到队头,以加快启动速度
void scheduleAddStartingWindow() {
if (DEBUG_STARTING_WINDOW) Slog.v(TAG_WM, "Enqueueing ADD_STARTING");
// post一个启动处理启动窗口的Runnable到Handler中,插入到队头,以加快启动速度
mService.mAnimationHandler.postAtFrontOfQueue(mAddStartingWindow);
}
```
这里往Handler中插入一个任务mAddStartingWindow,具体做的事情就是在这个任务中,注意这里调用的是postAtFrontOfQueue方法,往Handler队列头部插入任务,由于这个流程是启动一个Activity,所以是希望尽量快的启动,增加用户体验,所以往队头插入。我们继续看mAddStartingWindow这个任务:
```java
// 创建启动窗口的surface
private final Runnable mAddStartingWindow = () -> {
final StartingData startingData; // 创建启动窗口的封装类
final AppWindowToken container;
synchronized (mWindowMap) {
// 如果这个AppWindowContainerController控制的Activity是null,return
if (mContainer == null) {
if (DEBUG_STARTING_WINDOW) Slog.v(TAG_WM, "mContainer was null while trying to"
+ " add starting window");
return;
}
startingData = mContainer.startingData;
container = mContainer;
}
if (startingData == null) {
// Animation has been canceled... do nothing.
if (DEBUG_STARTING_WINDOW) Slog.v(TAG_WM, "startingData was nulled out before handling"
+ " mAddStartingWindow: " + mContainer);
return;
}
if (DEBUG_STARTING_WINDOW) Slog.v(TAG_WM, "Add starting "
+ this + ": startingData=" + container.startingData);
StartingSurface surface = null;
try {
// 创建一个启动窗口surface,调用SplashScreenStartingData的createStartingSurface方法
surface = startingData.createStartingSurface(container);
} catch (Exception e) {
Slog.w(TAG_WM, "Exception when adding starting window", e);
}
if (surface != null) {
boolean abort = false;
synchronized(mWindowMap) {
// If the window was successfully added, then
// we need to remove it.
// 如果这个Activity被移除了或者AppWindowToken的startingData为null
// 说明这个Activity无效的,那么就不显示了
if (container.removed || container.startingData == null) {
if (DEBUG_STARTING_WINDOW) Slog.v(TAG_WM,
"Aborted starting " + container
+ ": removed=" + container.removed
+ " startingData=" + container.startingData);
// 全部都置空
container.startingWindow = null;
container.startingData = null;
abort = true;
} else {
// 到这里就把创建的启动窗口surface保存到AppWindowToken的startingSurface中
container.startingSurface = surface;
}
if (DEBUG_STARTING_WINDOW && !abort) Slog.v(TAG_WM,
"Added starting " + mContainer
+ ": startingWindow="
+ container.startingWindow + " startingView="
+ container.startingSurface);
}
if (abort) {
surface.remove();
}
} else if (DEBUG_STARTING_WINDOW) {
Slog.v(TAG_WM, "Surface returned was null: " + mContainer);
}
};
```
这里这么长一串,其实主要就是一句代码surface = startingData.createStartingSurface(container),这个是创建一个快照的surface,这里具体的方法是调用前面SnapshotStartingData中的createStartingSurface方法,返回一个TaskSnapshotSurface,我们这里也不继续跟进去看surface创建的过程了,后面专门分析surface的时候再看,这里只要知道创建了一个surface后把他保存在AppWindowToken的startingSurface字段中,这样其实就等于把启动的快照surface保存在了启动Activity对应的AppWindowToken的startingSurface字段中了。到这里启动一个快照窗口的流程就完成了,其实就是把一个StartingSurface保存在AppWindowToken中。我们回到前面addStartingWindow方法,再看创建启动窗口的后半段方法:
```java
.................
// 如果主题设置了下面几种窗口的样式,不会有启动窗口
// 比如浮窗,透明,使用桌面作为背景,或者不要启动窗口这几项
if (theme != 0) {
AttributeCache.Entry ent = AttributeCache.instance().get(pkg, theme,
com.android.internal.R.styleable.Window, mService.mCurrentUserId);
if (ent == null) {
// Whoops! App doesn't exist. Um. Okay. We'll just pretend like we didn't
// see that.
return false;
}
// 透明窗口
final boolean windowIsTranslucent = ent.array.getBoolean(
com.android.internal.R.styleable.Window_windowIsTranslucent, false);
// 浮窗
final boolean windowIsFloating = ent.array.getBoolean(
com.android.internal.R.styleable.Window_windowIsFloating, false);
// 使用桌面作为app背景
final boolean windowShowWallpaper = ent.array.getBoolean(
com.android.internal.R.styleable.Window_windowShowWallpaper, false);
// 没有启动窗口
final boolean windowDisableStarting = ent.array.getBoolean(
com.android.internal.R.styleable.Window_windowDisablePreview, false);
if (DEBUG_STARTING_WINDOW) Slog.v(TAG_WM, "Translucent=" + windowIsTranslucent
+ " Floating=" + windowIsFloating
+ " ShowWallpaper=" + windowShowWallpaper);
// 如果设置了上面这几项,下面会return
if (windowIsTranslucent) {
return false;
}
if (windowIsFloating || windowDisableStarting) {
return false;
}
// 如果使用桌面作为背景
if (windowShowWallpaper) {
// 如果背景窗口为null的话,那么继续显示启动窗口,把启动窗口变成现实桌面背景的窗口
// 否则已经有显示桌面窗口的了,就不要启动窗口了
if (mContainer.getDisplayContent().mWallpaperController.getWallpaperTarget()
== null) {
// If this theme is requesting a wallpaper, and the wallpaper
// is not currently visible, then this effectively serves as
// an opaque window and our starting window transition animation
// can still work. We just need to make sure the starting window
// is also showing the wallpaper.
windowFlags |= FLAG_SHOW_WALLPAPER;
} else {
return false;
}
}
}
// 表示已经有一个带预览窗口的Activity了,那么会用这个启动窗口来显示
if (mContainer.transferStartingWindow(transferFrom)) {
// 如果能正常使用之前的启动窗口,那么就返回,否则下面会继续回创建启动窗口
return true;
}
// There is no existing starting window, and we don't want to create a splash screen, so
// that's it!
// 如果不是启动窗口的话,就不要创建了,return
if (type != STARTING_WINDOW_TYPE_SPLASH_SCREEN) {
return false;
}
if (DEBUG_STARTING_WINDOW) Slog.v(TAG_WM, "Creating SplashScreenStartingData");
// 创建启动窗口的处理类
mContainer.startingData = new SplashScreenStartingData(mService, pkg, theme,
compatInfo, nonLocalizedLabel, labelRes, icon, logo, windowFlags,
mContainer.getMergedOverrideConfiguration());
scheduleAddStartingWindow();
}
return true;
}
```
这里首先会获取启动进程相关的样式信息,如果没有和启动进程相关的样式信息,说明找不到这个进程,那就返回了。否则会继续寻找启动的窗口类型,如果是透明窗口,浮动窗口或者指定不需要启动窗口的话,那么也返回,这些都不需要添加专门的启动窗口。如果Activity的背景是以桌面壁纸为背景的话,看看壁纸是否存在,壁纸其实也是一个窗口,如果这个窗口为null的话,那么继续后面的添加启动窗口流程,否则就不用添加启动窗口了,返回了。
# 把复用的启动窗口转移到新启动的Activity中
之后会调用AppWindowToken的transferStartingWindow方法,这个方法是前面传过来的已经带有启动窗口的ActivityRecord中获取启动窗口,让复用之前的那个已经创建的启动窗口,我们可以看下这个方法:
```java
// 看看屏幕中是否已经有了这个启动窗口对应Activity的AppWindowToken,哟
// 把一个启动窗口的WindowState添加到对应的Activity的AppWindowToken容器中
// 这里参数transferFrom是和要启动ActivityRecord在同一个任务栈中的带启动窗口的ActivityRecord的apptoken
// 从这个方法逻辑可以看出,首先startingData是启动窗口数据,这个非空表示启动窗口的数据有了
// startingSurface表示根据startingData创建的启动窗口surface已经创建好了
// 最后startingWindow是WindowState表示已经添加到父容器中了
boolean transferStartingWindow(IBinder transferFrom) {
// 获取带启动窗口的Activity保存在WMS中的AppWindowToken
final AppWindowToken fromToken = getDisplayContent().getAppWindowToken(transferFrom);
if (fromToken == null) {
return false;
}
// 获取这个预览窗口,startingWindow的值在addWind时候添加的
final WindowState tStartingWindow = fromToken.startingWindow;
// 如果启动窗口非null,同时启动surface非null,表示这个启动窗口数据都存在
if (tStartingWindow != null && fromToken.startingSurface != null) {
// In this case, the starting icon has already been displayed, so start
// letting windows get shown immediately without any more transitions.
// 到这里,说明之前启动窗口数据都准备好了,可以理解显示,所以就不需要转场动画了
mService.mSkipAppTransitionAnimation = true;
if (DEBUG_STARTING_WINDOW) Slog.v(TAG_WM, "Moving existing starting " + tStartingWindow
+ " from " + fromToken + " to " + this);
final long origId = Binder.clearCallingIdentity();
// Transfer the starting window over to the new token.
//把之前启动窗口的数据赋给当前这个Activity
startingData = fromToken.startingData; // 启动数据
startingSurface = fromToken.startingSurface; // 启动surface
startingDisplayed = fromToken.startingDisplayed; // 是否已经显示了
// 由于这个启动窗口被当前这个Activity显示了,所以之前的Activity显示启动窗口置为false
fromToken.startingDisplayed = false;
startingWindow = tStartingWindow; // 启动窗口的WindowState
reportedVisible = fromToken.reportedVisible;
// 把之前Activity的启动窗口相关数据清空
fromToken.startingData = null;
fromToken.startingSurface = null;
fromToken.startingWindow = null;
// 启动窗口已经被转移到其他Activity了
fromToken.startingMoved = true;
// 把这个启动窗口属于的WindowToken和AppWindowToken设置为本Activity
tStartingWindow.mToken = this;
tStartingWindow.mAppToken = this;
if (DEBUG_ADD_REMOVE || DEBUG_STARTING_WINDOW) Slog.v(TAG_WM,
"Removing starting " + tStartingWindow + " from " + fromToken);
// 从之前Activity中移除这个启动窗口
fromToken.removeChild(tStartingWindow);
// 把启动窗口相关数据从之前的Activity中移除
fromToken.postWindowRemoveStartingWindowCleanup(tStartingWindow);
// 重置这个字段
fromToken.mHiddenSetFromTransferredStartingWindow = false;
// 添加启动窗口WIndowState到当前将要启动的AppWIndowTOken中
addWindow(tStartingWindow);
// Propagate other interesting state between the tokens. If the old token is displayed,
// we should immediately force the new one to be displayed. If it is animating, we need
// to move that animation to the new one.
// 根据启动窗口在之前Activity中的状态,同步同步到新的Activity中
if (fromToken.allDrawn) {
allDrawn = true;
deferClearAllDrawn = fromToken.deferClearAllDrawn;
}
// 第一次绘制窗口
if (fromToken.firstWindowDrawn) {
firstWindowDrawn = true;
}
// 如果这个Activity非隐藏状态
if (!fromToken.hidden) {
// 当前Activity也是非隐藏状态
hidden = false;
hiddenRequested = false;
// 这个被置为true,说明这个Activity的启动窗口是从其他地方拿过来的
// 并且当前hidden被置为false了
mHiddenSetFromTransferredStartingWindow = true;
}
// 设置这个Activiy中的所有元素的可见性
setClientHidden(fromToken.mClientHidden);
// 把之前Activity中窗口动画相关的和启动窗口动画相关的设置给当前这个Activity
fromToken.mAppAnimator.transferCurrentAnimation(
mAppAnimator, tStartingWindow.mWinAnimator);
// 更新焦点窗口
mService.updateFocusedWindowLocked(
UPDATE_FOCUS_WILL_PLACE_SURFACES, true /*updateInputWindows*/);
// 设置需要重新layout的标记
getDisplayContent().setLayoutNeeded();
// 对所有surface进行摆放
mService.mWindowPlacerLocked.performSurfacePlacement();
Binder.restoreCallingIdentity(origId);
return true;
} else if (fromToken.startingData != null) {
// 到这里说明这个Activity的启动窗口WindowState为null,或者
// 启动surface为null,但是启动的数据startingData有的,那么
// 可能是还没有完全创建好,那么我们就用之前的启动数据再来创建
// The previous app was getting ready to show a
// starting window, but hasn't yet done so. Steal it!
if (DEBUG_STARTING_WINDOW) Slog.v(TAG_WM,
"Moving pending starting from " + fromToken + " to " + this);
// 把启动数据复制给当前这个Activity
startingData = fromToken.startingData;
// 把之前Activity的启动数据清空
fromToken.startingData = null;
// 标记下已经转移给其他Activity了
fromToken.startingMoved = true;
if (getController() != null) {
// 再次创建
getController().scheduleAddStartingWindow();
}
return true;
}
// 到这里说明之前的启动窗口的startingWindow或startingSurface为null同时startingData为null
// 即启动窗口原始数据startingData肯定为null
// 所以不能用,那么获取下之前启动窗口用的AppWindowAnimator和现在这个Activity的AppWindowAnimator
// 这个是实现窗口动画的类
final AppWindowAnimator tAppAnimator = fromToken.mAppAnimator;
final AppWindowAnimator wAppAnimator = mAppAnimator;
// 如果之前启动窗口的thumbnail,即surfaceController非空,那么会把当前Activity
// 和窗口动画等相关的使用之前启动窗口的,所以下面会替换掉
if (tAppAnimator.thumbnail != null) {
// The old token is animating with a thumbnail, transfer that to the new token.
// 当前这个Activity的surfaceController也非空,那么会使用之前的,所以这里先把当前的surfaceController销毁
if (wAppAnimator.thumbnail != null) {
wAppAnimator.thumbnail.destroy();
}
// 用之前启动窗口的数据替换现在这个Activity的
wAppAnimator.thumbnail = tAppAnimator.thumbnail;
wAppAnimator.thumbnailLayer = tAppAnimator.thumbnailLayer;
wAppAnimator.thumbnailAnimation = tAppAnimator.thumbnailAnimation;
// 之前Activity的surfacecontroller置空
tAppAnimator.thumbnail = null;
}
//返回false,表示使用之前启动窗口没有成功
return false;
}
```
这个方法相对比较长,不过上面的注释也算是比较详细了,这里说下这个方法大概的含义。前面的方法分析中,我们看到要创建启动窗口,首先是要有StartingData这个类,具体的启动窗口就是根据这个类中的数据创建的,比如前面我们看到如果要窗口一个快照的启动窗口,首先要创建SnapshotStartingData这个类,这个类中保存了快照的图元封装类TaskSnapshot,后面我们还会看到SplashScreenStartingData这个类,这个类是根据我们app给出的主题样式来创建启动窗口了,我们后面会看到。有个了这个类后,通过前面的分析我们看到会创建一个Surface,这个surface会保存在启动Activity对应的AppWindowToken中,这个之前我们也分析过了,这里不在赘述。最后还有一步就是会创建启动窗口的WindowState类,这个类是描述一个窗口被添加到父容器后更加详细的一些信息,比如他的权限情况,在屏幕Z轴上的顺序,输入事件的处理对象等等,窗口被成功attach后,主要就是这个类来处理之后的窗口状态的,这个类现在还没登场,后面登场的时候我们会看到他具体做了哪些事情。
前面我们说过如果在同一个任务栈里面,启动窗口是可以复用的,前面我们也看到了会在当前任务栈里面寻找是否有可以复用的启动窗口。如果找到后,会把复用的启动窗口从之前的Activity中转移到当前这个Activity中,从上面这个方法中,我们看到转移的数据主要就是startingData,startingSurface和startingWindow这三个,启动窗口相关的主要就是这三个类来描述的,上面我们也大概说过了。所以这个方法做了些检查后,就会从原Activity中移除启动窗口,然后赋值给当前这个Activity,当然如果surface之前还没创建的话,会根据startingData来创建。如果上面复用的启动窗口都不可用的话,最后会看看之前有没有缩略图,有的话,会把缩略图转移到新Activity中,不过这个不影响后面继续创建启动窗口,下面还是要创建一个正常的启动窗口的,我们下面继续看。这个方法基本都是转移复用的启动窗口,具体注释上面都已经写了,可以参考下上面的注释。
# 添加闪屏类型的启动窗口
我们再回到前面addStartingWindow方法,如果上面没有可以的复用启动窗,那么就会创建一个SplashScreenStartingData类,然后根据这个类来创建surface。SplashScreenStartingData这个类我们上面已经提到过了,我们看下他的构造方法:
```java
SplashScreenStartingData(WindowManagerService service, String pkg, int theme,
CompatibilityInfo compatInfo, CharSequence nonLocalizedLabel, int labelRes, int icon,
int logo, int windowFlags, Configuration mergedOverrideConfiguration) {
super(service);
mPkg = pkg;
mTheme = theme;
mCompatInfo = compatInfo;
mNonLocalizedLabel = nonLocalizedLabel;
mLabelRes = labelRes;
mIcon = icon;
mLogo = logo;
mWindowFlags = windowFlags;
mMergedOverrideConfiguration = mergedOverrideConfiguration;
}
```
这个类我们可以看到主要的参数是App进程的一些数据,比如包名,主题,icon等,因为前面快照是截取任务栈最后一帧图片来作为启动窗,而这里是根据进程的主题样式来设置,所以SplashScreenStartingData保存的不是图元信息,而是进程的信息,后面会根据这个进程信息来创建surface,我们接着看下面的流程就知道。
回到addStartingWindow方法,创建好了SplashScreenStartingData类后,最后再次会调用scheduleAddStartingWindow方法来创建启动窗口的surface。这个方法我们之前分析快照类型的启动窗口时候已经分析过了,由于这里是会通过进程信息来创建surface,我们在来看看这个方法,这个方法的流程前面都分析过了,最后会执行mAddStartingWindow这个Runnable,我们直接看这个Runnable的关键部分:
```java
private final Runnable mAddStartingWindow = () -> {
final StartingData startingData; // 创建启动窗口的封装类
final AppWindowToken container;
............
surface = startingData.createStartingSurface(container);
............
}
```
这里会调用StartingData的createStartingSurface方法,这里我们知道StartingData的实现类是SplashScreenStartingData,所以我们看这个里面的createStartingSurface方法:
```java
StartingSurface createStartingSurface(AppWindowToken atoken) {
// 添加一个启动窗口,调用PhoneWindowManager的addSplashScreen方法
return mService.mPolicy.addSplashScreen(atoken.token, mPkg, mTheme, mCompatInfo,
mNonLocalizedLabel, mLabelRes, mIcon, mLogo, mWindowFlags,
mMergedOverrideConfiguration, atoken.getDisplayContent().getDisplayId());
}
```
这里会继续调用PhoneWindowManager的addSplashScreen方法:
```java
public StartingSurface addSplashScreen(IBinder appToken, String packageName, int theme,
CompatibilityInfo compatInfo, CharSequence nonLocalizedLabel, int labelRes, int icon,
int logo, int windowFlags, Configuration overrideConfig, int displayId) {
if (!SHOW_SPLASH_SCREENS) {
return null;
}
// 包名不能为空
if (packageName == null) {
return null;
}
WindowManager wm = null;
View view = null;
try {
Context context = mContext;
if (DEBUG_SPLASH_SCREEN) Slog.d(TAG, "addSplashScreen " + packageName
+ ": nonLocalizedLabel=" + nonLocalizedLabel + " theme="
+ Integer.toHexString(theme));
// 获取和这个屏幕有关的context
// Obtain proper context to launch on the right display.
final Context displayContext = getDisplayContext(context, displayId);
if (displayContext == null) {
// Can't show splash screen on requested display, so skip showing at all.
return null;
}
context = displayContext;
// 创建这个进程的context
if (theme != context.getThemeResId() || labelRes != 0) {
try {
context = context.createPackageContext(packageName, CONTEXT_RESTRICTED);
context.setTheme(theme);
} catch (PackageManager.NameNotFoundException e) {
// Ignore
}
}
// config非空
if (overrideConfig != null && !overrideConfig.equals(EMPTY)) {
if (DEBUG_SPLASH_SCREEN) Slog.d(TAG, "addSplashScreen: creating context based"
+ " on overrideConfig" + overrideConfig + " for splash screen");
// 创建一个有这个config相关资源的context,但是有些同样的资源,比较ClassLoader等会和其他context共用
final Context overrideContext = context.createConfigurationContext(overrideConfig);
overrideContext.setTheme(theme); // 设置主题
// 获取窗口样式
final TypedArray typedArray = overrideContext.obtainStyledAttributes(
com.android.internal.R.styleable.Window);
// 获取窗口背景的资源id
final int resId = typedArray.getResourceId(R.styleable.Window_windowBackground, 0);
if (resId != 0 && overrideContext.getDrawable(resId) != null) {
// We want to use the windowBackground for the override context if it is
// available, otherwise we use the default one to make sure a themed starting
// window is displayed for the app.
if (DEBUG_SPLASH_SCREEN) Slog.d(TAG, "addSplashScreen: apply overrideConfig"
+ overrideConfig + " to starting window resId=" + resId);
// 用这个带资源的context
context = overrideContext;
}
typedArray.recycle();
}
..............
```
这个方法我们分两段来看,前半段这里主要是创建一个Context,这里Context我们也不深入去讲,Context里面包含的东西也不少,后面有机会单独在分析Context相关的内容。这里获取Context是为后面创建启动窗口做准备的,熟悉启动窗口的同学会知道可以设置我们自定义的启动窗口,这个读取样式文件是定义在我们自己开发的app里面的,所以这里前半段代码通过包名创建Context来获取相关的资源,这样启动窗口就可以加载这些资源了。我们重点看后半段怎么创建启动窗口的:
```java
// 创建启动窗口PhoneWindow
final PhoneWindow win = new PhoneWindow(context);
// 设置是否是一个启动窗口
win.setIsStartingWindow(true);
// 获取窗口标题
CharSequence label = context.getResources().getText(labelRes, null);
// Only change the accessibility title if the label is localized
// 设置窗口标题
if (label != null) {
win.setTitle(label, true);
} else {
win.setTitle(nonLocalizedLabel, false);
}
// 设置窗口类型是启动窗口
win.setType(
WindowManager.LayoutParams.TYPE_APPLICATION_STARTING);
synchronized (mWindowManagerFuncs.getWindowManagerLock()) {
// Assumes it's safe to show starting windows of launched apps while
// the keyguard is being hidden. This is okay because starting windows never show
// secret information.
// 如果可以显示在锁屏界面上面,添加下面flag
if (mKeyguardOccluded) {
// 天假可以在锁屏上显示的flag
windowFlags |= FLAG_SHOW_WHEN_LOCKED;
}
}
// Force the window flags: this is a fake window, so it is not really
// touchable or focusable by the user. We also add in the ALT_FOCUSABLE_IM
// flag because we do know that the next window will take input
// focus, so we want to get the IME window up on top of us right away.
// 由于是启动窗口,所以不需要和用户交互。但是设置了FLAG_ALT_FOCUSABLE_IM,表示
// 可以被输入法覆盖和交互,以便后面窗口可以显示出来
win.setFlags(
windowFlags|
WindowManager.LayoutParams.FLAG_NOT_TOUCHABLE|
WindowManager.LayoutParams.FLAG_NOT_FOCUSABLE|
WindowManager.LayoutParams.FLAG_ALT_FOCUSABLE_IM,
windowFlags|
WindowManager.LayoutParams.FLAG_NOT_TOUCHABLE|
WindowManager.LayoutParams.FLAG_NOT_FOCUSABLE|
WindowManager.LayoutParams.FLAG_ALT_FOCUSABLE_IM);
// 设置图标
win.setDefaultIcon(icon);
win.setDefaultLogo(logo);
// 窗口布局大小
win.setLayout(WindowManager.LayoutParams.MATCH_PARENT,
WindowManager.LayoutParams.MATCH_PARENT);
final WindowManager.LayoutParams params = win.getAttributes();
// ActivityRecord的token
params.token = appToken;
// 包名
params.packageName = packageName;
// 窗口动画界面
params.windowAnimations = win.getWindowStyle().getResourceId(
com.android.internal.R.styleable.Window_windowAnimationStyle, 0);
// 硬件加速flag
params.privateFlags |=
WindowManager.LayoutParams.PRIVATE_FLAG_FAKE_HARDWARE_ACCELERATED;
// 增加对所有用户可见的flag
params.privateFlags |= WindowManager.LayoutParams.PRIVATE_FLAG_SHOW_FOR_ALL_USERS;
// 如果支持自动适配屏幕的大小,设置PRIVATE_FLAG_COMPATIBLE_WINDOW,会自动缩放屏幕大小
if (!compatInfo.supportsScreen()) {
params.privateFlags |= WindowManager.LayoutParams.PRIVATE_FLAG_COMPATIBLE_WINDOW;
}
params.setTitle("Splash Screen " + packageName);
// 添加一个背景view到phoneWindow中
addSplashscreenContent(win, context);
// 获取windowManagerImpl
wm = (WindowManager) context.getSystemService(WINDOW_SERVICE);
// 获取phoneWindow的DecorView
view = win.getDecorView();
if (DEBUG_SPLASH_SCREEN) Slog.d(TAG, "Adding splash screen window for "
+ packageName + " / " + appToken + ": " + (view.getParent() != null ? view : null));
// 把decorView加入PhoneWindow
wm.addView(view, params);
// Only return the view if it was successfully added to the
// window manager... which we can tell by it having a parent.
// 如果DecorView添加到phonewindow中了,那么他的parent非空,创建一个SplashScreenSurface,否则返回null
return view.getParent() != null ? new SplashScreenSurface(view, appToken) : null;
...............
```
这里是后半段代码,可以看到首先就创建了一个PhoneWindow,我们在第一篇关于WMS的文章中也介绍过这个类,不是每一个窗口都需要有这个类的,这个类里面持有的View才是真正被用户看到的,而这个类主要是作为一个窗口的整体,作为外部和这个窗口进行操作的中介,比如我们熟悉的setContentView方法就是在这个类里面执行的,具体setContentView的逻辑封装在PhoneWindow中,使得操作调用者不用关心具体view怎么添加到这里窗口中,同时这部分的逻辑也不放在view中,那么"窗口"来承担这部分工作是最合适的。
创建了PhoneWindow后就会设置一些标题,窗口类型,转场动画等,这里我们可以看到设置窗口flag的时候,设置的都是FLAG_NOT_TOUCHABLE这样子的,由于启动窗口是不需要和用户交互的,所以这里都设置为不可交互的。
经过一些列属性的设置后,会调用addSplashscreenContent这个方法,这个方法就是从主题样式里面获取要加载的启动窗口背景了,我们看下这个方法:
```java
// 添加一个启动带背景的View到PhoneWindow中
private void addSplashscreenContent(PhoneWindow win, Context ctx) {
// 获取窗口的style
final TypedArray a = ctx.obtainStyledAttributes(R.styleable.Window);
// 获取启动闪屏的背景
final int resId = a.getResourceId(R.styleable.Window_windowSplashscreenContent, 0);
a.recycle();
if (resId == 0) {
return;
}
final Drawable drawable = ctx.getDrawable(resId);
if (drawable == null) {
return;
}
// We wrap this into a view so the system insets get applied to the drawable.
final View v = new View(ctx);
// 设置启动闪屏的背景
v.setBackground(drawable);
// 把view添加到PhoneWindow中
win.setContentView(v);
}
```
这个方法我们可以看到会样式文件中获取Window_windowSplashscreenContent这个属性的文件,这个就是我们可以自定义启动背景的地方,默认是这样的:
```java
<item name="android:windowSplashscreenContent">@drawable/splashscreen</item>
```
我们可以自定义启动的界面,这里会把背景资源封装成Drawable,然后new一个View后设置为他的背景,最后会调用setContentView方法设置到PhoneWindow的Decorview中。这里的setContentView和我们熟悉的Activity的setContentView方法调用的是同一个方法,最后都是会调用到PhoneWindow中,我们这里不展开讲,主要知道这个背景的View被设置到PhoneWindow中了。
这里顺便提一个,有些同学可能会记得有<item name="android:windowBackground">,这个属性也可以设置背景,的确,在android 8.0之前这个属性如果替换为Drawable也是一样的效果,从8.0开始google考虑为了把启动窗口的背景单独作为开发点,所以添加了上面的windowSplashscreenContent这个属性,这个属性的优先级是高于之前的windowBackground,他会显示在windowBackground上面,所以如果你需要做启动界面背景的话,android 8.0后优先用这个属性。不过android 12可以添加一个Activity作为启动界面,这样各种自定义的动画效果也可以加上了,这个就先提一下,后面有空再专门研究启动界面背景。
我们接着看下面,会从context中获取WindowManager这个类,这个类我们在第一篇WMS的文章中也介绍过,他是继承ViewManager的,他的实现类是WindowManagerImpl,他是主要对前面的PhoneWindow进行添加删除等操作的,他的注册我们下篇文章再说,这里可以看到会从context中获取他的实例。
接着会从PhoneWindow中获取DecorView,我们看一眼这个方法:
```java
public final View getDecorView() {
// 如果DecorView为null或者获取DecorView的时候需要重新创建
if (mDecor == null || mForceDecorInstall) {
// 创建DecorView
installDecor();
}
return mDecor;
}
```
如果了解过WMS的同学应该知道Decorview是窗口最顶层的那个ViewGroup,他是FrameLayout的子类,我们自己定义的View都是会添加到DecorView里面的。从上面方法可以看到,如果DecorView不存在的话会调用installDecor方法创建DecorView,否则就返回存在的DecorView,这个方法最终会返回Decorview。由于这部分逻辑和Activity窗口的创建是相同的,所以我们这里不展开,在下面讲到Activity窗口创建的时候这里会展开讲,我们回到上面方法继续往下看。
最后会调用WindowManager的addView方法,这里其实就是把上面的DecorView添加到WMS中,这里添加的过程同样我们会放在创建Activity窗口的时候讲,逻辑都是一样的。在添加过程中会绘制View从而会在屏幕上显示出来,addView这个方法开始的流程里,包括了对应窗口添加的流程,也包括了对应View绘制的过程,所以这个方法结束后,其实用户就可以看到具体的界面了。我们会在后面主要分析从addView这里方法开始的流程,里面关于View的绘制流程在WMS的系列文章中不会分析,会放到专门的view系列文章中去分析。
好了,启动窗口添加结束后,最后会返回一个SplashScreenSurface。和快照启动窗口类似,快照启动窗口是SnapshotStartingData,里面保存的是图元,而这里SplashScreenSurface是保存的view,我们看下这个类:
```java
class SplashScreenSurface implements StartingSurface {
private static final String TAG = PhoneWindowManager.TAG;
private final View mView;
private final IBinder mAppToken;
SplashScreenSurface(View view, IBinder appToken) {
mView = view;
mAppToken = appToken;
}
@Override
public void remove() {
if (DEBUG_SPLASH_SCREEN) Slog.v(TAG, "Removing splash screen window for " + mAppToken + ": "
+ this + " Callers=" + Debug.getCallers(4));
final WindowManager wm = mView.getContext().getSystemService(WindowManager.class);
wm.removeView(mView);
}
}
```
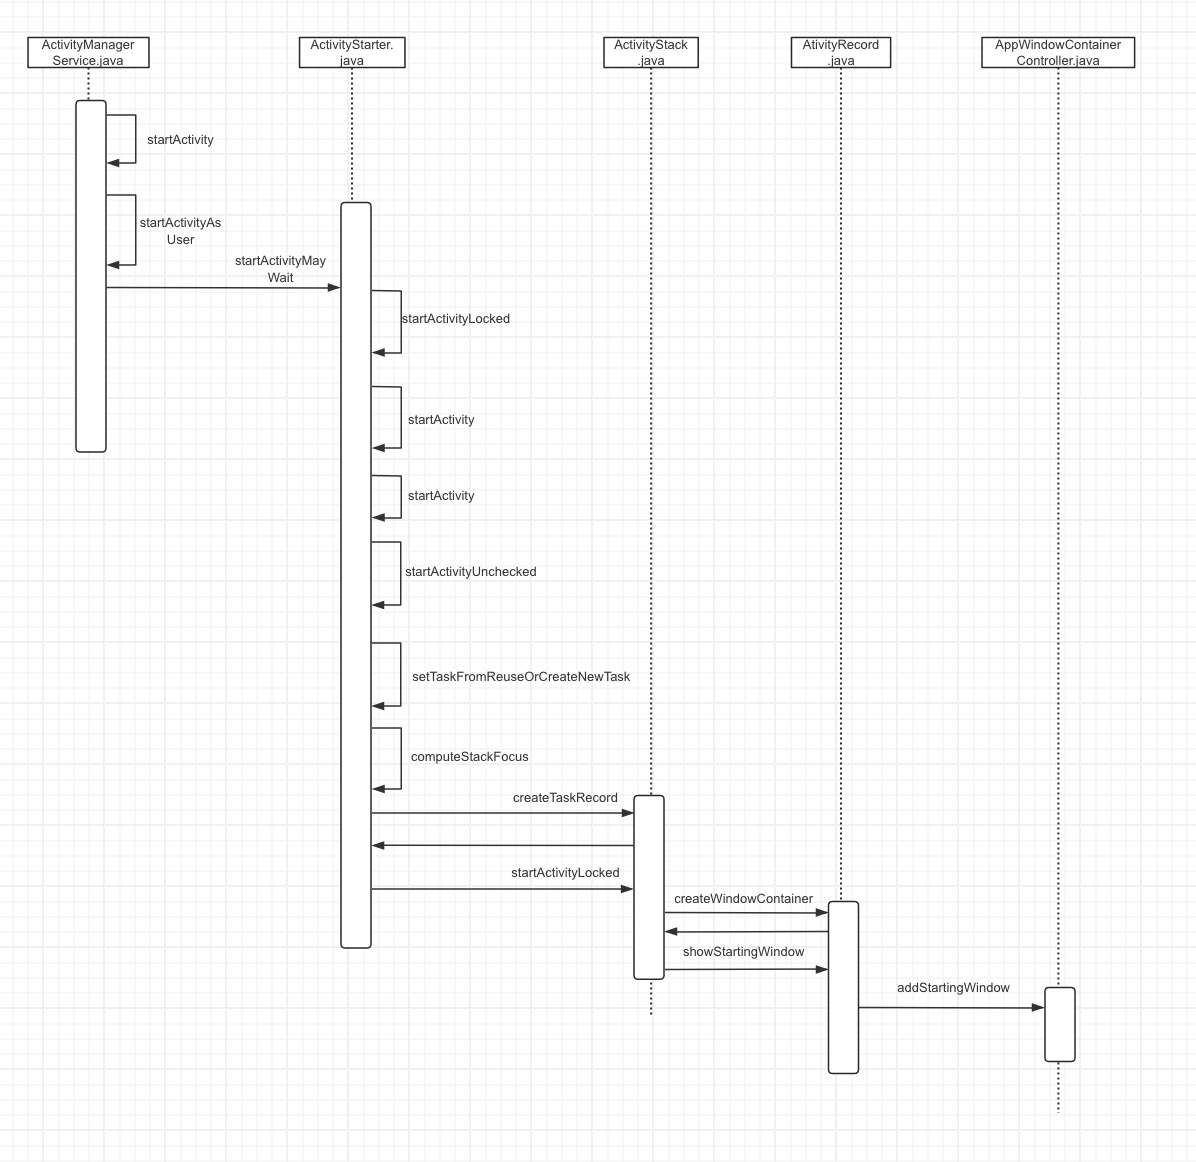
可以看到这个类里面会有一个View,就是将要显示的View。到这里的话,一个启动的窗口其实就会显示出来的了,如果上面有设置启动窗口的背景的话,会显示背景(可能速度非常快一闪而过),如果没设置背景的话,一般默认的背景颜色大多是白色,所以如果这个时候我们的app启动比较耗时的话,就会出现常见的白屏问题。不管怎么说,这个启动窗口其实在我们自己的进程起来前已经显示了,所以接着会回到AMS中,继续Activity的启动流程,关于Activity的启动流程这里也不赘述了,之前AMS系列文章也讲到过,我们接下去就会从Activity的启动开始,看看Activity的窗口是怎么添加的。这篇文章就说到这里,我们主要分析了从AMS启动一个Activity开始到一个启动界面的显示完成,知道了一个启动窗口是怎么添加的了,最后我们把到目前为止的流程给画一下,作为这篇文章的小结。

WMS(二)之Acivity启动流程一