
在WMS系列的第二篇文章中,我们分析到了AMS在启动一个Activity前,如果是一个新的任务栈会有一个启动窗口显示在真正的Activity完成启动前,在启动窗口的流程处理完后,经过一些的AMS流程,最终会走到客户端ActivityThread的handleLaunchActivity方法,这之间的具体流程就不在叙述了,可以去看下关于之前AMS的几篇文章,由于之前关于Activity的启动流程我们也都分析过,但是那时候是偏向AMS的流程,所以WMS相关部分并没有做过多分析,现在我们重点会分析关于WMS方面的流程,所以可能会跳过很多之前已经分析过的代码,如果不太熟悉AMS的同学还是先看下关于AMS的部分,在理解AMS的基础上再来看WMS就要好理解一些。
# 进程中初始化service的过程
在分析客户端这边的流程前,我们先来看一个类,通过这个类,我们可以看到一个进程中获取系统的一些service是怎么处理的,比如这里WindowManager是怎么初始化的,这个类主要是添加移除窗口中的View等操作,之前的文章中我们也接触到了,虽然这个类不算是系统service,但是他们初始化流程是一个的,我们看看他们是怎么创建的。
```java
final class SystemServiceRegistry {
...........
static {
...........
registerService(Context.WINDOW_SERVICE, WindowManager.class,
new CachedServiceFetcher<WindowManager>() {
@Override
public WindowManager createService(ContextImpl ctx) {
return new WindowManagerImpl(ctx);// 实现类
}});
...........
}
.............
}
```
可以看到这里有个SystemServiceRegistry类,这个类有个静态初始化方法,在这个类加载的时候就会执行里面的方法,我们看到里面会执行registerService,这里有三个参数,第一个是个String,第二个是个class,第三个是个ServiceFetcher对象。这里从名字可以看出这些参数和WindowManager有关,我们看下registerService这个方法:
```java
private static final HashMap<Class<?>, String> SYSTEM_SERVICE_NAMES =
new HashMap<Class<?>, String>();
private static final HashMap<String, ServiceFetcher<?>> SYSTEM_SERVICE_FETCHERS =
new HashMap<String, ServiceFetcher<?>>();
private static <T> void registerService(String serviceName, Class<T> serviceClass,
ServiceFetcher<T> serviceFetcher) {
// 以class为key,service相关类的名字为value
SYSTEM_SERVICE_NAMES.put(serviceClass, serviceName);
// 以service相关类名字为key,实现类为value
SYSTEM_SERVICE_FETCHERS.put(serviceName, serviceFetcher);
}
```
这个方法就两行代码,分别是保存两个HashMap,第一个SYSTEM_SERVICE_NAMES是key是class,value是这个class对应的名字。第二个SYSTEM_SERVICE_FETCHERSkey是这个class的名字,value是ServiceFetcher。ServiceFetcher是什么呢,我们看下这个类:
```java
static abstract interface ServiceFetcher<T> {
T getService(ContextImpl ctx);
}
```
他是一个抽象类,返回的是泛型的类型。我们回到前面SystemServiceRegistry静态的初始化方法可以看到在传入这个参数的时候,是new了一个CachedServiceFetcher类,我们看下这个类:
```java
static abstract class CachedServiceFetcher<T> implements ServiceFetcher<T> {
private final int mCacheIndex;
public CachedServiceFetcher() {
mCacheIndex = sServiceCacheSize++;
}
@Override
@SuppressWarnings("unchecked")
public final T getService(ContextImpl ctx) {
final Object[] cache = ctx.mServiceCache;
synchronized (cache) {
// Fetch or create the service.
Object service = cache[mCacheIndex];
if (service == null) {
try {
service = createService(ctx);
cache[mCacheIndex] = service;
} catch (ServiceNotFoundException e) {
onServiceNotFound(e);
}
}
return (T)service;
}
}
public abstract T createService(ContextImpl ctx) throws ServiceNotFoundException;
}
```
可以看到,这个类继承了ServiceFetcher,也是一个抽象类,他实现了ServiceFetcher的getService方法,从这个方法的实现,可以看出这里设计的很巧妙。我们看到getService方法会从ContextImpl中获取一个数组,然后这个类的泛型实例如果在这个数组中,就返回,不在的话会调用createService方法创建后保存在数组中在返回。
之所以说这里设计巧妙是因为,我们看到这个类在初始化的时候会把当前静态变量sServiceCacheSize加一保存下来,由于是静态变量所以一旦确定了这个数组,那么这个类的实例在数组中的下标也就确定了,这样就把数组下标和这个类初始化联系起来,实现起来非常方便也不用单独维护这个数字,这是巧妙的地方之一。
第二点我们知道数组一旦确定了大小,要改变的话虽然不是不可以,但是要扩容的话相对就比较麻烦,所以一般最好是开始就确定好大小。而这里数组的大小是根据这里初始化CachedServiceFetcher个数来的,由于android系统一直在升级,所以这里的CachedServiceFetcher数量其实是不定了,要确定数量不是很容易。但是我们根据前面的代码可以知道,这里new一个CachedServiceFetcher是在SystemServiceRegistry静态初始化块里面的,而数组是保存在ContextImpl中的所以我们到ContextImpl中看下这个数组是怎么初始化的:
```java
final Object[] mServiceCache = SystemServiceRegistry.createServiceCache();
public static Object[] createServiceCache() {
return new Object[sServiceCacheSize];
}
```
这里看到这里创建数组的方法放在SystemServiceRegistry这个类中的,也就是说只有等SystemServiceRegistry都初始化完毕了才会创建数组,而SystemServiceRegistry初始化后,所有CachedServiceFetcher就都new好了,自然数组数量也就确定了,而且今后如果要添加CachedServiceFetcher类也不用担心。而调用getService肯定是在Context创建后才会调用的,此时才会正在创建具体的CachedServiceFetcher中的泛型类,这样也起到了延迟加载的作用,所以这里是第二个巧妙的地方。
第三点这里用到了抽象工厂的设计模式,我们看到这里createService是个抽象方法,而getService返回的对象是通过createService方法创建的,而createService方法的实现是在registerService时候new CachedServiceFetcher时候实现的,所以这里通过抽象工厂实现来不同的本地服务的获取。本篇文章的开头是创建了一个WindowManager的实现类WindowManagerImpl,这是一个本地类,还可以获取一个Binder,比如我们看注册PowerManager的时候:
```java
registerService(Context.POWER_SERVICE, PowerManager.class,
new CachedServiceFetcher<PowerManager>() {
@Override
public PowerManager createService(ContextImpl ctx) throws ServiceNotFoundException {
IBinder b = ServiceManager.getServiceOrThrow(Context.POWER_SERVICE);
IPowerManager service = IPowerManager.Stub.asInterface(b);
return new PowerManager(ctx.getOuterContext(),
service, ctx.mMainThread.getHandler());
}});
```
可以看到PowerManager就是获取一个PowerManager对象,他封装了PowerManager的Binder代理,所以说这里创建对象也很灵活,不论是本地的,还是Binder对象都可以创建。
# 初始化Activity
好了,我们在正式分析创建Activity的窗口前,看了一些进程是怎么初始化系统service的,一方面后面看到这部分代码的时候就比较清楚了,另一个方面这个也是一种很好的设计模式,我们可以在自己的项目中借鉴一下。下面我们开始进入启动Activity的部分,先从ActivityThread的handleLaunchActivity方法开始,这个是启动一个进程后,开始创建Activity的第一个方法,具体从ASM怎么走到这里的这里就不说了,可以参考AMS流程部分,但是后面代码还是主要贴出和WMS相关的部分,:
```java
private void handleLaunchActivity(ActivityClientRecord r, Intent customIntent, String reason) {
.........
WindowManagerGlobal.initialize();
Activity a = performLaunchActivity(r, customIntent);
..........
if (a != null) {
........
// 调用onResume
handleResumeActivity(r.token, false, r.isForward,
!r.activity.mFinished && !r.startsNotResumed, r.lastProcessedSeq, reason);
...........
}
..........
}
```
这个方法我们主要看里面几个和WMS相关的方法。首先是初始化一个WindowManagerGlobal,这个类其实是一个代理类,他本身没做什么事情,主要是封装了WindowManagerService和Session,调用他们来做事情,Session这个类我们在后面会遇到,其实后面我们会看到客户端这里并不是直接调用WMS的,是通过Session这个类来与WMS进行通信,由于和窗口有关的不仅仅只有WMS,还有其他的模块,所以窗口会统一只和Session进行通信,具体Session和谁通信不用窗口来管,窗口只要发送和接受请求就可以了,这样把所有逻辑都封装在一起就容易管理了,这个我们后面会看到,这里我们看下WindowManagerGlobal初始化做了什么:
```java
public static void initialize() {
getWindowManagerService();
}
public static IWindowManager getWindowManagerService() {
synchronized (WindowManagerGlobal.class) {
if (sWindowManagerService == null) {
sWindowManagerService = IWindowManager.Stub.asInterface(
ServiceManager.getService("window"));
try {
if (sWindowManagerService != null) {
ValueAnimator.setDurationScale(
sWindowManagerService.getCurrentAnimatorScale());
}
} catch (RemoteException e) {
throw e.rethrowFromSystemServer();
}
}
return sWindowManagerService;
}
}
```
这里方法很简单就是获取WMS后保存在sWindowManagerService中,这个的WMS在后面会提供给Session使用,我们后面再说,回到前面handleLaunchActivity方法,接着会调用performLaunchActivity方法。
```java
private Activity performLaunchActivity(ActivityClientRecord r, Intent customIntent) {
..............
activity = mInstrumentation.newActivity(
cl, component.getClassName(), r.intent);
................
activity.attach(appContext, this, getInstrumentation(), r.token,
r.ident, app, r.intent, r.activityInfo, title, r.parent,
r.embeddedID, r.lastNonConfigurationInstances, config,
r.referrer, r.voiceInteractor, window, r.configCallback);
..................
if (r.isPersistable()) {
mInstrumentation.callActivityOnCreate(activity, r.state, r.persistentState);
} else {
// 调用Activity的onCreate方法,这里里面就会调用onCreate,从而DecorView会创建
mInstrumentation.callActivityOnCreate(activity, r.state);
}
......................
}
```
在这个方法里面我们看到了会创建衣蛾Activity,创建的方法我们不跟进看了,之前分析Activity的时候也已经分析过了,我们主要在看下Activity的attach方法:
```java
final void attach(Context context, ActivityThread aThread,
Instrumentation instr, IBinder token, int ident,
Application application, Intent intent, ActivityInfo info,
CharSequence title, Activity parent, String id,
NonConfigurationInstances lastNonConfigurationInstances,
Configuration config, String referrer, IVoiceInteractor voiceInteractor,
Window window, ActivityConfigCallback activityConfigCallback) {
............
// window的初始化
// 这里第一个参数就是本Activity,这个最终会传给超类Context,后面context.getSystemService调用的是本Activity的getSystemService覆写
方法
// 参数二Window正常新启动一个Activity是null,在比如resize场景下销毁时候会保存Window,然后重建的时候调用到attach这里就会有了,入口在
ActivityThread的performLaunchActivity方法中
// 参数三 配置变化时的回调函数
mWindow = new PhoneWindow(this, window, activityConfigCallback);
mWindow.setWindowControllerCallback(this);
mWindow.setCallback(this);
mWindow.setOnWindowDismissedCallback(this);
mWindow.getLayoutInflater().setPrivateFactory(this);
// 设置软键盘模式,如果不是未指定的,就设置键盘模式
if (info.softInputMode != WindowManager.LayoutParams.SOFT_INPUT_STATE_UNSPECIFIED) {
mWindow.setSoftInputMode(info.softInputMode);
}
if (info.uiOptions != 0) {
mWindow.setUiOptions(info.uiOptions);
}
.............
// 把WindowManager设置给这个PhoneWIndow,当然还有appName和mToken(代表一个AMS中的ActivityRecord)
mWindow.setWindowManager(
(WindowManager)context.getSystemService(Context.WINDOW_SERVICE),
mToken, mComponent.flattenToString(),
(info.flags & ActivityInfo.FLAG_HARDWARE_ACCELERATED) != 0);
// LocalActivityManager是一个可以把一个Activity转化为view加入到另一个Activity中的这么一个类
// 所以如果这个Activity是被转化为decorView加入到另一个父Activity中的话,这里的mParent就是那个父Activity
if (mParent != null) {
mWindow.setContainer(mParent.getWindow());
}
// 把phoneWindow中创建的WindowManagerImpl保存到Activity中
mWindowManager = mWindow.getWindowManager();
....................
}
```
这里主要截取了和WMS相关的部分,可以看到这里也new了一个PhoneWindow,然后设置一些回调函数,以及根据minifest中的配置设置键盘和actionbar的显示样式。之后我们看到会调用PhoneManager的setWindowManager方法,这个方法就是获取文章开头我们提到的获取WindowManagerImpl,我们马上来看这个方法,先继续往后看。
接着会判断这个Activity的mParent是否存在,什么Activity会存在父Activity呢?可能一般我们开发中用的不太多,android有个类LocalActivityManager,他可以把一个Activity转化为View加载到另一个Activity里面,这样被加载到的Activity就是他的父Activity。在这种情况下会把父Activity的Window保存在这个Actvity中,这个我们了解一下就好,知道有这个场景就可以。
最后把前面创建的WindowManagerImpl保存在这个Activity中。好了,我们在回去看下上面的setWindowManager方法:
```java
public void setWindowManager(WindowManager wm, IBinder appToken, String appName,
boolean hardwareAccelerated) {
mAppToken = appToken;
mAppName = appName;
mHardwareAccelerated = hardwareAccelerated
|| SystemProperties.getBoolean(PROPERTY_HARDWARE_UI, false);
if (wm == null) {
// 这里mContext如果是Activity的话,会调用Activity的getSystemServi方法中获得的,第一次可能是null
// 但是会调用super的这个方法,即从contextImpl中获取
wm = (WindowManager)mContext.getSystemService(Context.WINDOW_SERVICE);
}
// 在创建一个属于Activity的WindowManagerImpl,保存在phoneWindow的mWindowManager中
mWindowManager = ((WindowManagerImpl)wm).createLocalWindowManager(this);
}
```
这里可以看到,会保存ActivityRecord的token和包名,之后会调用getSystemService方法获取WindowManager,然后再用这个WindowManager创建一个本地的WindowManager,这个本地的WindowManager是带有PhoneWindow参数的,所以他只属于这个Actvity,和全局的WindowManager不一样,这点要注意,我们可以看下createLocalWindowManager方法:
```java
public WindowManagerImpl createLocalWindowManager(Window parentWindow) {
return new WindowManagerImpl(mContext, parentWindow);
}
private WindowManagerImpl(Context context, Window parentWindow) {
mContext = context;
mParentWindow = parentWindow;
}
```
这个方法也很简单,除了保存Context外还保存了这个PhoneWindow。好了,Activity的attach方法看完了,我们回到前面performLaunchActivity方法中,接着就会调用到我们都很熟悉的onCreate方法了。这里会调用到Instrumentation的callActivityOnCreate方法:
```java
public void callActivityOnCreate(Activity activity, Bundle icicle) {
prePerformCreate(activity);
activity.performCreate(icicle);// 调用客户端Activity的OnCreate方法
postPerformCreate(activity);
}
final void performCreate(Bundle icicle) {
restoreHasCurrentPermissionRequest(icicle);
onCreate(icicle);
mActivityTransitionState.readState(icicle);
performCreateCommon();
```
这里最后就会调用到Activity的onCreate方法,在onCreate方法中,最重要的就是setContentView了,这个就是加载布局文件的,我们看下这里View是怎么加载的。
# Activity的setContentView
```java
public void setContentView(@LayoutRes int layoutResID) {
getWindow().setContentView(layoutResID); // 调用PhoneWindow的setContentView
initWindowDecorActionBar(); // 初始化bar
}
```
这里看到首先会调用PhoneWindow的setContentView方法来加载布局文件,之后会初始化Actionbar。我们先看下PhoneWindow中的setContentView方法:
```java
public void setContentView(int layoutResID) {
// 顶层加载容器是空
if (mContentParent == null) {
installDecor(); // 创建DecorView,以及顶层的加载容器
} else if (!hasFeature(FEATURE_CONTENT_TRANSITIONS)) {
// 如果不要转场动画,先把mContentParent中的view都移除
mContentParent.removeAllViews();
}
// 如果有转场动画
if (hasFeature(FEATURE_CONTENT_TRANSITIONS)) {
// 创建这个layoutResID对应的场景
final Scene newScene = Scene.getSceneForLayout(mContentParent, layoutResID,
getContext());
// 把当前phoneWindow的根布局的场景设置为newScene
transitionTo(newScene);
} else {
// 如果没有转场动画,加载layoutResID这个布局到decorView的groupView中
mLayoutInflater.inflate(layoutResID, mContentParent);
}
mContentParent.requestApplyInsets();
// 输入事件的回调
final Callback cb = getCallback();
// 非空的话,并且加载的view已经变化了,所以这里
// 调用onContentChanged方法通知下,比如在Activity
// 中就有这个回调的实现,但是是空实现
if (cb != null && !isDestroyed()) {
cb.onContentChanged();
}
// mContentParent已经加载了view
mContentParentExplicitlySet = true;
}
```
setContentView我们应该是非常熟悉的,但是具体他做了些什么,我们这就来看看。这里首先判断mContentParent是否为null,这个变量是Decorview里面的一个根ViewGroup,我们自己定义的布局view不是直接加载的DecorView下面的,Decorview下面还有一层ViewGroup,我们自己的view是加载在这层ViewGroup下面的,就是这里的mContentParent,这个赋值的地方在installDecor方法里面,如果mContentParent为null,说明还没有Decorview,installDecor方法就是创建Decorview的,我们稍等回头来看。
如果mContentParent非null,说明已经加载过DecorView了,但是当前加载的view不一定是我们现在请求的这个,所以这里有个flag标志FEATURE_CONTENT_TRANSITIONS,他表示的是从一个窗口中切换view是否需要转换的动画,这里窗口可以理解为一个Activity,如果不需要转换动画的话,就情况当前
mContentParent中的内容,下面会重新加载。否则的话会创建Scene来进行view的切换,这里之所以用Scene主要是这里允许在Actvity内部的布局切换也允许使用动画,Scene中保存了具体加载view的信息,这里方便动画的处理,下面我们也会看下Scene这个类。
如果不需要动画切花布局,那么就直接调用LayoutInflater的inflate把布局文件加载mContentParent中,这个加载也是我们经常用的加载方法,这里就不多说了。最后设置了些布局加载变化的回调函数等,这个方法就完成了。
这里我们先看下installDecor这个方法,看看是怎么初始化DecorView的:
# 初始化DecorView
```java
private void installDecor() {
mForceDecorInstall = false;
if (mDecor == null) { // 如果还没有DecorView
mDecor = generateDecor(-1);// 创建一个DecorView
mDecor.setDescendantFocusability(ViewGroup.FOCUS_AFTER_DESCENDANTS);
mDecor.setIsRootNamespace(true);
if (!mInvalidatePanelMenuPosted && mInvalidatePanelMenuFeatures != 0) {
mDecor.postOnAnimation(mInvalidatePanelMenuRunnable);
}
} else {
mDecor.setWindow(this); // 把这个phoneWindow设置给DecorView
}
// 如果DecorView中的ViewGroup是null
if (mContentParent == null) {
// 根据主题不同,加载一个子viewGroup到DecorView中
// 返回其中的ID_ANDROID_CONTENT这个ViewGroup,作为后面添加布局的容器
// 也就是R.id.content
mContentParent = generateLayout(mDecor);
// Set up decor part of UI to ignore fitsSystemWindows if appropriate.
mDecor.makeOptionalFitsSystemWindows();
...................
}
}
```
这个方法比较长,我们分三部分来看,但是最重要的就是这里第一部分,我们先看下。首先看到在PhoneWindow里面mDecor变量是否为null,如果为null的话,会继续调用generateDecor方法来创建DecorView,否则就会把当前这个PhoneWindow设置给mDecor。然后看到前面方法出现的mContentParent,这个是DecorView中的一个元素,如果为null,会调用generateLayout方法从DecorView中获取。第一部分又涉及到了2个方法,generateDecor创建DecorView以及generateLayout获取mContentParent,我们看完installDecor方法后面的部分在回来看这2个方法。
```java
..........
// 获取DecorView中的ActionBarOverlayLayout
final DecorContentParent decorContentParent = (DecorContentParent) mDecor.findViewById(
R.id.decor_content_parent);
if (decorContentParent != null) { // 如果ActionBarOverlayLayout非空的话
// 把ActionBarOverlayLayout设置给mDecorContentParent
mDecorContentParent = decorContentParent;
mDecorContentParent.setWindowCallback(getCallback());
if (mDecorContentParent.getTitle() == null) {
mDecorContentParent.setWindowTitle(mTitle);
}
// 获取Activity窗口的样式
final int localFeatures = getLocalFeatures();
for (int i = 0; i < FEATURE_MAX; i++) {
// 遍历设置的窗口样式
if ((localFeatures & (1 << i)) != 0) {
// 调用ActionBarOverlayLayout中的initFeature方法
// 初始化Actionbar的加载布局
mDecorContentParent.initFeature(i);
}
}
// Actionbar按钮显示样式
mDecorContentParent.setUiOptions(mUiOptions);
// icon和logo方面的设置
if ((mResourcesSetFlags & FLAG_RESOURCE_SET_ICON) != 0 ||
(mIconRes != 0 && !mDecorContentParent.hasIcon())) {
mDecorContentParent.setIcon(mIconRes);
} else if ((mResourcesSetFlags & FLAG_RESOURCE_SET_ICON) == 0 &&
mIconRes == 0 && !mDecorContentParent.hasIcon()) {
mDecorContentParent.setIcon(
getContext().getPackageManager().getDefaultActivityIcon());
mResourcesSetFlags |= FLAG_RESOURCE_SET_ICON_FALLBACK;
}
if ((mResourcesSetFlags & FLAG_RESOURCE_SET_LOGO) != 0 ||
(mLogoRes != 0 && !mDecorContentParent.hasLogo())) {
mDecorContentParent.setLogo(mLogoRes);
}
// Invalidate if the panel menu hasn't been created before this.
// Panel menu invalidation is deferred avoiding application onCreateOptionsMenu
// being called in the middle of onCreate or similar.
// A pending invalidation will typically be resolved before the posted message
// would run normally in order to satisfy instance state restoration.
PanelFeatureState st = getPanelState(FEATURE_OPTIONS_PANEL, false);
if (!isDestroyed() && (st == null || st.menu == null) && !mIsStartingWindow) {
invalidatePanelMenu(FEATURE_ACTION_BAR);
}
} else {
// 看看DecorView中有没有显示title的布局,这个布局在screen_title里面
mTitleView = findViewById(R.id.title);
// 如果有显示titile的布局
if (mTitleView != null) {
// 但是窗口style中要求的是没有titile的样式
if ((getLocalFeatures() & (1 << FEATURE_NO_TITLE)) != 0) {
// 获取titile_container布局,这个在screen_custom_title.xml里面
final View titleContainer = findViewById(R.id.title_container);
// 如果非null,不显示
if (titleContainer != null) {
titleContainer.setVisibility(View.GONE);
} else {
mTitleView.setVisibility(View.GONE);
}
mContentParent.setForeground(null);
} else {
// 非不显示titile的布局,设置titile
mTitleView.setText(mTitle);
}
}
}
// 如果没有背景,但是有mBackgroundFallbackResource这个资源的时候,会设置这个资源作为背景
if (mDecor.getBackground() == null && mBackgroundFallbackResource != 0) {
mDecor.setBackgroundFallback(mBackgroundFVallbackResource);
}
.............
```
第二部分方法看似有点长,其实主要是初始化ActionBar部分。可以看到这里开始从DecorView中获取DecorContentParent,这个是一个接口,他的实现类是ActionBarOverlayLayout,这里会设置下他的title,加载布局样式,设置按钮等等。如果没有ActionBar,则根据当前窗口样式,设置titile。最后还会根据是否有背景来设置DecorView的背景。这部分做的事情不难理解,不用多说,我们主要看一眼初始化ActionBar样式的方法:
```java
public void initFeature(int windowFeature) {
pullChildren();
switch (windowFeature) {
case Window.FEATURE_PROGRESS:
// 标题栏带进度条,比如像webview加载网页的时候
// ActionBarView中的initProgress初始化view
mDecorToolbar.initProgress();
break;
case Window.FEATURE_INDETERMINATE_PROGRESS:
// 自定义标题栏进度条样式
mDecorToolbar.initIndeterminateProgress();
break;
case Window.FEATURE_ACTION_BAR_OVERLAY:
// ActionBar覆盖住下面的内容的样式
setOverlayMode(true);
break;
}
}
```
这个是初始化ActionBar的方法,我们大概看一眼就行,可以看到这里不同窗口ActionBar样式也不一样,比如WebView加载网页是带进度条的,所以如果是Webview的ActionBar会带有进度条,或者是OverLay模式,ActionBar会覆盖在下面内容的上面。我们了解一下就好,有兴趣的同学可以专门再去研究。我们回到上面installDecor方法,在看下剩余的方法:
```java
................
// 如果这个phoneWindow有转场动画
if (hasFeature(FEATURE_ACTIVITY_TRANSITIONS)) {
// 如果还没有转场动画的执行类
if (mTransitionManager == null) {
// 首先获取下转场动画资源
final int transitionRes = getWindowStyle().getResourceId(
R.styleable.Window_windowContentTransitionManager,
0);
if (transitionRes != 0) {
// 获取下这个类,这个类是负责转场动画加载类
final TransitionInflater inflater = TransitionInflater.from(getContext());
// 获取带转场资源的动画处理类
mTransitionManager = inflater.inflateTransitionManager(transitionRes,
mContentParent);
} else {
// 没有自定义就new一个默认的转场动画执行类
mTransitionManager = new TransitionManager();
}
}
// 下面是各种转场动画的一些定义数据,比如进入退出动画等等
mEnterTransition = getTransition(mEnterTransition, null,
R.styleable.Window_windowEnterTransition);
mReturnTransition = getTransition(mReturnTransition, USE_DEFAULT_TRANSITION,
R.styleable.Window_windowReturnTransition);
mExitTransition = getTransition(mExitTransition, null,
R.styleable.Window_windowExitTransition);
mReenterTransition = getTransition(mReenterTransition, USE_DEFAULT_TRANSITION,
R.styleable.Window_windowReenterTransition);
mSharedElementEnterTransition = getTransition(mSharedElementEnterTransition, null,
R.styleable.Window_windowSharedElementEnterTransition);
mSharedElementReturnTransition = getTransition(mSharedElementReturnTransition,
USE_DEFAULT_TRANSITION,
R.styleable.Window_windowSharedElementReturnTransition);
mSharedElementExitTransition = getTransition(mSharedElementExitTransition, null,
R.styleable.Window_windowSharedElementExitTransition);
mSharedElementReenterTransition = getTransition(mSharedElementReenterTransition,
USE_DEFAULT_TRANSITION,
R.styleable.Window_windowSharedElementReenterTransition);
if (mAllowEnterTransitionOverlap == null) {
mAllowEnterTransitionOverlap = getWindowStyle().getBoolean(
R.styleable.Window_windowAllowEnterTransitionOverlap, true);
}
if (mAllowReturnTransitionOverlap == null) {
mAllowReturnTransitionOverlap = getWindowStyle().getBoolean(
R.styleable.Window_windowAllowReturnTransitionOverlap, true);
}
if (mBackgroundFadeDurationMillis < 0) {
mBackgroundFadeDurationMillis = getWindowStyle().getInteger(
R.styleable.Window_windowTransitionBackgroundFadeDuration,
DEFAULT_BACKGROUND_FADE_DURATION_MS);
}
if (mSharedElementsUseOverlay == null) {
mSharedElementsUseOverlay = getWindowStyle().getBoolean(
R.styleable.Window_windowSharedElementsUseOverlay, true);
}
}
}
}
```
最后一部分就是我们前面说过的,如果切换DecorView中的布局,会有转场动画,这里就是创建转场动画的执行类TransitionManager,这里会看一下有没有定义转场动画的文件,会从windowContentTransitionManager这个属性中获取,会用这个动画创建TransitionManager类,否则就new一个默认的TransitionManager对象,最后会从style中获取各种转场动画保存下来。
最后这段代码主要是获取动画的一些资源,这样整个DecorView就初始化好了,我们上面有2个重点方法没有说,一个是创建DecorView的generateDecor方法,我们跟进看下:
```java
protected DecorView generateDecor(int featureId) {
// System process doesn't have application context and in that case we need to directly use
// the context we have. Otherwise we want the application context, so we don't cling to the
// activity.
Context context;
if (mUseDecorContext) { // 创建PhoneWindow的时候mUseDecorContext会被置为true
// 获取Application
Context applicationContext = getContext().getApplicationContext();
if (applicationContext == null) { // 如果没有获取到Application
context = getContext(); // 那么就获取当前组件的context
} else {
// 如果有Application,那么就创建一个持有Application的DecorContext
// 最好是DecorContext,就可以不依赖具体的Activity了,只要进程存在就可以显示
context = new DecorContext(applicationContext, getContext().getResources());
if (mTheme != -1) {
context.setTheme(mTheme); // 设置主题
}
}
} else {
context = getContext();
}
return new DecorView(context, featureId, this, getAttributes());
}
```
这个方法不长,也不难理解。首先获取Context,然后创建DecorView。这里我们说下关于Context,根据上面代码会首先获取ApplicationContext,如果不存在的话,会从PhoneWindow中获取Context,根据前面我们的分析,如果是一个Activity的PhoneWindow的话,会在Activity的attach方法里面创建PhoneWindow,传给PhoneWindow的是Activity的Context。但是如果ApplicationContext不为null,那么这里会把ApplicationContext封装为DecorContext,也就是说DecorView会优先使用ApplicationContext,这样这个DecorView就可以不依赖Activity存在了,最后就会new一个DecorView,我们接着看DecorView:
```java
public class DecorView extends FrameLayout implements RootViewSurfaceTaker, WindowCallbacks {
..............
DecorView(Context context, int featureId, PhoneWindow window,
WindowManager.LayoutParams params) {
super(context);
mFeatureId = featureId;
// 获取一些动画,窗口颜色相关的资源
mShowInterpolator = AnimationUtils.loadInterpolator(context,
android.R.interpolator.linear_out_slow_in);
mHideInterpolator = AnimationUtils.loadInterpolator(context,
android.R.interpolator.fast_out_linear_in);
mBarEnterExitDuration = context.getResources().getInteger(
R.integer.dock_enter_exit_duration);
mForceWindowDrawsStatusBarBackground = context.getResources().getBoolean(
R.bool.config_forceWindowDrawsStatusBarBackground)
&& context.getApplicationInfo().targetSdkVersion >= N;
mSemiTransparentStatusBarColor = context.getResources().getColor(
R.color.system_bar_background_semi_transparent, null /* theme */);
updateAvailableWidth(); // 更新下窗口宽度资源
setWindow(window); // 设置phoneWindow给DecorView
updateLogTag(params);
// 下面是获取一些和context相关的颜色大小等资源
mResizeShadowSize = context.getResources().getDimensionPixelSize(
R.dimen.resize_shadow_size);
initResizingPaints();
}
...........
}
```
关于DecorView我们可以看到他是FrameLayout的子类,也就是一个ViewGroup,他的构造方法里面主要就是初始化一些必要的资源,这里我们看一下就好。到这里其实一个DecorView就创建好了,他是衣蛾FrameLayout,前面我们说到,我们自己的View并不是直接加载到DecorView下面的,而是他里面还有ViewGroup,这个ViewGroup会赋值给PhoneWindow中的mContentParent变量,读取这个ViewGroup的方法是generateLayout,我们看下这个方法:
```java
public static final int ID_ANDROID_CONTENT = com.android.internal.R.id.content;
// 根据主题的不同,加载一个不同的子viewGroup到DecorView中,并且DecorView中
// 取出ID_ANDROID_CONTENT这个布局返回,后面所有的布局都会加入到这个布局中
protected ViewGroup generateLayout(DecorView decor) {
// Apply data from current theme.
TypedArray a = getWindowStyle(); // 获取这个Window的style
if (false) {
System.out.println("From style:");
String s = "Attrs:";
for (int i = 0; i < R.styleable.Window.length; i++) {
s = s + " " + Integer.toHexString(R.styleable.Window[i]) + "="
+ a.getString(i);
}
System.out.println(s);
}
// float窗口的设置
mIsFloating = a.getBoolean(R.styleable.Window_windowIsFloating, false);
int flagsToUpdate = (FLAG_LAYOUT_IN_SCREEN|FLAG_LAYOUT_INSET_DECOR)
& (~getForcedWindowFlags());
if (mIsFloating) {
setLayout(WRAP_CONTENT, WRAP_CONTENT);
setFlags(0, flagsToUpdate);
} else {
setFlags(FLAG_LAYOUT_IN_SCREEN|FLAG_LAYOUT_INSET_DECOR, flagsToUpdate);
}
// 下面是各种style中窗口样式的设置,更加style的设置调用requestFeature方法
if (a.getBoolean(R.styleable.Window_windowNoTitle, false)) {
requestFeature(FEATURE_NO_TITLE);
} else if (a.getBoolean(R.styleable.Window_windowActionBar, false)) {
// Don't allow an action bar if there is no title.
requestFeature(FEATURE_ACTION_BAR);
}
........................
int layoutResource;
// 获取窗口的样式
int features = getLocalFeatures();
// System.out.println("Features: 0x" + Integer.toHexString(features));
// 下面就是根据获取的窗口样式features,加载不同的布局,赋给layoutResource
if ((features & (1 << FEATURE_SWIPE_TO_DISMISS)) != 0) {
layoutResource = R.layout.screen_swipe_dismiss;
setCloseOnSwipeEnabled(true);
}
.........................
mDecor.onResourcesLoaded(mLayoutInflater, layoutResource);
// 获取DecorView中的ID_ANDROID_CONTENT(R.id.content)这个布局,后续我们自己开发的都会加入到这个布局中
// 也就是上面的layoutResource中的元素
ViewGroup contentParent = (ViewGroup)findViewById(ID_ANDROID_CONTENT);
if (contentParent == null) {
throw new RuntimeException("Window couldn't find content container view");
}
.............
return contentParent;
```
这个方法是非常的长,但是大多是获取窗口style的不同类型来加载不同布局的代码,所以这里省略了大部分,这里我们先看到根据style中设置的窗口类型来设置窗口,之后会根据不同的窗口类型来获取不同DecorView的布局,前面在创建DecorView的时候我们看到其实就是一个FrameLayout类,里面并没有具体的布局,这里就会把具体的布局加载到DecorView中。
之后我们看到有ID_ANDROID_CONTENT这个元素的id,值是com.android.internal.R.id.content,所以会从布局中获取这个元素,这个元素就是加载我们自定义布局的ViewGroup了,最后会返回这个ViewGroup赋值给PhoneWindow的mContentParent变量。
# Scene的创建
至此,DecorView就创建好了,加载我们自定义布局的mContentParent也获取了,我们回到setContentView方法,之前我们还说到如果窗口支持里面不同加载的View切换的话,会封装一个Scene来保存加载的布局,我们来看看Scene是怎么回事,先看下Scene的构造方法:
```java
private Scene(ViewGroup sceneRoot, int layoutId, Context context) {
mContext = context;
mSceneRoot = sceneRoot;
mLayoutId = layoutId;
}
```
Scene构造函数有三个参数,第一个就是DecorView中要加载我们自定义View的ViewGroup,第二个是要加载View的id,第三个是Context。所以Scene就是一个保存了加载ViewGroup和被加载View的封装类。我们在看下setContentView中创建Scene的过程,调用的是Scene的getSceneForLayout方法:
```java
// 获取参数一所在的ViewGroup中layoutId这个View所对应的Scene
// 从这里可以看出,每个ViewGroup中有一个SparseArray,这个SparseArray中保存着这个ViewGroup中
// 的所有场景。(场景可以理解为一个具体的View,即每个ViewGroup中可以保存多个被切到过去的view)
public static Scene getSceneForLayout(ViewGroup sceneRoot, int layoutId, Context context) {
// 获取参数SceneRoot中的场景集合
SparseArray<Scene> scenes = (SparseArray<Scene>) sceneRoot.getTag(
com.android.internal.R.id.scene_layoutid_cache);
// 如果场景集合是null,那么new一个,并且设置给这个viewGroup
if (scenes == null) {
scenes = new SparseArray<Scene>();
sceneRoot.setTagInternal(com.android.internal.R.id.scene_layoutid_cache, scenes);
}
// 看看这个场景集合中,没有参数二需要的view
Scene scene = scenes.get(layoutId);
// 如果有就返回
if (scene != null) {
return scene;
} else {
// new一个场景
scene = new Scene(sceneRoot, layoutId, context);
// 把这个场景put到场景集合中
scenes.put(layoutId, scene);
return scene;
}
}
```
这个方法中第一个参数就是DecorView中加载我们传入View的ViewGroup,在这个ViewGroup中绑定了一个SparseArray,这个SparseArray中保存了这个ViewGroup中加载过的Scene,如果能找到当前要加载的View的Scene,那么返回,否则会创建一个Scene后放入SparseArray再返回。
接着我们在来看下有了这个Scene后,怎么加入这个Scene的,加载的方法是PhoneWindow的transitionTo方法:
```java
private void transitionTo(Scene scene) {
// 如果这个phoneWindow还没有加载的场景,即理解为还没有加载任何一个界面
if (mContentScene == null) {
// 初始化这个场景。初始化主要就是把子元素加入到根布局中
// 并且把加载的这个界面场景scene设置给根布局几phoneWindow的decorview中的根容器
scene.enter();
} else {
// 到这里说明当前这个phonewindow已经有场景了,那么要把根布局的场景替换为scene
mTransitionManager.transitionTo(scene);
}
// 把最新的场景保存给这个phoneWindow
mContentScene = scene;
}
```
这里mContentScene是当前这个窗口中是否有Scene,如果有的话表示需要做一个Scene间的切换动作,这里就会涉及到动画了。如果没有就直接加载Scenen里面的View,最后会把这个Scene保存在mContentScene中。在当前PhoneWindow没有Scenen的情况下,会调用Scene的enter方法,我们看下这个方法:
```java
public void enter() {
// Apply layout change, if any
// 如果有布局ID或者有具体的view,即mLayout
if (mLayoutId > 0 || mLayout != null) {
// empty out parent container before adding to it
// 加载本场景的view前,先情况根布局所有的子元素
getSceneRoot().removeAllViews();
// 如果布局ID大于0,加载布局Id对应的view到mSceneRoot中
if (mLayoutId > 0) {
LayoutInflater.from(mContext).inflate(mLayoutId, mSceneRoot);
} else {
// 没有布局Id,就加载现在已有的mLayout
mSceneRoot.addView(mLayout);
}
}
// Notify next scene that it is entering. Subclasses may override to configure scene.
if (mEnterAction != null) {
mEnterAction.run();
}
// 把这个scene设置给根布局
setCurrentScene(mSceneRoot, this);
}
```
这个方法比较简单,会先从viewGroup中移除所有的子元素,然后通过LayoutInflater.inflate加载子布局或者addView加载View,最后还会调用setCurrentScene方法把scene保存在mSceneRoot中,我们看下这个方法:
```java
// 将要进入一个场景的时候,即打开一个新界面,会调用这个方法
// 这里参数view是进入界面的根组件,即mSceneRoot,这个方法是把进入的场景赋值给他的根布局
// 这样根布局就有了当前正在显示的场景了,如果还有其他场景要用这个根布局进入的话,就可以知道能不能直接用这个根布局了
static void setCurrentScene(View view, Scene scene) {
view.setTagInternal(com.android.internal.R.id.current_scene, scene);
}
```
这个方法就是把当前要加载额Scene保存在父Viewgroup,之后如果要切换ViewGroup中的Scene的话,可以知道当前ViewGroup是否有值。好了,我们回到前面transitionTo方法中,上面分析的是不需要切换Scene的情况,在来看下需要切换Scene的情况,调用的是TransitionManager的transitionTo方法:
```java
public void transitionTo(Scene scene) {
// Auto transition if there is no transition declared for the Scene, but there is
// a root or parent view
// 参数一是要进入的场景
// 参数二是下面要执行的转场动画。这个转场动画可能是进入参数一场景的转场动画
// 也可能是离开这个进入场景根布局当前加载布局的转场动画
changeScene(scene, getTransition(scene));
}
```
TransitionManager这个类是切换scene时候的转场动画类,是在前面的初始化DecorView中创建的,我们看到这里会继续调用changeScene,我们看下这个方法:
```java
private static ArrayList<ViewGroup> sPendingTransitions = new ArrayList<ViewGroup>();
private static void changeScene(Scene scene, Transition transition) {
// 获取要进入场景的根布局
final ViewGroup sceneRoot = scene.getSceneRoot();
// 如果等待转场动画的根布局集合中没有这个根布局,说明这个根布局目前没有加载其他的场景,可以使用
if (!sPendingTransitions.contains(sceneRoot)) {
// 如果进入这个场景没有转场动画
if (transition == null) {
// 那么仅需要把这个场景的子view加入到根布局中,把这个场景设置给根布局
scene.enter();
} else {
// 走到这里,说明接下去会有一个转场动画
// 这个根布局将要执行转场动画了,先加入到sPendingTransitions集合中
sPendingTransitions.add(sceneRoot);
// 复制这个下面要执行的转场动画
Transition transitionClone = transition.clone();
// 把根布局设置给这个转场动画
transitionClone.setSceneRoot(sceneRoot);
// 获取这个根布局当前加载的场景
// 当然也可能是null,表示是将要进入的一个场景
Scene oldScene = Scene.getCurrentScene(sceneRoot);
// 如果根布局当前有加载其他的场景,并且这个场景是通过资源文件加载的
// 根据isCreatedFromLayoutResource方法的注释,如果场景的view不是
// 来自一个资源文件的加载,那么移除view的时候有什么不好的影响不得而知,应该避免
if (oldScene != null && oldScene.isCreatedFromLayoutResource()) {
// 设置这个转场动画的mCanRemoveViews为true,表示可以移除布局中的view
transitionClone.setCanRemoveViews(true);
}
// 参数一 sceneRoot 场景的根布局
// 参数二 transitionClone转场动画
sceneChangeSetup(sceneRoot, transitionClone);
// 初始化这个场景,把将要进入的场景子view加载到根布局中,并且把这个场景设置给根布局
scene.enter();
// 注册场景变化时候的回调,即准备执行转场动画的回调函数
sceneChangeRunTransition(sceneRoot, transitionClone);
}
}
}
```
这个方法的第一个参数是将要加载的Scene,第二个参数是切换这个Scene时候的转场动画。这个方法会首先看下sPendingTransitions这个集合里面是否已经有这个Scene所要加载的ViewGroup了,如果已经有了那么就不用做什么了,这个ViewGroup已经在等待加载一个Scene了。否则的话,如果转场动画非空的话,最后会调用sceneChangeSetup这个方法把当然加载View中的一些数值会保存到转场动画中,我们稍稍看下这个方法:
```java
// 参数一sceneRoot表示将要执行转场动画的根布局
// 参数二transition是将要执行的转场动画
private static void sceneChangeSetup(ViewGroup sceneRoot, Transition transition) {
// Capture current values
// 获取sceneRoot根布局对应的所有当前正在运行的转场动画,由于这个根布局要执行新的转场动画了,所以
// 需要先把当前正在运行的转场动画停止
ArrayList<Transition> runningTransitions = getRunningTransitions().get(sceneRoot);
if (runningTransitions != null && runningTransitions.size() > 0) {
// 遍历这些正在运行的转场动画,由于有新的转场动画要执行,所以把老的都先暂停
for (Transition runningTransition : runningTransitions) {
// 停止这个动画的运行
runningTransition.pause(sceneRoot);
}
}
// 新的转场动画非空
if (transition != null) {
// 计算开始视图位置保存在transition中
// 简单理解就是会在根布局里面,把动画需要用到的view的位置都保存在transition
transition.captureValues(sceneRoot, true);
}
// Notify previous scene that it is being exited
// 看看这个将要执行转场动画的根布局,当前是否有加载场景,有的话退出
Scene previousScene = Scene.getCurrentScene(sceneRoot);
if (previousScene != null) {
previousScene.exit();
}
}
```
这个方法会先停止这个ViewGroup中在运行的动画,之后会调用Transition的captureValues方法,这个方法就是设置view动画数据的方法,这个不跟进去看了,关于动画这里也是非常大的一个模块,我们这里不说,这个方法只要会记录下view在执行动画时候一些位置,比如开始结束位置等,这样在执行动画的时候就可以按照我们设置的来了,我们这里知道是设置动画数据的就可以了,回到前面changeScene方法。
设置完转场动画后,还是会调用Scene的enter来加载View,最后在设置下转场动画的一些监听函数,这样切换Scene的流程就设置好了。具体加载view的显示和动画的执行都会在View绘制那里处理,我们后面遇到会提一下,详细的View模块的分析我们还是单独写文章来讲。
至此setContentView方法就执行完毕了,在Activity的的onCreate方法中调用setContentView后,其实就把要加载的view保存在PhoneWindow中了,正如我们熟悉的那样,真正的显示是早Activity的onResume生命周期中的,我们下面回到ActivityThread继续看后面的流程。
# Activity的onResume流程
上面的的onCreate流程是从ActivityThread的handleLaunchActivity方法中执行performLaunchActivity方法引申出去的,接着会执行handleResumeActivity方法开始onResume部分的处理流程:
```java
final void handleResumeActivity(IBinder token,
boolean clearHide, boolean isForward, boolean reallyResume, int seq, String reason) {
..............
// 调用onResume
r = performResumeActivity(token, clearHide, reason);
// 为true表示这个Activity已经启动过了,但是目前还没显示,要等待显示
// 比如一个Activity执行startForResult时候会把mStartedActivity置为true
// 此时其他Activity执行完后,回到这个Activity后,会走到这里
boolean willBeVisible = !a.mStartedActivity;
// 如果willBeVisible为false,mStartedActivity为true,
// 表示Activity是通过startActivityForResult启动的,现在启动的Activity回到了这里
// 先不要马上显示,因为有可能在resume的时候有启动了另一个Activity把这个又盖住了
// 先到AMS中检查下是否上面还有其他Activity
if (!willBeVisible) {
try {
// 检查下这个已经启动过的Activity,在AMS中是否处于最上面的显示位置
willBeVisible = ActivityManager.getService().willActivityBeVisible(
a.getActivityToken());
} catch (RemoteException e) {
throw e.rethrowFromSystemServer();
}
}
...............
}
```
我们先来看这一小段。performResumeActivity方法里面就会调用onResume方法,这里AMS相关内容就不说了。接着我们看到willBeVisible这个变量,这个变量表示这个Activity是否要被显示,他的值取决于mStartedActivity这个变量。默认一般启动一个Activity的时候mStartedActivity这个值是为false,所以正常这里willBeVisible会为true,接下去会要显示这个Activity,如果这个Activity有启动了一个其他Activity后,再回到这里的时候会被显示。但是我们知道有一种启动方式startActivityForResult,在这种启动方式中会把mStartedActivity置为true,如下方法:
```java
public void startActivityForResult(@RequiresPermission Intent intent, int requestCode,
@Nullable Bundle options) {
if (mParent == null) {
...........
Instrumentation.ActivityResult ar =
mInstrumentation.execStartActivity(
this, mMainThread.getApplicationThread(), mToken, this,
intent, requestCode, options);
if (ar != null) {
// 回调给发起者
mMainThread.sendActivityResult(
mToken, mEmbeddedID, requestCode, ar.getResultCode(),
ar.getResultData());
}
if (requestCode >= 0) {
mStartedActivity = true;
}
.....................
}
................
}
```
这里可以看到通过startActivityForResult启动另一个Activity的时候,如果需要返回消息的话,会把mStartedActivity置为true,等到启动的Activity结束后,AMS会重新调用这个Activity的onResume方法,在那里会重新把这个mStartedActivity值为false:
```java
public final ActivityClientRecord performResumeActivity(IBinder token,
boolean clearHide, String reason) {
........
if (clearHide) {
r.hideForNow = false;
r.activity.mStartedActivity = false;
}
........
}
```
上面这一小段截取的代码可以看到在performResumeActivity方法中会重新把mStartedActivity置为true,所以回到上面handleResumeActivity方法中。如果mStartedActivity为true的话,说明正常情况还不应该回到这个Activity,因为通过startActivityResult方法启动另一个Activity后再回来时需要返回消息处理的,现在mStartedActivity值为true,说明现在还没接受到消息,所以就不显示了。当然这里还会继续检查下,如果当前前台显示的Activity就是这个Activity了,那也只有显示了,正常情况下前台显示的应该是他启动的那个Activity。willBeVisible这个变量就说明到一下,我们继续看handleResumeActivity方法:
```java
final void handleResumeActivity(IBinder token,
boolean clearHide, boolean isForward, boolean reallyResume, int seq, String reason) {
.............
// 如果ActivityClientRecord的window是空,同时Activity没有finish,同时在AMS中已经有了
// 这里willBeVisible为true,即mStartedActivity为false,即默认值,表示不是一个startForResult
// 的Activity或者是一个startActivityForResult后回来再次显示这个Activity
if (r.window == null && !a.mFinished && willBeVisible) {
// 进入这里说明AMS中已经有了,所以下面从ActivityClientRecord中取出数据
// 开始初始化windows的一些属性
// 获取activity的phoneWindow
r.window = r.activity.getWindow();
// 获取DecorView,即PhoneWIndow的DecorView
View decor = r.window.getDecorView();
// DecorView设为不可见
decor.setVisibility(View.INVISIBLE);
// 获取WindowManagerImpl
ViewManager wm = a.getWindowManager();
// 布局参数,这个window就是Activity的PhoneWindow
WindowManager.LayoutParams l = r.window.getAttributes();
a.mDecor = decor;
// 一个应用类型额窗口
l.type = WindowManager.LayoutParams.TYPE_BASE_APPLICATION;
l.softInputMode |= forwardBit;
if (r.mPreserveWindow) { // 如果销毁时候要保存Window的话
a.mWindowAdded = true; // 标记下已经这个窗口数据已经添加到WM中了
r.mPreserveWindow = false; //重置设置销毁时候不要保存Window
// 获取之前Window的ViewRootImpl
ViewRootImpl impl = decor.getViewRootImpl();
if (impl != null) {
// 重新设置下view中的回调
impl.notifyChildRebuilt();
}
}
if (a.mVisibleFromClient) { // 如果要求显示这个Activity
if (!a.mWindowAdded) { // DecorView还没添加到窗口中
a.mWindowAdded = true;
// Dcorview添加到windowManagerGLobal中,当然还有ViewRootImpl和params
wm.addView(decor, l);
} else { // 如果已经添加到WMS中了
// The activity will get a callback for this {@link LayoutParams} change
// earlier. However, at that time the decor will not be set (this is set
// in this method), so no action will be taken. This call ensures the
// callback occurs with the decor set.
a.onWindowAttributesChanged(l);
}
}
// If the window has already been added, but during resume
// we started another activity, then don't yet make the
// window visible.
// willBeVisible为false,表示当前这个Activity是调用startActivityForResult
// 方法启动了另一个Activity,然后另一个Activity又回到了这个,但是回到这个Activity
// resume的时候又启动了另一个Activity,所以又把这个Activity盖住了,所以不能显示
} else if (!willBeVisible) {
// 进入到这里说明还没有启动好,或者AMS中虽然有,但是不可用
if (localLOGV) Slog.v(
TAG, "Launch " + r + " mStartedActivity set");
r.hideForNow = true;
}
..............
// 如果Activity是可见的,更新设置DecorView可见
if (r.activity.mVisibleFromClient) {
r.activity.makeVisible();
}
}
```
剩下这些代码也就是onResume中和WMS相关的重点代码了,我们来看一下。这里如果ActivityClientRecord的Window变量为null,说明还没添加到WMS中,同时这个Activity是要显示的,那么下面就会开始添加窗口到WMS的流程了。否则如果willBeVisible为false,说明不需要显示,把ActivityClientRecord的hideForNow置为true,这个不用多说,我们重点来看下添加窗口到WMS的流程。
通过前面分析onCreate的时候,我们知道已经在Actvity中创建了PhoneWindow对象了,并且创建了DecorViewView,DecorViewView里面也已经有了需要加载的View,所以这里会先把DecorView置为不可见,等后面添加到WMS后,在置为可见。之后获取PhoneWindow的LayoutParams,这个是关于这个窗口的参数,把这个参数的类型置为TYPE_BASE_APPLICATION,说明这个是一个应用类型的窗口。
之后我们会看到ActivityClientRecord中有mPreserveWindow这个变量,这个变量表示在Activity销毁的时候时候要保留PhoneWindow和WindowManager对象,我们知道有些场景下这个Actvity销毁后会立刻恢复,比如横竖屏这种情况,而从前面我们分析onCreate中场景PhoneWindow的过程可以看过,其实做的事情还是非常多的,所以像横竖屏这种情况下,虽然会走onDestory的生命周期,但是没有必要销毁PhoneWindow和WindowManager,所以这里如果这个值是true的话,说明已经添加到WMS中了,这里会置Activity的mWindowAdded为ture,接着下面就会更加这个值是否为true来决定是否要走添加窗口到WMS的流程的,我们这里肯定是要走这个流程的,所以会调用WindowManager的addView方法:
```java
public void addView(@NonNull View view, @NonNull ViewGroup.LayoutParams params) {
// 如果这里params中的token为null,会取默认的token
applyDefaultToken(params);
// 这里比如一个Activity调用Toast,这个mParentWindow是null
// 如果是一个Activity,mParentWindow是phoneWindow
mGlobal.addView(view, params, mContext.getDisplay(), mParentWindow);
}
```
这里首先会调用applyDefaultToken方法,如果这个窗口有指定窗口或者父窗口的话会获取他们的token,我们这里是启动的一个Activity所以这里没有父窗口,后面我们会看到会获取ActivityRecord来代表这个窗口,下面会继续调用WindowManagerGlobal的addView方法。
# WindowManagerGlobal调用addView方法
WindowManagerGlobal这个类我们前面说过,他是个全局单例类,他们里面会保存一些全局的管理信息,但是主要的功能是会调用WMS和Session来做的,这里调用了addView方法,我们来看一下:
```java
public void addView(View view, ViewGroup.LayoutParams params,
Display display, Window parentWindow) {
if (view == null) {
throw new IllegalArgumentException("view must not be null");
}
if (display == null) { // 屏幕不能为null
throw new IllegalArgumentException("display must not be null");
}
if (!(params instanceof WindowManager.LayoutParams)) {
throw new IllegalArgumentException("Params must be WindowManager.LayoutParams");
}
final WindowManager.LayoutParams wparams = (WindowManager.LayoutParams) params;
// Activity和子窗口的话,parentWindow是一个phoneWindow
// 系统窗口,比如Toast的话,这里的parentWindow是null
if (parentWindow != null) { // 如果有phoneWindow的话
// 从Phonewindow中获取token和titile等信息,保存到wparams中
parentWindow.adjustLayoutParamsForSubWindow(wparams);
} else { // 如果没有父窗口,设置一些硬件加速之类的
// If there's no parent, then hardware acceleration for this view is
// set from the application's hardware acceleration setting.
final Context context = view.getContext();
if (context != null
&& (context.getApplicationInfo().flags
& ApplicationInfo.FLAG_HARDWARE_ACCELERATED) != 0) {
wparams.flags |= WindowManager.LayoutParams.FLAG_HARDWARE_ACCELERATED;
}
}
...............
}
```
这个方法比较长,我们分三部分来看,以上是第一部分。首先做一些校验,没有异常的话,会获得参数的parentWindow,这个parentWindow就是Activity的PhoneWindow对象,会调用PhoneWindow的adjustLayoutParamsForSubWindow,从这个窗口中获取一些参数保存到wparams中。如果parentWindow为null,说明这个窗口不需要PhoneWindow,比如有些系统窗口,像是Toast就没有PhoneWindow,他们可以直接通过调用这里WindowManageImpl的addView方法来窗口到WMS,我们后面可以看到最终一个窗口会表示为WindowState这个类,而PhoneWindow我们之前也说过,他是封装了View的,主要是处理一些和用户交互等工作,显示窗口并不是必要的。好了,我们这里跟进PhoneWindow的adjustLayoutParamsForSubWindow方法看一下:
```java
void adjustLayoutParamsForSubWindow(WindowManager.LayoutParams wp) {
CharSequence curTitle = wp.getTitle();
// 第一个分支是子窗口
if (wp.type >= WindowManager.LayoutParams.FIRST_SUB_WINDOW &&
wp.type <= WindowManager.LayoutParams.LAST_SUB_WINDOW) {
if (wp.token == null) { // 如果这个LayoutParams还没有一个window的binder
View decor = peekDecorView(); // 获取DectorView
if (decor != null) {
// 获取这个window的binder,即一个W
wp.token = decor.getWindowToken();
}
}
// 根据子窗口不同类型,赋值title
if (curTitle == null || curTitle.length() == 0) {
final StringBuilder title = new StringBuilder(32);
if (wp.type == WindowManager.LayoutParams.TYPE_APPLICATION_MEDIA) {
title.append("Media");
} else if (wp.type == WindowManager.LayoutParams.TYPE_APPLICATION_MEDIA_OVERLAY) {
title.append("MediaOvr");
} else if (wp.type == WindowManager.LayoutParams.TYPE_APPLICATION_PANEL) {
title.append("Panel");
} else if (wp.type == WindowManager.LayoutParams.TYPE_APPLICATION_SUB_PANEL) {
title.append("SubPanel");
} else if (wp.type == WindowManager.LayoutParams.TYPE_APPLICATION_ABOVE_SUB_PANEL) {
title.append("AboveSubPanel");
} else if (wp.type == WindowManager.LayoutParams.TYPE_APPLICATION_ATTACHED_DIALOG) {
title.append("AtchDlg");
} else {
title.append(wp.type);
}
if (mAppName != null) {
title.append(":").append(mAppName);
}
wp.setTitle(title);
}
} else if (wp.type >= WindowManager.LayoutParams.FIRST_SYSTEM_WINDOW &&
wp.type <= WindowManager.LayoutParams.LAST_SYSTEM_WINDOW) {
// 这里是系统窗口
// We don't set the app token to this system window because the life cycles should be
// independent. If an app creates a system window and then the app goes to the stopped
// state, the system window should not be affected (can still show and receive input
// events).
if (curTitle == null || curTitle.length() == 0) {
// 添加LayoutParams的名字
final StringBuilder title = new StringBuilder(32);
title.append("Sys").append(wp.type);
if (mAppName != null) {
title.append(":").append(mAppName);
}
wp.setTitle(title);
}
} else {
// 走到这里是表示一个Activity窗口,如果wp.token即Activity自己的参数中有没有窗口的token
// 这个tokend就是ActivityRecord代表的那个token
// mContainer是Activity的父窗口。这里mContainer为null表示是一个正常启动的Activity
// 非null的话表示是一个父Activity,当前这个Activity是通过LocalActivityManager被转化为
// 了一个view加载到父Activity中了,所以这里的token是父Activity的ActivityRecord
if (wp.token == null) {
wp.token = mContainer == null ? mAppToken : mContainer.mAppToken;
}
if ((curTitle == null || curTitle.length() == 0)
&& mAppName != null) {
wp.setTitle(mAppName);
}
}
// 设置下包名
if (wp.packageName == null) {
wp.packageName = mContext.getPackageName();
}
// 设置是否要硬件加速
if (mHardwareAccelerated ||
(mWindowAttributes.flags & FLAG_HARDWARE_ACCELERATED) != 0) {
wp.flags |= FLAG_HARDWARE_ACCELERATED;
}
}
```
我们之前有说过,android中窗口分为三种类型,应用窗口,子窗口和系统窗口,这个方法就分别根据这三种不同类的窗口,读取窗口信息。
首先是子窗口,每个窗口都有个token(其实就是一个Binder)来标识这个窗口,子窗口的话他的token会是他的父窗口,这里如果这个子窗口token是null的话,会调用 Window的peekDecorView方法,这个方法实现在PhoneWindow中,他会获得他父窗口的DecorView,再从父窗口的DecorView中获取token,这里调用的方法是DecorView的getWindowToken方法:
```java
AttachInfo mAttachInfo;
public IBinder getWindowToken() {
return mAttachInfo != null ? mAttachInfo.mWindowToken : null;
}
```
我们可以看到这里token就是一个IBinder,他是从AttachInfo中获取的,AttachInfo这个我们到目前还没有遇到过,根据上面我们说的子窗口的token是获取的父窗口的token,所以这个AttachInfo就是父窗口DecorView的,我们现在在分析的是Activity的添加窗口流程,Activity就是一个典型的父窗口,我们后面就会说到创建AttachInfo的过程,这里我们提前先看一下AttachInfo的构造方法:
```java
// 参数一 Session
// 参数二 W
// 参数二 Display
// 参数四 ViewRootImpl
AttachInfo(IWindowSession session, IWindow window, Display display,
ViewRootImpl viewRootImpl, Handler handler, Callbacks effectPlayer,
Context context) {
// Session
mSession = session;
// W
mWindow = window;
// W的binder
mWindowToken = window.asBinder();
// 屏幕
mDisplay = display;
// 把ViewRootImpl赋值给view了
mViewRootImpl = viewRootImpl;
// Hander
mHandler = handler;
// AttachInfo.Callbacks
mRootCallbacks = effectPlayer;
// 创建View树观察者
mTreeObserver = new ViewTreeObserver(context);
}
```
这个构造方法主要是赋值传入的参数,这个里面有些参数我们之前也都已经见过了,比如IWindowSession,Display等等,这里主要有2个参数IWindow和ViewRootImpl,ViewRootImpl这个是一个非常重要的类,窗口在服务端主要是和WMS进行通信,而在客户端主要是和具体的View通信,ViewRootImpl这个里面就是主要负责View方面的所有操作,包括上面这个AttachInfo也是在ViewRootImpl中创建的,后面我们就会看到。而这里的IWindow我们看下他的实现类:
```java
// 这个类的2个变量,一个就是ViewRootImpl是操作客户端view的
// 另一个IWindowSession是与WMS通信的。这样这个类就是客户端与服务端的一个中间类了
static class W extends IWindow.Stub {
private final WeakReference<ViewRootImpl> mViewAncestor;
private final IWindowSession mWindowSession;
.....................
}
```
这个类我们只要看他里面有这2个变量就可以了,可以看到W是一个Binder,他里面有2个变量,一个是ViewRootImpl,另一个是IWindowSession。一个是和客户端View通信的,另一个是和WMS通信的,而他自己也是一个Binder,这个类后面我们会看到会被传到WMS中,这样WMS如果需要通知客户端什么消息的话,就可以用这个类来操作了,可见这个类的作用主要是提供给WMS操作客户端来用的。
我们回到前面AttachInfo类,这个类中保存了上面这个W的实例对象,这个对象是在ViewRootImpl中创建的,之后会分发给DecorView,所以所有这个父窗口的子view都可以获取到这个AttachInfo类,再回到我们前面adjustLayoutParamsForSubWindow方法,所以一个子窗口可以通过父窗口获取token,即一个W类的Binder对象。
子窗口获取了父窗口的token后,接下来会根据不同子窗口的类型,设置窗口的title,这里比较简单就不多说了。
分析完了子窗口后再来看下系统窗口,系统窗口非常的简单,就直接设置下title就好,由于系统窗口的token会在创建的时候设置,所以在初始化的时候就会确定,所以不用在添加的时候再去计算,这里只要设置下title就好了。顺便提一下,之所以子窗口和应用类型窗口需要在添加窗口过程中计算,是因为他们的token都可能需要从父窗口中获取,子窗口自然不必说了,上面也看到了,他本身没有token,需要从父窗口中获取token,而应用类型的窗口,也是有可能需要从父窗口中获取token的,比如我们熟悉的AlertDialog,他需要依附一个Activity才能运行,可能大家觉得他会一个子窗口,但是他也是一个应用窗口,关于他的源码后时间再分析,我们就看一下这里type创建的代码:
```java
public LayoutParams() {
super(LayoutParams.MATCH_PARENT, LayoutParams.MATCH_PARENT);
type = TYPE_APPLICATION; // 默认是应用类型的窗口
format = PixelFormat.OPAQUE;
}
```
在WindowManager的类中,默认创建LayoutParams就是应用类型的,Dialog就是用的这个默认类型的,所以对于一个应用类型的窗口在初始化的时候也是可能不确定token是什么的,需要从他父窗口获取,所以我们这里会看到只有系统窗口在添加的时候不需要token,我们下面继续看添加应用类型窗口的代码。
应用类型的代码同样也是先计算窗口的token,这里会判断变量mContainer是否为空,正常启动的话,一个Actvity走到这里这个值是空,所以会取mAppToken,这个就是ActivityRecord那里创建的IBinder,所以这里Activity的token就获取了。同样上面我们介绍过Dialog需要获取父窗口的token,也会走到这里,Dialog是需要Activity作为父窗口的,所以到这里会获取Activity的token,如果用service获取Application作为Context这里就获取不到token,token为空的话后面的流程会抛出异常,这个我们后面分析中会看到,这里提一下。
另外这里mContainer大部分情况是null,除非这里启动的Activity使用了LocalActivityManager封装为了View加载到另一个Activity中,那么这里的mContainer就非空了,我们之前在Activity的attach方法中看到会调用setContainer把父窗口的Window设置给mContainer,这样这里就是获取父Activity的token了,这里关于LocalActivityManager的使用不多说了,有兴趣的同学可以自己去看下,我们就提一下这个。
好了adjustLayoutParamsForSubWindow方法基本就说完,最后还会设置一下包名和硬件加速等就返回了。这个方法我们看到最主要的就是设置token,这里我们看到除了系统窗口不在这里设置外,子窗口和应用窗口都会在这里设置。应用窗口一般会使用Activty的token,而子窗口会使用一个在ViewRootImpl类中场景的的Binder作为token,这个创建我们在下面会说。所以说三种类型的窗口,他们使用的token来源是不一样的,子窗口的父窗口不一定都是Activity,所以他会取DecorView下创建的token作为自己的token,系统窗口会由系统来创建token,应用窗口就是Activity,所以取的是ActivityRecord中的token。这些token的作用是作为一个key,他们都有一个WindowToken(获取AppWindowToken)作为对应的value保存在全局变量中,这样系统查找不同窗口就比较方便了。我们回到WindowManagerGlobal的addView方法,上面分析了这么多是这个方法的一部分,我们继续看后面的代码:
```java
public void addView(View view, ViewGroup.LayoutParams params,
Display display, Window parentWindow) {
..............
ViewRootImpl root;
View panelParentView = null;
synchronized (mLock) {
// Start watching for system property changes.
// 监听系统属性的变化
if (mSystemPropertyUpdater == null) {
mSystemPropertyUpdater = new Runnable() {
@Override public void run() {
synchronized (mLock) {
for (int i = mRoots.size() - 1; i >= 0; --i) {
mRoots.get(i).loadSystemProperties();
}
}
}
};
SystemProperties.addChangeCallback(mSystemPropertyUpdater);
}
// 看看当前view集合中有没有现在这个view的下标
int index = findViewLocked(view, false);
if (index >= 0) { // 说明当前view集合中中已经存在了
if (mDyingViews.contains(view)) { //如果正在移除,比如异步移除时候会把view添加到这个mDyingViews中
// Don't wait for MSG_DIE to make it's way through root's queue.
// 做一些对和这个view相关的清理工作,为后面重新添加view做准备
mRoots.get(index).doDie();
} else {
// 进入到这里说明view已经被add了,并且没有在销毁中,所以报错
throw new IllegalStateException("View " + view
+ " has already been added to the window manager.");
}
// The previous removeView() had not completed executing. Now it has.
}
// If this is a panel window, then find the window it is being
// attached to for future reference.
// 如果是一个子窗口类型的,查找他的父窗口
if (wparams.type >= WindowManager.LayoutParams.FIRST_SUB_WINDOW &&
wparams.type <= WindowManager.LayoutParams.LAST_SUB_WINDOW) {
final int count = mViews.size();
// 遍历view集合
for (int i = 0; i < count; i++) {
// 如果找到一个和当前view的父窗口token一样的,说明这个view是父窗口,取出赋值给panelParentView
// 比如一个Dialog,这里是要找Activity的窗口
if (mRoots.get(i).mWindow.asBinder() == wparams.token) {
// 获取这个view作为当前view的父view
panelParentView = mViews.get(i);
}
}
}
..................
}
```
这里是第二部分代码。开始是添加一些系统属性变化监听等,这个不多说,和我们WMS主流程关系不大。接着会调用findViewLocked方法看看当前运行的窗口中是否有这个view了,findViewLocked这个方法比较简单,我们看一眼:
```java
private int findViewLocked(View view, boolean required) {
final int index = mViews.indexOf(view);
// required为true的调用一般是在移除或者更新一个view的时候,移除或者更新
// 一个view说明这个view应该是存在的,所以如果这个时候发现不存在,那么会报错
if (required && index < 0) {
throw new IllegalArgumentException("View=" + view + " not attached to window manager");
}
return index;
}
```
mViews这个变量是一个集合,我们后面马上就会看到,他保存了当前添加到WMS中的所有view,如果能找到这个view会返回他在集合中的下标,后面会根据这个view是否当前正在移除来判断是否要继续添加,如果正在移除的话会继续添加,否则会抛出异常,当然如果目前没有这个view的话那就继续WMS添加的流程,我们回调前面方法。
回到前面addView方法,如果当前已经有这个View了,那么会查找mDyingViews是否有这个view,mDyingViews这个集合表示当前等待被移除的view,如果有的话,会调用view的doDie方法,这个方法下面贴出来看一下,不详细解释了,主要就是移除一些之前添加是否保存的数据:
```java
// 从窗口中移除view,把保存在WindowManagerGlobal中的view的一些数据清除
void doDie() {
// 检查下这个view所在的线程是否是当前线程
checkThread();
if (LOCAL_LOGV) Log.v(mTag, "DIE in " + this + " of " + mSurface);
synchronized (this) {
// 如果这个方法已经被调用了,return
if (mRemoved) {
return;
}
// 标记下这个方法已经被调用了
mRemoved = true;
// view已经添加到父容器中了
if (mAdded) {
// 销毁和这个view相关的
dispatchDetachedFromWindow();
}
// 如果已经添加到父容器中了,并且mFirst为false
// 说明已经调用了performTraversals方法,进入渲染了
if (mAdded && !mFirst) {
// 销毁渲染器
destroyHardwareRenderer();
if (mView != null) {
int viewVisibility = mView.getVisibility();
// 可见性是否有变化
boolean viewVisibilityChanged = mViewVisibility != viewVisibility;
// 如果窗口属性有改变,或者view的可见性有改变
if (mWindowAttributesChanged || viewVisibilityChanged) {
// If layout params have been changed, first give them
// to the window manager to make sure it has the correct
// animation info.
try {
if ((relayoutWindow(mWindowAttributes, viewVisibility, false)
& WindowManagerGlobal.RELAYOUT_RES_FIRST_TIME) != 0) {
mWindowSession.finishDrawing(mWindow);
}
} catch (RemoteException e) {
}
}
// 释放surface
mSurface.release();
}
}
mAdded = false;
}
// WindowManagerGlobal中保存了几个和这个view相关的数据,移除他们
WindowManagerGlobal.getInstance().doRemoveView(this);
}
```
上面这个方法会立刻移除和这个View相关的数据,原来在mDyingViews集合中的view是等待被移除的,说明当前还没移除,由于现在需要添加一个一样的View了,所以需要立刻移除,我们接着回到addView方法。
如果当前添加的这个窗口是子窗口类型的话,会遍历mRoots这个集合,这个集合中保存的是所有当前窗口的ViewRootImpl,我们下面就会看到为这个添加的窗口创建ViewRootImpl,每次创建ViewRootImpl后会添加到mRoots。根据我们前面分析的添加一个子窗口类型的ViewRootImpl会从父窗口的DecorView中获取token,而这个token就是ViewRootImpl中创建的W类的Binder,所以现在会遍历mRoots集合找到这个父窗口,如果找到token相等的父窗口,就会从mViews集合中获取这个父窗口的View赋值给panelParentView变量。
我们这里遇到了好几个集合,是不是有点晕,其实主要有三个集合,他们的大小是相等,并且相同下标对应的都是同一个窗口数据,我们来看最后这段代码就清楚了。
```java
// 该进程中所有Window中的的View
private final ArrayList<View> mViews = new ArrayList<View>();
// 该进程中所有Window的viewRootImpl
private final ArrayList<ViewRootImpl> mRoots = new ArrayList<ViewRootImpl>();
// 所有的view的LayoutParams参数集合
private final ArrayList<WindowManager.LayoutParams> mParams =
new ArrayList<WindowManager.LayoutParams>();
public void addView(View view, ViewGroup.LayoutParams params,
Display display, Window parentWindow) {
...........
// 创建一个ViewRootImpl
root = new ViewRootImpl(view.getContext(), display);
// 这里设置view的参数
view.setLayoutParams(wparams);
// 当前view添加到View集合中
mViews.add(view);
// 当前viewrootImpl添加到集合中
mRoots.add(root);
// 当前view的参数添加到参数集合中
mParams.add(wparams);
// do this last because it fires off messages to start doing things
try {
// 参数一 view,要添加的view
// 参数二 wparams,view的参数
// 参数二 view添加到的父容器
root.setView(view, wparams, panelParentView);
} catch (RuntimeException e) {
// BadTokenException or InvalidDisplayException, clean up.
if (index >= 0) {
removeViewLocked(index, true);
}
throw e;
}
.....
}
```
最后这代码的逻辑就比较清楚了。首先会创建ViewRootImpl,这个我们前面一直提到,现在终于看到他的创建了,我们等会再来看这个构造方法。接着把前面计算出的参数ViewRootImpl赋给当前显示的view,之后可以看到有3个集合,这三个集合中,mViews代表要显示的View,mRoots代表操作这个View的ViewRootImpl,mParams代表这个View的参数LayoutParams,可以看到每次执行WMS添加窗口的流程,都是会同步添加3个集合,所以他们的位置是相同的,所以前面我们看到在一个下标处从mRoots中获取ViewRootImpl计算后,可以从相同下标处从mViews获取对应的View,因为添加的时候他们是相同的,当然移除的时候也是会同时移除的,比如上面我们调用View的doDie方法时候,如果继续跟进去看的话,最终会调用到WindowManagerGlobal的doRemoveView方法,如下:
```java
void doRemoveView(ViewRootImpl root) {
synchronized (mLock) {
// 获取这个ViewRootImpl在mRoots中的下标
final int index = mRoots.indexOf(root);
// 从几个保存view相关的集合中,移除这个view相关的数据
if (index >= 0) {
mRoots.remove(index);
mParams.remove(index);
final View view = mViews.remove(index);
mDyingViews.remove(view);
}
}
if (ThreadedRenderer.sTrimForeground && ThreadedRenderer.isAvailable()) {
doTrimForeground();
}
}
```
这个方法中可以看到,会同时从上面三个集合中移除这个view。这三个集合我们现在弄清楚了,在回过头看下ViewRootImpl的构造方法:
```java
public ViewRootImpl(Context context, Display display) {
mContext = context;
// 获取Session
mWindowSession = WindowManagerGlobal.getWindowSession();
mDisplay = display;
mBasePackageName = context.getBasePackageName();
mThread = Thread.currentThread();
mLocation = new WindowLeaked(null);
mLocation.fillInStackTrace();
mWidth = -1;
mHeight = -1;
mDirty = new Rect();
mTempRect = new Rect();
mVisRect = new Rect();
mWinFrame = new Rect();
// 这个是一个Binder
mWindow = new W(this);
mTargetSdkVersion = context.getApplicationInfo().targetSdkVersion;
mViewVisibility = View.GONE;
mTransparentRegion = new Region();
mPreviousTransparentRegion = new Region();
// ViewRootImpl被创建的时候初始化为true。调用performTraversals方法时候会被设置为false
mFirst = true; // true for the first time the view is added
mAdded = false;
mAttachInfo = new View.AttachInfo(mWindowSession, mWindow, display, this, mHandler, this,
context);
mAccessibilityManager = AccessibilityManager.getInstance(context);
mAccessibilityManager.addAccessibilityStateChangeListener(
mAccessibilityInteractionConnectionManager, mHandler);
mHighContrastTextManager = new HighContrastTextManager();
mAccessibilityManager.addHighTextContrastStateChangeListener(
mHighContrastTextManager, mHandler);
mViewConfiguration = ViewConfiguration.get(context);
mDensity = context.getResources().getDisplayMetrics().densityDpi;
mNoncompatDensity = context.getResources().getDisplayMetrics().noncompatDensityDpi;
// 处理输入事件的,比如声音按键等
mFallbackEventHandler = new PhoneFallbackEventHandler(context);
mChoreographer = Choreographer.getInstance();
mDisplayManager = (DisplayManager)context.getSystemService(Context.DISPLAY_SERVICE);
if (!sCompatibilityDone) {
sAlwaysAssignFocus = true;
sCompatibilityDone = true;
}
loadSystemProperties();
}
```
这个构造方法主要就是创建一个和窗口属性有关的类,这里我们主要看下WindowSession这个类,剩下的mWindow这个是一个W类,这个类型我们前面已经介绍过了,里面保存的是ViewRootImpl本身以及一个Session,是WMS用来通知客户端View的Binder类,也是一个子窗口类型的token。另外还有个AttachInfo类,我们前面也分析过了,这里保存了这个添加窗口的一些信息,主要的也就是Session和W类,并且会赋值给他的对应View,从而让他的子窗口可以获取到这个token。ViewRootImpl会和他操作的View对应起来,是通过setView方法来设置的,这个也是一个重点方法,我们后面会重点分析。现在我们看下WindowSession是怎么创建他的实例的:
```java
public static IWindowSession getWindowSession() {
synchronized (WindowManagerGlobal.class) {
if (sWindowSession == null) {
try {
// 获取InputMethodManager
InputMethodManager imm = InputMethodManager.getInstance();
// 获取WMS
IWindowManager windowManager = getWindowManagerService();
// 获取Session,在WMS中
sWindowSession = windowManager.openSession(
new IWindowSessionCallback.Stub() {
@Override
public void onAnimatorScaleChanged(float scale) {
// 设置ValueAnimator的缩放值
ValueAnimator.setDurationScale(scale);
}
},
imm.getClient(), imm.getInputContext());
} catch (RemoteException e) {
throw e.rethrowFromSystemServer();
}
}
return sWindowSession;
}
}
```
这个方法是WindowManagerGlobal中的静态方法,可以看到这里会调用WindowManagerService的openSession方法,其参数还有InputMethodManager,这个我们暂且不管,去看看WindowManagerService中的openSession方法:
```java
public IWindowSession openSession(IWindowSessionCallback callback, IInputMethodClient client,
IInputContext inputContext) {
if (client == null)
throw new IllegalArgumentException("null client");
if (inputContext == null)
throw new IllegalArgumentException("null inputContext");
Session session = new Session(this, callback, client, inputContext);
return session;
}
```
这个方法开始检查了下IInputMethodClient和context不为空,然后创建了一个Session类返回,我们看下Session的构造方法:
```java
// Session构造函数,他主要封装了WMS,所以是客户端和WMS沟通的桥梁
// 但是他不仅仅是作为一个WMS桥梁的作用,除了WMS外,他里面还会处理输入法相关的内容
// 参数 client 输入法的客户端部分,负责客户端和IMMS之前的通信
// 参数inputContext 客户端向输入法暴露的接口,负责输入法和客户端通信
public Session(WindowManagerService service, IWindowSessionCallback callback,
IInputMethodClient client, IInputContext inputContext) {
mService = service; // WMS
mCallback = callback;
mClient = client;
mUid = Binder.getCallingUid();
mPid = Binder.getCallingPid();
mLastReportedAnimatorScale = service.getCurrentAnimatorScale();
mCanAddInternalSystemWindow = service.mContext.checkCallingOrSelfPermission(
INTERNAL_SYSTEM_WINDOW) == PERMISSION_GRANTED;
mShowingAlertWindowNotificationAllowed = mService.mShowAlertWindowNotifications;
StringBuilder sb = new StringBuilder();
sb.append("Session{");
sb.append(Integer.toHexString(System.identityHashCode(this)));
sb.append(" ");
sb.append(mPid);
if (mUid < Process.FIRST_APPLICATION_UID) {
sb.append(":");
sb.append(mUid);
} else {
sb.append(":u");
sb.append(UserHandle.getUserId(mUid));
sb.append('a');
sb.append(UserHandle.getAppId(mUid));
}
sb.append("}");
mStringName = sb.toString();
synchronized (mService.mWindowMap) {
if (mService.mInputMethodManager == null && mService.mHaveInputMethods) {
IBinder b = ServiceManager.getService(
Context.INPUT_METHOD_SERVICE);
// 获取系统的IMMS
mService.mInputMethodManager = IInputMethodManager.Stub.asInterface(b);
}
}
long ident = Binder.clearCallingIdentity();
try {
// Note: it is safe to call in to the input method manager
// here because we are not holding our lock.
// 如果IMMS非空
if (mService.mInputMethodManager != null) {
// 把输入法客户端和IMMS同学,以及客户端和输入法之前通信的inputContext,添加到IMMS中
mService.mInputMethodManager.addClient(client, inputContext,
mUid, mPid);
} else {
client.setUsingInputMethod(false);
}
// 设置死亡连接
client.asBinder().linkToDeath(this, 0);
} catch (RemoteException e) {
// The caller has died, so we can just forget about this.
try {
if (mService.mInputMethodManager != null) {
mService.mInputMethodManager.removeClient(client);
}
} catch (RemoteException ee) {
}
} finally {
Binder.restoreCallingIdentity(ident);
}
}
```
通过这个构造方法,我们可以看到Session会持有的不光只有WMS,还有和输入法相关代表客户端输入法的IInputMethodClient以及服务端的InputMethodManager,除此以外后面我们还会看到他的里面还有操作surface的SurfaceSession等等,所以Session其实对于客户端的窗口来说,他不仅仅只是WMS这一些系统服务的中介,而且多个系统服务的中介,当然这些系统服务可以让客户端窗口单独的自己去通信,这样对于客户端来说面对操作的对象就有好多个,有些对象可能相互之间还有联系,所以Session的作用就是整个这些系统服务和客户端的通信,对客户端来说他只需要面对Session这一个对象就可以了,至于具体使用的系统服务交给Session去处理,这样从整体的结构上就比较紧凑了。
Session我们可以从他的字面去理解,就是一个会话的过程,客户端和系统服务之间的会话,可以通过Session这个中介来处理。我们知道ViewRootImpl这个类是对于View的操作,他里面有个W类对象封装了ViewRootImpl这个对象,而且是一个Binder,所以后面我们可以看到Session在和WMS通信的时候会把W类这个实例对象传过去,这样,在服务端也可以直接和客户端进行通信了。这样的话,客户端 -> Session -> 服务端 -> 客户端, 这样一个闭环就形成了。我们看到这里确实WMS流程这块,设计到不同的类和概念很多,但是分析到这里仔细想想,确实可以看出google开发团队对于软件设计的一种思考,虽然我们还有点模糊,但是可以理解他们的这种设计思路,用户我们自己的开发过程中。
Session大致的作用就说这么多吧,具体使用等后面调用到他的时候再说,我们回到前面WindowManagerGlobal中的addView方法,最后会调用ViewRootImpl的setView方法继续后面的流程,我们这篇文章已经说了很多了,后面的流程我们先不说,画一下到目前的流程图,下篇文章继续分析后面的流程。
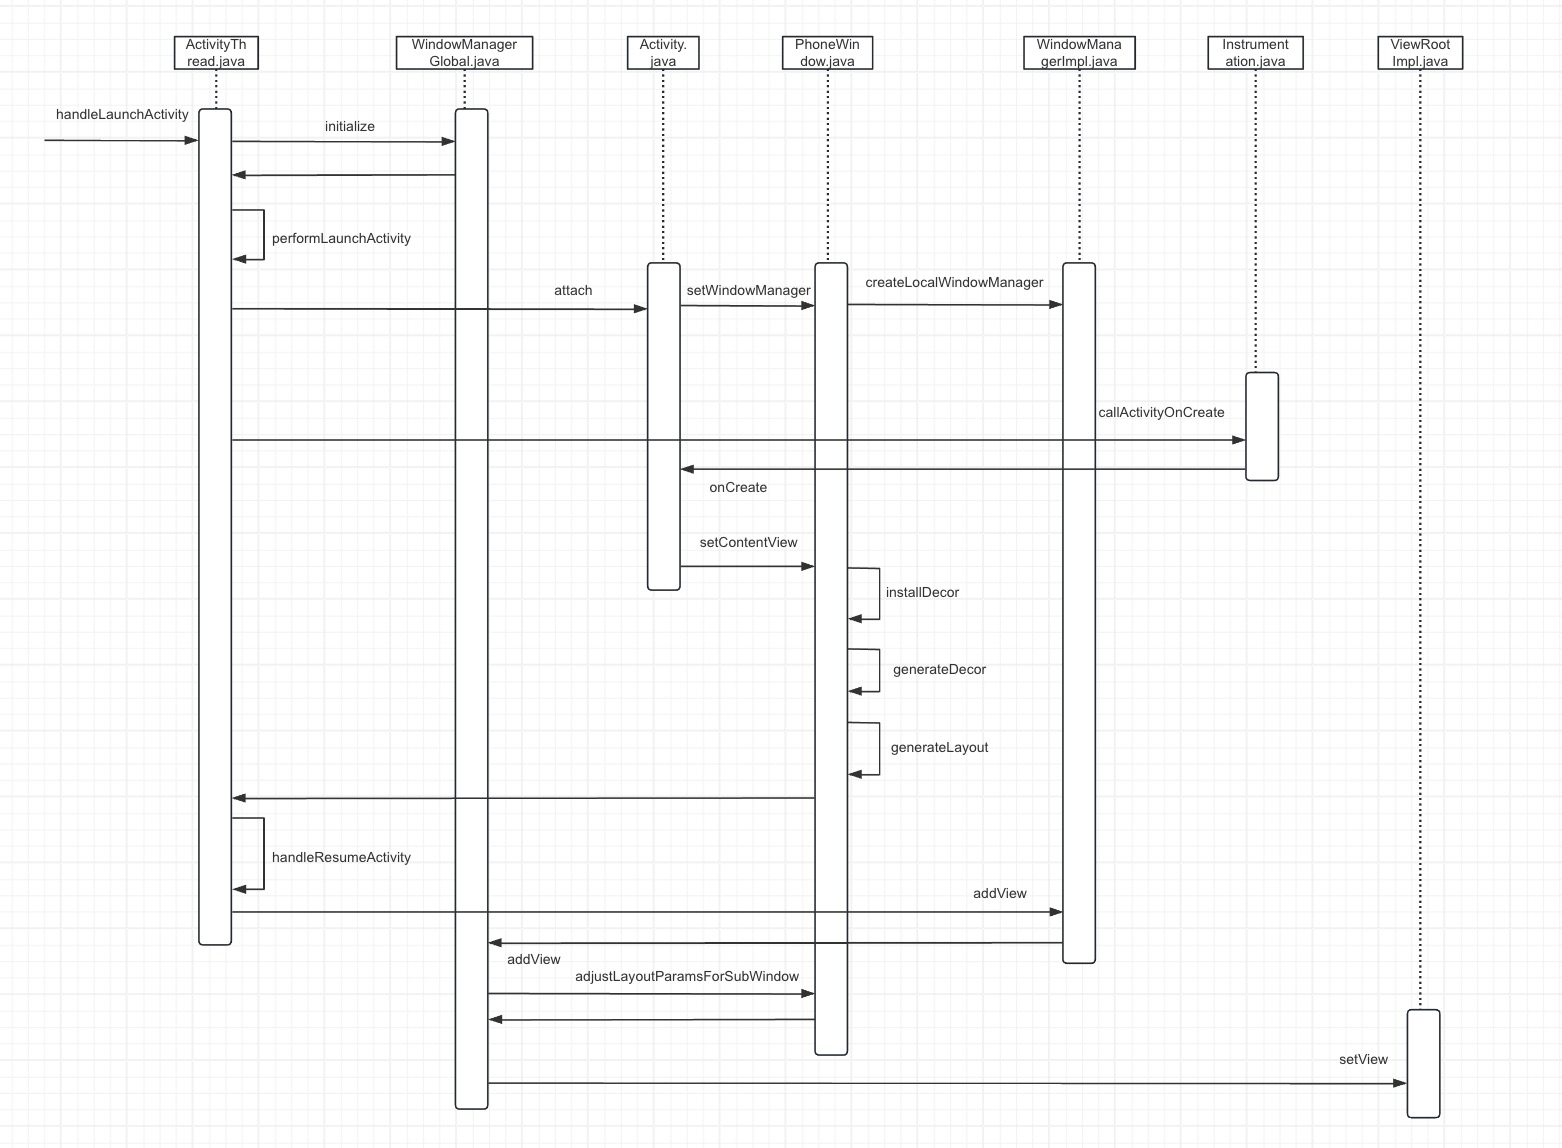

WMS(三)之Acivity启动流程二