
上一篇文章讲到了新建一个进程,在新建完进程后会回调到android.app.ActivityThread的main方法,这篇文章就从main方法开始讲。先看下main方法的代码:
```java
public static void main(String[] args) {
.....................
Process.setArgV0("<pre-initialized>");
Looper.prepareMainLooper(); // Looper
// 创建ActivityThread
// 创建ActivityThread的同时会创建mAppThread变量的实例ApplicationThread,AMS中有ApplicationThreadProxy即是通过binder走到ApplicationThread
// 调用它里面的方法,比如schedulePauseActivity等
ActivityThread thread = new ActivityThread();
thread.attach(false); // 创建成功后attach通知AMS
if (sMainThreadHandler == null) {
sMainThreadHandler = thread.getHandler(); // 赋值Handler
}
if (false) {
Looper.myLooper().setMessageLogging(new
LogPrinter(Log.DEBUG, "ActivityThread"));
}
// End of event ActivityThreadMain.
Trace.traceEnd(Trace.TRACE_TAG_ACTIVITY_MANAGER);
Looper.loop();
throw new RuntimeException("Main thread loop unexpectedly exited");
}
```
我们先从总体上看下这个方法。省略一些无关紧要的初始化步骤,我们可以看到,方法开始先初始化的一个MainLooper,方法的最后调用loop方法等待接受新的消息,这个是handler的内容,本篇文章不准备多讲,不过相信看这篇文章的同学肯定也知道是做什么用的,一个进程正常运行起来后后续都是通过handler来进行消息传递的,而消息的传递都是通过这里的loop循环来处理,这里就是开启了这个loop。这方面的内容就不多说了,在handler分析的文章中会细说,有兴趣的同学可以看hander的分析。
这里我们主要还是看进程的初始化,可以看到这里会new一个ActivityThread,然后执行attach方法。ActivityThread的构造函数比较简单,我们看下:
```java
ActivityThread() {
mResourcesManager = ResourcesManager.getInstance();
}
```
就获取一个ResourcesManager,这个就不多说了,我们接着看下attach方法:
```java
// 创建进程成功后调用ActivityThread的attach方法通知AMS
private void attach(boolean system) {
sCurrentActivityThread = this;
mSystemThread = system; // 是否系统进程
if (!system) {
ViewRootImpl.addFirstDrawHandler(new Runnable() {
@Override
public void run() {
ensureJitEnabled();
}
});
android.ddm.DdmHandleAppName.setAppName("<pre-initialized>",
UserHandle.myUserId());
// ApplicationThread的asBinder就是ApplicationThread
RuntimeInit.setApplicationObject(mAppThread.asBinder());
// 获取AMS的代理
final IActivityManager mgr = ActivityManager.getService();
try {
// 这个方法里面可以研究的也挺多,Instrment就是在这里走下去创建的
mgr.attachApplication(mAppThread);
} catch (RemoteException ex) {
throw ex.rethrowFromSystemServer();
}
// Watch for getting close to heap limit.
BinderInternal.addGcWatcher(new Runnable() {
@Override public void run() {
if (!mSomeActivitiesChanged) {
return;
}
Runtime runtime = Runtime.getRuntime();
long dalvikMax = runtime.maxMemory();
long dalvikUsed = runtime.totalMemory() - runtime.freeMemory();
if (dalvikUsed > ((3*dalvikMax)/4)) {
if (DEBUG_MEMORY_TRIM) Slog.d(TAG, "Dalvik max=" + (dalvikMax/1024)
+ " total=" + (runtime.totalMemory()/1024)
+ " used=" + (dalvikUsed/1024));
mSomeActivitiesChanged = false;
try {
mgr.releaseSomeActivities(mAppThread);
} catch (RemoteException e) {
throw e.rethrowFromSystemServer();
}
}
}
});
} else {
// Don't set application object here -- if the system crashes,
// we can't display an alert, we just want to die die die.
android.ddm.DdmHandleAppName.setAppName("system_process",
UserHandle.myUserId());
try {
mInstrumentation = new Instrumentation();
ContextImpl context = ContextImpl.createAppContext(
this, getSystemContext().mPackageInfo);
mInitialApplication = context.mPackageInfo.makeApplication(true, null);
mInitialApplication.onCreate();
} catch (Exception e) {
throw new RuntimeException(
"Unable to instantiate Application():" + e.toString(), e);
}
}
..............
}
```
方法的参数表示这个是否是一个系统进程,一般来说我们创建的都是非系统进程,前面main调用attach的时候传入的也是false,所以这里我们看前面的分支。
# 通知AMS
这里我们又看到了IActivityManager这个类了,在第一篇文章中我们已经有分析过了,这个是个AIDL,在系统编译后会生成java文件。这个获取的是AMS在调用者端的代理,调用代理的attachApplication方法。在AMS系列文章的第一篇中有讲到过,AIDL真正的java文件是在系统编译后生成的,我们看下生成文件中的这个方法:
```java
// IActivityManager.java
@Override public void attachApplication(android.app.IApplicationThread app) throws android.os.RemoteException
{
android.os.Parcel _data = android.os.Parcel.obtain();
android.os.Parcel _reply = android.os.Parcel.obtain();
try {
_data.writeInterfaceToken(DESCRIPTOR);
_data.writeStrongBinder((((app!=null))?(app.asBinder()):(null)));
mRemote.transact(Stub.TRANSACTION_attachApplication, _data, _reply, 0);
_reply.readException();
}
finally {
_reply.recycle();
_data.recycle();
}
}
```
这个方法的最后可以看到调用了mRemote.transact(Stub.TRANSACTION_attachApplication, _data, _reply, 0),这里的mRemote就是AMS的代理,调用transact后会走到AMS端,我们注意到这里的第一个参数TRANSACTION_attachApplication,在AMS端也是在同一个AIDL文件中执行的,我们在这个文件中再找下TRANSACTION_attachApplication这个值:
```java
// IActivityManager.java
case TRANSACTION_attachApplication:
{
data.enforceInterface(DESCRIPTOR);
android.app.IApplicationThread _arg0;
_arg0 = android.app.IApplicationThread.Stub.asInterface(data.readStrongBinder());
this.attachApplication(_arg0);
reply.writeNoException();
return true;
}
```
找到这个参数的case后,可以看到最后会调用到AMS的attachApplication方法,我们接下去可以在ActivityManagerService中看到这个方法,在继续看这个方法前,
我们看下这个方法的参数_arg0,他是由Stub调用asInterface来的,由之前我们分析过的Binder的知识可以知道,他是返回一个Proxy的,而他的参数是一个BinderProxy(这些都是Binder有关的概念,有兴趣的同学可以先看看Binder系列的文章,这里大概知道他们是什么就可以),他来自于data,我们看下data是什么。
这里我们回到ActivityThread中的attach方法,在看下调用attachApplication方法时候的参数mgr.attachApplication(mAppThread),可以看到参数是变量mAppThread,而mAppThread是一个ApplicationThread对象,我们看下ApplicationThread这个类:
```java
private class ApplicationThread extends IApplicationThread.Stub {
public final void schedulePauseActivity(IBinder token, boolean finished,
boolean userLeaving, int configChanges, boolean dontReport) {
............
}
public final void scheduleStopActivity(IBinder token, boolean showWindow,
int configChanges) {
.............
}
public final void scheduleResumeActivity(IBinder token, int processState,
boolean isForward, Bundle resumeArgs) {
........
}
@Override
public final void scheduleLaunchActivity(Intent intent, IBinder token, int ident,
ActivityInfo info, Configuration curConfig, Configuration overrideConfig,
CompatibilityInfo compatInfo, String referrer, IVoiceInteractor voiceInteractor,
int procState, Bundle state, PersistableBundle persistentState,
List<ResultInfo> pendingResults, List<ReferrerIntent> pendingNewIntents,
boolean notResumed, boolean isForward, ProfilerInfo profilerInfo) {
..........
}
.......................
}
```
可以看到ApplicationThread是一个Stub,看到这个就可以知道他是个Binder了,即AMS和客户端就是通过他来通信的。上面的代码我列出了部分的方法,可以看到都是一些涉及到后续和Actvity有关的方法,由此可以看出,AMS凡是和某个进程通信的时候都是通过这个类作为入口的,通过他在进一步操作这个进程的后续动作。我们回到前面的方法。
# 回到AMS
由此可以知道AMS的attachApplication是一个目标进程的代理,他封装了具有进程间通信能力的Binder,所以AMS通过他就可以和具体的某个进程通信了,我们看下AMS的attachApplication方法:
```java
public final void attachApplication(IApplicationThread thread) {
synchronized (this) {
int callingPid = Binder.getCallingPid();
final long origId = Binder.clearCallingIdentity();
attachApplicationLocked(thread, callingPid); // AMS启动的thread组件
Binder.restoreCallingIdentity(origId);
}
}
```
这里会继续调用attachApplicationLocked方法,我们跟进去看:
```java
private final boolean attachApplicationLocked(IApplicationThread thread,
int pid) {
ProcessRecord app;
long startTime = SystemClock.uptimeMillis();
// 正常情况下,这里已经取得了启动进程的pid了
if (pid != MY_PID && pid >= 0) {
synchronized (mPidsSelfLocked) {
// 通过这个pid,把保存在mPidsSelfLocked的ProcessRecord取出
// 保存是在创建进程前保存的,见方法StartProcessLocked
app = mPidsSelfLocked.get(pid);
}
} else {
app = null;
}
if (app == null) { // 如果没有取得进程,说明有问题,return
Slog.w(TAG, "No pending application record for pid " + pid
+ " (IApplicationThread " + thread + "); dropping process");
EventLog.writeEvent(EventLogTags.AM_DROP_PROCESS, pid);
if (pid > 0 && pid != MY_PID) {
killProcessQuiet(pid);
//TODO: killProcessGroup(app.info.uid, pid);
} else {
try {
thread.scheduleExit();
} catch (Exception e) {
// Ignore exceptions.
}
}
return false;
}
// If this application record is still attached to a previous
// process, clean it up now.
// 如果这个进程和之前某个进行过关联,清除掉之前的
if (app.thread != null) {
handleAppDiedLocked(app, true, true);
}
// Tell the process all about itself.
if (DEBUG_ALL) Slog.v(
TAG, "Binding process pid " + pid + " to record " + app);
// 获取进程名字
final String processName = app.processName;
try {
AppDeathRecipient adr = new AppDeathRecipient(
app, pid, thread);
// 注册一个死亡通知
thread.asBinder().linkToDeath(adr, 0);
app.deathRecipient = adr;
} catch (RemoteException e) {
app.resetPackageList(mProcessStats);
startProcessLocked(app, "link fail", processName);
return false;
}
EventLog.writeEvent(EventLogTags.AM_PROC_BOUND, app.userId, app.pid, app.processName);
// 以下设置一些当前进程的参数
app.makeActive(thread, mProcessStats); // 这个方法把client的进程代理ApplicationThreadProxy赋值给这个ProcessRecord
app.curAdj = app.setAdj = app.verifiedAdj = ProcessList.INVALID_ADJ;
app.curSchedGroup = app.setSchedGroup = ProcessList.SCHED_GROUP_DEFAULT;
app.forcingToImportant = null;
updateProcessForegroundLocked(app, false, false);
app.hasShownUi = false;
app.debugging = false;
app.cached = false;
app.killedByAm = false;
app.killed = false;
// We carefully use the same state that PackageManager uses for
// filtering, since we use this flag to decide if we need to install
// providers when user is unlocked later
app.unlocked = StorageManager.isUserKeyUnlocked(app.userId);
// 移除前面的超是handler
mHandler.removeMessages(PROC_START_TIMEOUT_MSG, app);
// mProcessesReady这个在AMS启动后调用main里面就设置为true了,所以这里一般是true
// 后面一个是persistent应用
boolean normalMode = mProcessesReady || isAllowedWhileBooting(app.info);
...................
checkTime(startTime, "attachApplicationLocked: immediately before bindApplication");
mStackSupervisor.mActivityMetricsLogger.notifyBindApplication(app);
// 这里的bindApplication方法会再次回到客户端,并会创建Instrement
if (app.instr != null) {
thread.bindApplication(processName, appInfo, providers,
app.instr.mClass,
profilerInfo, app.instr.mArguments,
app.instr.mWatcher,
app.instr.mUiAutomationConnection, testMode,
mBinderTransactionTrackingEnabled, enableTrackAllocation,
isRestrictedBackupMode || !normalMode, app.persistent,
new Configuration(getGlobalConfiguration()), app.compat,
getCommonServicesLocked(app.isolated),
mCoreSettingsObserver.getCoreSettingsLocked(),
buildSerial);
} else {
thread.bindApplication(processName, appInfo, providers, null, profilerInfo,
null, null, null, testMode,
mBinderTransactionTrackingEnabled, enableTrackAllocation,
isRestrictedBackupMode || !normalMode, app.persistent,
new Configuration(getGlobalConfiguration()), app.compat,
getCommonServicesLocked(app.isolated),
mCoreSettingsObserver.getCoreSettingsLocked(),
buildSerial);
}
checkTime(startTime, "attachApplicationLocked: immediately after bindApplication");
updateLruProcessLocked(app, false, null);
checkTime(startTime, "attachApplicationLocked: after updateLruProcessLocked");
app.lastRequestedGc = app.lastLowMemory = SystemClock.uptimeMillis();
} catch (Exception e) {
// todo: Yikes! What should we do? For now we will try to
// start another process, but that could easily get us in
// an infinite loop of restarting processes...
Slog.wtf(TAG, "Exception thrown during bind of " + app, e);
app.resetPackageList(mProcessStats);
app.unlinkDeathRecipient();
startProcessLocked(app, "bind fail", processName);
return false;
}
// Remove this record from the list of starting applications.
// 因为已经启动了,从正在启动状态合集中移除这个进程
mPersistentStartingProcesses.remove(app);
if (DEBUG_PROCESSES && mProcessesOnHold.contains(app)) Slog.v(TAG_PROCESSES,
"Attach application locked removing on hold: " + app);
mProcessesOnHold.remove(app);
boolean badApp = false;
boolean didSomething = false;
// See if the top visible activity is waiting to run in this process...
// 这里会调用attachApplicationLocaked来进一步启动activity
if (normalMode) {
try {
// 进一步启动Activity
if (mStackSupervisor.attachApplicationLocked(app)) {
didSomething = true;
}
} catch (Exception e) {
Slog.wtf(TAG, "Exception thrown launching activities in " + app, e);
badApp = true;
}
}
// Find any services that should be running in this process...
if (!badApp) {
try {
// 这里是启动一个service
didSomething |= mServices.attachApplicationLocked(app, processName);
checkTime(startTime, "attachApplicationLocked: after mServices.attachApplicationLocked");
} catch (Exception e) {
Slog.wtf(TAG, "Exception thrown starting services in " + app, e);
badApp = true;
}
}
// Check if a next-broadcast receiver is in this process...
if (!badApp && isPendingBroadcastProcessLocked(pid)) {
try {
// 这里是启动广播
didSomething |= sendPendingBroadcastsLocked(app);
checkTime(startTime, "attachApplicationLocked: after sendPendingBroadcastsLocked");
} catch (Exception e) {
// If the app died trying to launch the receiver we declare it 'bad'
Slog.wtf(TAG, "Exception thrown dispatching broadcasts in " + app, e);
badApp = true;
}
}
................
return true;
}
```
还记得在AMS创建一个进程前,会创建一个ProcessRecord对象把他保存在mPidsSelfLocked里,所以这里首先判断有没有这个ProcessRecord,如果没有的话说明有问题,就退出了。
之后如果之前已经有创建了这个进程了,那么把这个老进程清掉,后面接着会调用makeActive方法,把新进程赋值给他。
经过一系列的操作之后,最后会调用bindApplication方法。这里又会回到客户端进程那里。这里方法的深入我们等下讲,先继续往后看,把这个方法先看完。
接下来我们看到会有调用到attachApplicationLocked这个方法,这里会分别启动Activity,Service和BoardCast。
#再次回到Application
大致这个方法就做了这些事,我们看到这里除了更新下AMS中保留的该进程的信息外,主要有2个方法,一个是再次回调到客户端进程中。另一个就是启动要求的Activity。我们先看下bindApplication这个方法,他最终会回调到前面我们说过的ApplicationThread类的bindApplication方法中:
```java
public final void bindApplication(String processName, ApplicationInfo appInfo,
List<ProviderInfo> providers, ComponentName instrumentationName,
ProfilerInfo profilerInfo, Bundle instrumentationArgs,
IInstrumentationWatcher instrumentationWatcher,
IUiAutomationConnection instrumentationUiConnection, int debugMode,
boolean enableBinderTracking, boolean trackAllocation,
boolean isRestrictedBackupMode, boolean persistent, Configuration config,
CompatibilityInfo compatInfo, Map services, Bundle coreSettings,
String buildSerial) {
if (services != null) {
// Setup the service cache in the ServiceManager
ServiceManager.initServiceCache(services);
}
setCoreSettings(coreSettings);
// 这里组装数据,继续往后传
AppBindData data = new AppBindData();
data.processName = processName;
data.appInfo = appInfo;
data.providers = providers;
data.instrumentationName = instrumentationName;
data.instrumentationArgs = instrumentationArgs;
data.instrumentationWatcher = instrumentationWatcher;
data.instrumentationUiAutomationConnection = instrumentationUiConnection;
data.debugMode = debugMode;
data.enableBinderTracking = enableBinderTracking;
data.trackAllocation = trackAllocation;
data.restrictedBackupMode = isRestrictedBackupMode;
data.persistent = persistent;
data.config = config;
data.compatInfo = compatInfo;
data.initProfilerInfo = profilerInfo;
data.buildSerial = buildSerial;
sendMessage(H.BIND_APPLICATION, data); // 继续bind application
}
```
这个方法可以看到,首先会判断从AMS那里传过来的参数services是否为空,如果非空的话,会把他设给ServiceManager的缓存。这个参数是什么呢?我们可以看到AMS中设置的方法:
```java
private HashMap<String, IBinder> getCommonServicesLocked(boolean isolated) {
// Isolated processes won't get this optimization, so that we don't
// violate the rules about which services they have access to.
if (isolated) {
if (mIsolatedAppBindArgs == null) {
mIsolatedAppBindArgs = new HashMap<>();
mIsolatedAppBindArgs.put("package", ServiceManager.getService("package"));
}
return mIsolatedAppBindArgs;
}
if (mAppBindArgs == null) {
mAppBindArgs = new HashMap<>();
// Setup the application init args
mAppBindArgs.put("package", ServiceManager.getService("package"));
mAppBindArgs.put("window", ServiceManager.getService("window"));
mAppBindArgs.put(Context.ALARM_SERVICE,
ServiceManager.getService(Context.ALARM_SERVICE));
}
return mAppBindArgs;
}
```
可以看到他是PMS,WMS和AlarmManagerService,可见在进程初始化的时候,这3个模块是优先获取的。我们回到前面bindApplication方法。
接着组装了一些数据后,就会通过handler发送BIND_APPLICATION消息,接着走到Hander中:
```java
case BIND_APPLICATION: // AMS中处理完进程的启动后,会再次通知客户端,会走到这里
Trace.traceBegin(Trace.TRACE_TAG_ACTIVITY_MANAGER, "bindApplication");
AppBindData data = (AppBindData)msg.obj;
handleBindApplication(data);
Trace.traceEnd(Trace.TRACE_TAG_ACTIVITY_MANAGER);
break;
```
继续调用handleBindApplication方法:
```java
private void handleBindApplication(AppBindData data) {
............
data.info = getPackageInfoNoCheck(data.appInfo, data.compatInfo);
............
if (ii != null) {
final ApplicationInfo instrApp = new ApplicationInfo();
ii.copyTo(instrApp);
instrApp.initForUser(UserHandle.myUserId());
final LoadedApk pi = getPackageInfo(instrApp, data.compatInfo,
appContext.getClassLoader(), false, true, false);
final ContextImpl instrContext = ContextImpl.createAppContext(this, pi);
try {
final ClassLoader cl = instrContext.getClassLoader();
mInstrumentation = (Instrumentation)
cl.loadClass(data.instrumentationName.getClassName()).newInstance();
} catch (Exception e) {
throw new RuntimeException(
"Unable to instantiate instrumentation "
+ data.instrumentationName + ": " + e.toString(), e);
}
final ComponentName component = new ComponentName(ii.packageName, ii.name);
mInstrumentation.init(this, instrContext, appContext, component,
data.instrumentationWatcher, data.instrumentationUiAutomationConnection);
if (mProfiler.profileFile != null && !ii.handleProfiling
&& mProfiler.profileFd == null) {
mProfiler.handlingProfiling = true;
final File file = new File(mProfiler.profileFile);
file.getParentFile().mkdirs();
Debug.startMethodTracing(file.toString(), 8 * 1024 * 1024);
}
} else {
mInstrumentation = new Instrumentation(); // 这里创建Instrumentation
}
...............
try {
// If the app is being launched for full backup or restore, bring it up in
// a restricted environment with the base application class.
Application app = data.info.makeApplication(data.restrictedBackupMode, null);
mInitialApplication = app;
// don't bring up providers in restricted mode; they may depend on the
// app's custom Application class
if (!data.restrictedBackupMode) {
if (!ArrayUtils.isEmpty(data.providers)) {
installContentProviders(app, data.providers);
// For process that contains content providers, we want to
// ensure that the JIT is enabled "at some point".
mH.sendEmptyMessageDelayed(H.ENABLE_JIT, 10*1000);
}
}
// Do this after providers, since instrumentation tests generally start their
// test thread at this point, and we don't want that racing.
try {
mInstrumentation.onCreate(data.instrumentationArgs);
}
catch (Exception e) {
throw new RuntimeException(
"Exception thrown in onCreate() of "
+ data.instrumentationName + ": " + e.toString(), e);
}
try {
// 这里最终会调用Application的onCreate
mInstrumentation.callApplicationOnCreate(app);
} catch (Exception e) {
if (!mInstrumentation.onException(app, e)) {
throw new RuntimeException(
"Unable to create application " + app.getClass().getName()
+ ": " + e.toString(), e);
}
}
.................
}
```
这个方法非常的长,我们只看我们关心的,这里第一个地方。会创建一个LoadApk,LoadApk是一个描述和apk底层信息比较相关的类,他的里面包括了ActivityThread,包名,ClassLoader,以及Receivers和Service的map等。看下他的调用方法getPackageInfoNoCheck:
```java
public final LoadedApk getPackageInfoNoCheck(ApplicationInfo ai) {
return getPackageInfo(ai, null, false, true);
}
private final LoadedApk getPackageInfo(ApplicationInfo aInfo,
ClassLoader baseLoader, boolean securityViolation, boolean includeCode) {
synchronized (mPackages) {
WeakReference<LoadedApk> ref;
if (includeCode) {
ref = mPackages.get(aInfo.packageName); // 根据包名获得LoadedApk
} else {
ref = mResourcePackages.get(aInfo.packageName);
}
LoadedApk packageInfo = ref != null ? ref.get() : null;
if (packageInfo == null || (packageInfo.mResources != null
&& !packageInfo.mResources.getAssets().isUpToDate())) {
if (localLOGV) Slog.v(TAG, (includeCode ? "Loading code package "
: "Loading resource-only package ") + aInfo.packageName
+ " (in " + (mBoundApplication != null
? mBoundApplication.processName : null)
+ ")");
packageInfo =
new LoadedApk(this, aInfo, this, baseLoader,
securityViolation, includeCode &&
(aInfo.flags&ApplicationInfo.FLAG_HAS_CODE) != 0);
if (includeCode) { // 把LoadedApk加入集合中
mPackages.put(aInfo.packageName,
new WeakReference<LoadedApk>(packageInfo));
} else {
mResourcePackages.put(aInfo.packageName,
new WeakReference<LoadedApk>(packageInfo));
}
}
return packageInfo;
}
}
```
最终会调到getPackageInfo方法。ActivityThread有个变量mPackages,他是一个以包名为key,LoadApk为value的map。这个方法首先看下有没有这个包名的LoadApk,有就返回,没有就new一个。之后把他存到mPackages中。
我们回到handleBindApplication方法。接下来还记得Instrumentation这个类吗,我们开始启动一个Activity的时候就有通过这个类来调用,具体这个类创建的细节我们也不关心了,主要知道这个类是在进程创建后回调的时候创建的。
之后会调用LoadApk的makeApplication方法,来创建一个Application,这个Application就是我们平时开发中最熟知的那个Application了。我们看下makeApplication这个方法:
```java
public Application makeApplication(boolean forceDefaultAppClass,
Instrumentation instrumentation) {
if (mApplication != null) { // 如果已经有Application了
return mApplication; // 返回之
}
Trace.traceBegin(Trace.TRACE_TAG_ACTIVITY_MANAGER, "makeApplication");
Application app = null;
String appClass = mApplicationInfo.className; // 获取Application的类名
if (forceDefaultAppClass || (appClass == null)) { // 如果要求强制用默认类名,或者没有获取到类名
appClass = "android.app.Application"; // 用这个默认的类名
}
try {
// 下面开始是创建Application的Context,除了Application有Context,每个Activity
// 也有Context,比如创建每个Activity的时候也会创建自己的Context
java.lang.ClassLoader cl = getClassLoader(); // 获取类加载器
if (!mPackageName.equals("android")) {
Trace.traceBegin(Trace.TRACE_TAG_ACTIVITY_MANAGER,
"initializeJavaContextClassLoader");
// 会把类加载器设置给主线程的
initializeJavaContextClassLoader();
Trace.traceEnd(Trace.TRACE_TAG_ACTIVITY_MANAGER);
}
// 创建Application的context
ContextImpl appContext = ContextImpl.createAppContext(mActivityThread, this);
// 创建Application
app = mActivityThread.mInstrumentation.newApplication(
cl, appClass, appContext);
// 把Application设置给context,其实就是context持有application
appContext.setOuterContext(app);
// 通过以上可以看出Application其实就是封装了Context,即持有Context。
// Context包含了许多东西,打的来说,一个是Resource资源,另外是其他模块的Manager,
// 比如AlarmManager,LocationManger,PowerManager,AudioManger等等
} catch (Exception e) {
if (!mActivityThread.mInstrumentation.onException(app, e)) {
Trace.traceEnd(Trace.TRACE_TAG_ACTIVITY_MANAGER);
throw new RuntimeException(
"Unable to instantiate application " + appClass
+ ": " + e.toString(), e);
}
}
mActivityThread.mAllApplications.add(app); // 把Application加入当前进程集合
mApplication = app; //设置本进程的application
if (instrumentation != null) {
try {
// 调用Application的Oncreate
instrumentation.callApplicationOnCreate(app);
} catch (Exception e) {
if (!instrumentation.onException(app, e)) {
Trace.traceEnd(Trace.TRACE_TAG_ACTIVITY_MANAGER);
throw new RuntimeException(
"Unable to create application " + app.getClass().getName()
+ ": " + e.toString(), e);
}
}
}
..................
return app;
}
```
LoadApk中的mApplication变量会保存已经创建的Application。如果有则返回,没有的话接下就会要创建一个Application。首先通过之前PMS的解析可以获取在minifest中的Application类名(如果有自定义的话,没自定义默认android.app.Application),由于这里如果自定义类的话,每个应用的类是不同的,所以只能知道一个类名,所以需要通过反射来创建,既然反射的话,必然要用到类加载器,所以这里先调用getClassLoader获得类加载器,然后创建一个Context。对于Context我们平日的开发中经常会接触,但是他里面到底是些什么呢,我们大概看一下:
```java
public abstract class Context {
..............
public abstract AssetManager getAssets();
public abstract Resources getResources();
public abstract PackageManager getPackageManager();
public abstract ContentResolver getContentResolver();
public abstract Looper getMainLooper();
public abstract ApplicationInfo getApplicationInfo();
public abstract ClassLoader getClassLoader();
.............
}
```
可以看到Context里面包含的还是挺多东西的,比如像asset,resource,packManager,resolver,loop,ApplicationInfo,classLoader等等都有。此外他 的实现类ContextImpl也包含有一些数据:
```java
class ContextImpl extends Context {
..............
final @NonNull ActivityThread mMainThread;
final @NonNull LoadedApk mPackageInfo;
private final @Nullable IBinder mActivityToken;
...............
}
```
可以看到这里包含了ActivityThread,LoadedApk,IBinder(也就是ActivityRecord)。所以Context包含了程序在运行过程中的种种资源数据,通过createAppContext方法创建后,下面在创建Application的时候需要把这个context传过去,创建Application通过newApplication:
```java
public Application newApplication(ClassLoader cl, String className, Context context)
throws InstantiationException, IllegalAccessException,
ClassNotFoundException {
return newApplication(cl.loadClass(className), context);
}
static public Application newApplication(Class<?> clazz, Context context)
throws InstantiationException, IllegalAccessException,
ClassNotFoundException {
Application app = (Application)clazz.newInstance();
// 把context传递给ContextWrapper
// 把LoadAPK传递给Application
app.attach(context);
return app;
}
```
可以看到这里最终通过clazz.newInstance()反射来创建这个Application,之后调用attach方法,把context传过去:
```java
/* package */ final void attach(Context context) {
attachBaseContext(context);
// Application持有LoadApk
mLoadedApk = ContextImpl.getImpl(context).mPackageInfo;
}
```
这里看到把context会传给Application,Application就会持有Context,另外还会把LoadApk传给Application。这样一个Application就持有了一个Context。下面还会调用setOuterContext把Application传给Context,这样Context也会持有一个Application。最后把创建的Application加入到ActivityThread的mAllApplications集合中,再调用Instrument的callApplicationOnCreate方法:
```java
public void callApplicationOnCreate(Application app) {
app.onCreate();
}
```
可以看到这里会调用Application的onCreate方法,这个方法大家应该都很熟悉了吧,一般我们开发app需要在进程起来后做一些初始化动作的时候会覆写这个方法。
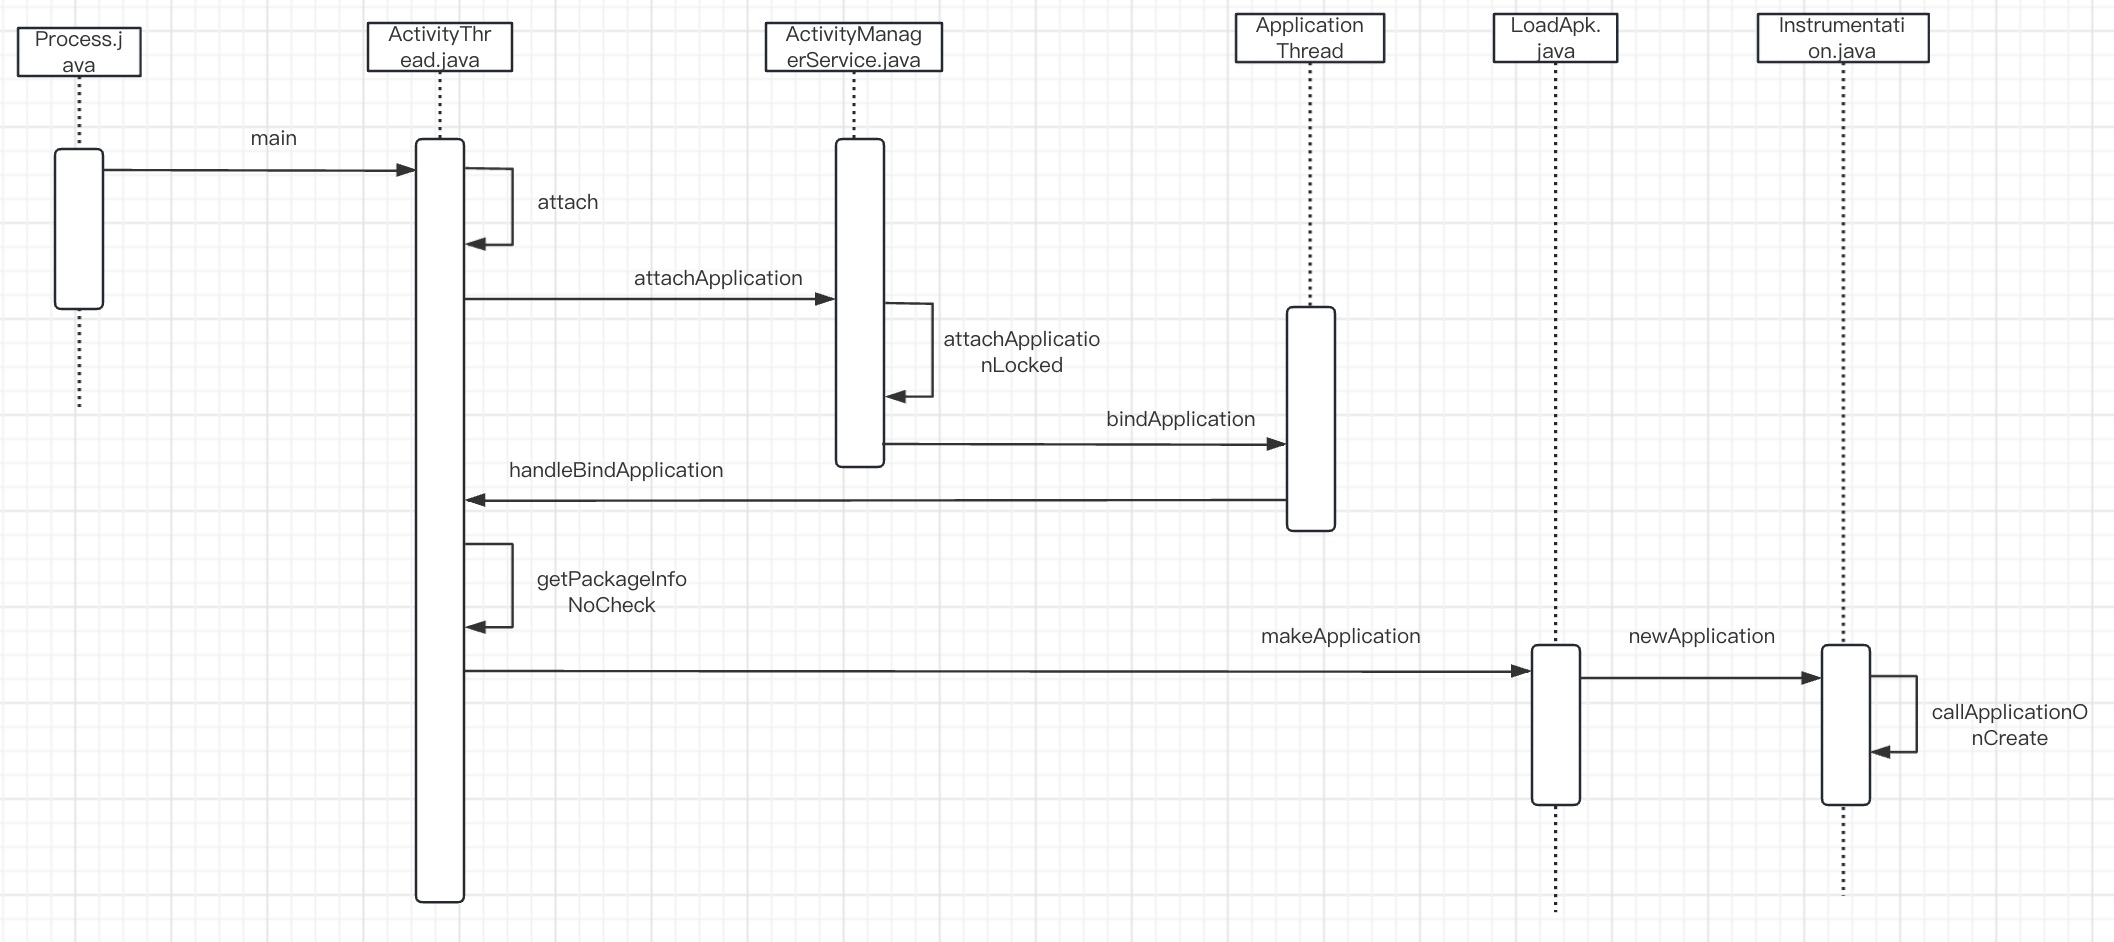
返回到handleBindApplication方法,至此,一个进程就已经创建完毕了。接下去会继续在前面的AMS中往下执行,如果要启动一个新Activity的话,接下去就是启动Activity的流程了,这个我们等会说,先把Application的启动流程时序图画一下作为目前的小结。
#启动Activity
前面分析到AMSattachApplicationLocked方法的时候,除了创建进程外,接下去还会调用attachApplicationLocked方法去启动Activity,我们现在从这个方法开始看怎么启动一个Activity的:
```java
boolean attachApplicationLocked(ProcessRecord app) throws RemoteException {
final String processName = app.processName; // 获取进程名
boolean didSomething = false;
// 遍历所有屏幕
for (int displayNdx = mActivityDisplays.size() - 1; displayNdx >= 0; --displayNdx) {
// 获取每个屏幕下的所有ActivityStack
ArrayList<ActivityStack> stacks = mActivityDisplays.valueAt(displayNdx).mStacks;
// 遍历所有ActivityStack
for (int stackNdx = stacks.size() - 1; stackNdx >= 0; --stackNdx) {
// 获取每个ActivityStack
final ActivityStack stack = stacks.get(stackNdx);
// 如果不是聚焦stack跳过
if (!isFocusedStack(stack)) {
continue;
}
// 获取顶部activity
ActivityRecord hr = stack.topRunningActivityLocked();
if (hr != null) {
// 如果顶部的这个activity还没有进程
// uid和现在这个进程一样,经常名也一样
// 那就启动
if (hr.app == null && app.uid == hr.info.applicationInfo.uid
&& processName.equals(hr.processName)) {
try {
// 这里开始启动这个Activity
if (realStartActivityLocked(hr, app, true, true)) {
didSomething = true;
}
} catch (RemoteException e) {
Slog.w(TAG, "Exception in new application when starting activity "
+ hr.intent.getComponent().flattenToShortString(), e);
throw e;
}
}
}
}
}
if (!didSomething) {
ensureActivitiesVisibleLocked(null, 0, !PRESERVE_WINDOWS);
}
return didSomething;
}
```
上一篇文章分析怎么确定一个启动的ActivityStack和任务栈的时候,我们已经把要启动的ActivityRecord放入任务栈顶部了,并且ActivityStack也调整为焦点了,所以这个方法开始遍历屏幕后取出焦点的ActivityStack,然后再取出任务栈顶的ActivityRecord。由于这里的流程我们讨论的是,在没有存在进程的情况下,新创建进程后再启动Activity,所以这里的ActivityRecord中是没有记录ProcessRecord的,所以这里经过一些校验后,确认这个ActivityRecord是我们要启动的Activity后,调用realStartActivityLocked方法继续启动Activity。
# 从AMS回调到进程中启动Activity
realStartActivityLocked这个方法我们在上一篇文章讲到,在已经存在进程的情况下也是会调用到这个方法的,上一篇文章分析到了这个方法执行到scheduleLaunchActivity这个方法,也就是跨进程调用ApplicationThread类的scheduleLaunchActivity方法,这个跨进程的过程前面分析创建进程的时候也分析过了,这是一样的套路,就不多说了,我们直接看进程的scheduleLaunchActivity这个方法:
```java
public final void scheduleLaunchActivity(Intent intent, IBinder token, int ident,
ActivityInfo info, Configuration curConfig, Configuration overrideConfig,
CompatibilityInfo compatInfo, String referrer, IVoiceInteractor voiceInteractor,
int procState, Bundle state, PersistableBundle persistentState,
List<ResultInfo> pendingResults, List<ReferrerIntent> pendingNewIntents,
boolean notResumed, boolean isForward, ProfilerInfo profilerInfo) {
updateProcessState(procState, false);
ActivityClientRecord r = new ActivityClientRecord(); // 每个Activity在client都有一个ActivityClientRecord
r.token = token; // token是AMS中的ActivityRecord
r.ident = ident; // 一个根据ActivityRecord,即上面的token计算出来的hashcode。可以参见System.identityHashCode(r)
r.intent = intent; // 启动时候的Intent
r.referrer = referrer;
r.voiceInteractor = voiceInteractor;
r.activityInfo = info; // 可以理解成minifest
r.compatInfo = compatInfo;
r.state = state; // onsaveInstance的Bundle
r.persistentState = persistentState;
r.pendingResults = pendingResults;
r.pendingIntents = pendingNewIntents;
r.startsNotResumed = notResumed;
r.isForward = isForward;
r.profilerInfo = profilerInfo;
r.overrideConfig = overrideConfig;
updatePendingConfiguration(curConfig);
sendMessage(H.LAUNCH_ACTIVITY, r); // 发送Hander消息
}
```
这里首先会创建一个ActivityClientRecord对象,我们知道每个Activity在AMS中的对象是ActivityRecord,那么回到进程中对应的就是ActivityClientRecord,把封装了从AMS中传过来的数据,然后通过handler继续调用:
```java
case LAUNCH_ACTIVITY: { // 启动一个Activity后,会走到这里
Trace.traceBegin(Trace.TRACE_TAG_ACTIVITY_MANAGER, "activityStart");
final ActivityClientRecord r = (ActivityClientRecord) msg.obj;
// 把LoadApk赋值给这个Activity的packageInfo
r.packageInfo = getPackageInfoNoCheck(
r.activityInfo.applicationInfo, r.compatInfo);
// 启动一个Activity
handleLaunchActivity(r, null, "LAUNCH_ACTIVITY");
Trace.traceEnd(Trace.TRACE_TAG_ACTIVITY_MANAGER);
} break;
```
这个方法会通过调用getPackageInfoNoCheck来获取一个loadApk,这个方法在前面已经介绍过了,这个不多说了。之后继续调用handleLaunchActivity方法:
```java
private void handleLaunchActivity(ActivityClientRecord r, Intent customIntent, String reason) {
unscheduleGcIdler(); // 这个是取消gc,我猜是既然要启动一个新界面了,就不gc了,怕影响启动
mSomeActivitiesChanged = true;
if (r.profilerInfo != null) {
mProfiler.setProfiler(r.profilerInfo);
mProfiler.startProfiling();
}
// Make sure we are running with the most recent config.
handleConfigurationChanged(null, null);
if (localLOGV) Slog.v(
TAG, "Handling launch of " + r);
// Initialize before creating the activity
WindowManagerGlobal.initialize();
// 启动一个Activity
Activity a = performLaunchActivity(r, customIntent);
if (a != null) {
r.createdConfig = new Configuration(mConfiguration);
reportSizeConfigurations(r);
Bundle oldState = r.state;
// 调用onResume
handleResumeActivity(r.token, false, r.isForward,
!r.activity.mFinished && !r.startsNotResumed, r.lastProcessedSeq, reason);
// 如果这个Activity起来后,不需要resume,那么就pause他
if (!r.activity.mFinished && r.startsNotResumed) {
performPauseActivityIfNeeded(r, reason);
if (r.isPreHoneycomb()) {
r.state = oldState;
}
}
} else {
// If there was an error, for any reason, tell the activity manager to stop us.
try {
// 如果这个activity为null,finish他
ActivityManager.getService()
.finishActivity(r.token, Activity.RESULT_CANCELED, null,
Activity.DONT_FINISH_TASK_WITH_ACTIVITY);
} catch (RemoteException ex) {
throw ex.rethrowFromSystemServer();
}
}
}
```
这个方法开始先调用unscheduleGcIdler方法,这个方法是取消gc垃圾回收,之所以在开始先取消GC垃圾回收,我的猜测是gc可能会引起一些对象被销毁,现在正在启动一个Activity,好不容易走到这里,如果gc把启动时需要的对象销毁了,那么就得不偿失了,所以这取消gc垃圾回收是为了不影响正常的Activity启动。
之后经过WMS初始化等操作,执行了performLaunchActivity方法:
```java
private Activity performLaunchActivity(ActivityClientRecord r, Intent customIntent) {
// System.out.println("##### [" + System.currentTimeMillis() + "] ActivityThread.performLaunchActivity(" + r + ")");
ActivityInfo aInfo = r.activityInfo; // 获取Activity的minifest
if (r.packageInfo == null) { // 如果LoadApk为空,创建之
r.packageInfo = getPackageInfo(aInfo.applicationInfo, r.compatInfo,
Context.CONTEXT_INCLUDE_CODE);
}
ComponentName component = r.intent.getComponent(); // 获取这个Activity的包名和类名
if (component == null) { // 如果component为null,即包名和类名是空,重新解析之
component = r.intent.resolveActivity(
mInitialApplication.getPackageManager());
r.intent.setComponent(component);
}
// 这个字段非null,说明是一个alias的Activity,那么需要启动真正的Activity
// targetActivity这个字段就是真正的Activity,重新拼装包名和类名
if (r.activityInfo.targetActivity != null) {
component = new ComponentName(r.activityInfo.packageName,
r.activityInfo.targetActivity);
}
// 创建context
ContextImpl appContext = createBaseContextForActivity(r);
Activity activity = null;
try {
java.lang.ClassLoader cl = appContext.getClassLoader(); // 获得一个类加载器
// 这里通过类加载器来newInstance这个Activity类
activity = mInstrumentation.newActivity(
cl, component.getClassName(), r.intent);
StrictMode.incrementExpectedActivityCount(activity.getClass());
r.intent.setExtrasClassLoader(cl);
r.intent.prepareToEnterProcess();
if (r.state != null) {
r.state.setClassLoader(cl);
}
} catch (Exception e) {
if (!mInstrumentation.onException(activity, e)) {
throw new RuntimeException(
"Unable to instantiate activity " + component
+ ": " + e.toString(), e);
}
}
```
这个方法我们分两段来看,以上是第一段。首先看下ActivityClientRecord中loadApk有没有,如果没有的话调用getPackageInfo获取,这个前面也分析过了。
接着看下ComponentName有没有,如果没有的话,重新获取这个intent的包名和类型,返回一个ComponentName。
再往下,我们看下ActivityInfo中的targetActivity字段是否为空,ActivityInfo可以看成是PMS解析minifest后的封装,如果targetActivity不为空则说明这是一个alias的Activity,所以targetActivity才是代表真正的Activity,所以这时候需要修改下ComponentName,重新获取包名和类型来new一个ComponentName。
前面分析创建一个进程的时候看到,创建一个进程的时候需要有个Context,同样创建一个Activity的时候也需要一个context,这个也很正常,我们平时开发的时候无论是application还是activity都是可以获取Context的,所以这里Actvity通过createBaseContextForActivity方法来创建context。
```java
// 创建Activity的Context返回
private ContextImpl createBaseContextForActivity(ActivityClientRecord r) {
final int displayId;
try {
displayId = ActivityManager.getService().getActivityDisplayId(r.token);
} catch (RemoteException e) {
throw e.rethrowFromSystemServer();
}
// 创建Activity的Context
ContextImpl appContext = ContextImpl.createActivityContext(
this, r.packageInfo, r.activityInfo, r.token, displayId, r.overrideConfig);
// 下面是debug模式下的处理,可以忽略
final DisplayManagerGlobal dm = DisplayManagerGlobal.getInstance();
// For debugging purposes, if the activity's package name contains the value of
// the "debug.use-second-display" system property as a substring, then show
// its content on a secondary display if there is one.
String pkgName = SystemProperties.get("debug.second-display.pkg");
if (pkgName != null && !pkgName.isEmpty()
&& r.packageInfo.mPackageName.contains(pkgName)) {
for (int id : dm.getDisplayIds()) {
if (id != Display.DEFAULT_DISPLAY) {
Display display =
dm.getCompatibleDisplay(id, appContext.getResources());
appContext = (ContextImpl) appContext.createDisplayContext(display);
break;
}
}
}
return appContext;
}
```
这个方法通过调用createActivityContext来获取context,我们继续跟进去看一下:
```java
static ContextImpl createActivityContext(ActivityThread mainThread,
LoadedApk packageInfo, ActivityInfo activityInfo, IBinder activityToken, int displayId,
Configuration overrideConfiguration) {
if (packageInfo == null) throw new IllegalArgumentException("packageInfo");
String[] splitDirs = packageInfo.getSplitResDirs();
// 获取类加载器
ClassLoader classLoader = packageInfo.getClassLoader();
if (packageInfo.getApplicationInfo().requestsIsolatedSplitLoading()) {
Trace.traceBegin(Trace.TRACE_TAG_RESOURCES, "SplitDependencies");
try {
classLoader = packageInfo.getSplitClassLoader(activityInfo.splitName);
splitDirs = packageInfo.getSplitPaths(activityInfo.splitName);
} catch (NameNotFoundException e) {
// Nothing above us can handle a NameNotFoundException, better crash.
throw new RuntimeException(e);
} finally {
Trace.traceEnd(Trace.TRACE_TAG_RESOURCES);
}
}
// new一个context
// Context持有着ActivityThread,LoadedApk,ActivityRecord,classLoader
ContextImpl context = new ContextImpl(null, mainThread, packageInfo, activityInfo.splitName,
activityToken, null, 0, classLoader);
// Clamp display ID to DEFAULT_DISPLAY if it is INVALID_DISPLAY.
displayId = (displayId != Display.INVALID_DISPLAY) ? displayId : Display.DEFAULT_DISPLAY;
final CompatibilityInfo compatInfo = (displayId == Display.DEFAULT_DISPLAY)
? packageInfo.getCompatibilityInfo()
: CompatibilityInfo.DEFAULT_COMPATIBILITY_INFO;
final ResourcesManager resourcesManager = ResourcesManager.getInstance();
// Create the base resources for which all configuration contexts for this Activity
// will be rebased upon.
// 设置context的resource
context.setResources(resourcesManager.createBaseActivityResources(activityToken, // ActivityRecord
packageInfo.getResDir(),
splitDirs,
packageInfo.getOverlayDirs(),
packageInfo.getApplicationInfo().sharedLibraryFiles,
displayId,
overrideConfiguration,
compatInfo,
classLoader));
context.mDisplay = resourcesManager.getAdjustedDisplay(displayId,
context.getResources());
return context;
}
```
这个方法我们看到同样也是先new一个ContextImpl,由于这里是Activity的context,所以这里除了必要的一些context信息外,还需要有displayId和CompatibilityInfo,displayId代表着这个Activity将被显示在哪个屏幕上,CompatibilityInfo是保存着显示适配的一些数据,比如显示的宽度大小限制,屏幕显示密度等,把这些和显示有关的数据也要设置给context,之后返回这个context。
回到performLaunchActivity方法,得到了context后,和之前创建进程时的套路一样,先获得类加载器,然后调用Instrument的newActivity方法创建Activity:
```java
public Activity newActivity(ClassLoader cl, String className,
Intent intent)
throws InstantiationException, IllegalAccessException,
ClassNotFoundException {
return (Activity)cl.loadClass(className).newInstance();
}
```
这里很简单利用反射来创建Activity,之后就返回了。
我们回到performLaunchActivity方法,接着看后半段代码:
```java
try {
// 创建Application
Application app = r.packageInfo.makeApplication(false, mInstrumentation);
if (localLOGV) Slog.v(TAG, "Performing launch of " + r);
if (localLOGV) Slog.v(
TAG, r + ": app=" + app
+ ", appName=" + app.getPackageName()
+ ", pkg=" + r.packageInfo.getPackageName()
+ ", comp=" + r.intent.getComponent().toShortString()
+ ", dir=" + r.packageInfo.getAppDir());
if (activity != null) {
// 获取activity的名字
CharSequence title = r.activityInfo.loadLabel(appContext.getPackageManager());
Configuration config = new Configuration(mCompatConfiguration);
if (r.overrideConfig != null) {
config.updateFrom(r.overrideConfig);
}
if (DEBUG_CONFIGURATION) Slog.v(TAG, "Launching activity "
+ r.activityInfo.name + " with config " + config);
Window window = null;
if (r.mPendingRemoveWindow != null && r.mPreserveWindow) {
window = r.mPendingRemoveWindow;
r.mPendingRemoveWindow = null;
r.mPendingRemoveWindowManager = null;
}
// 把当前activity设置到这个Context中
appContext.setOuterContext(activity);
// 初始化新建的这个activity,比如 Context,ActivityThread,ActivityRecord
// Activity身份的ident,application,启动这个activity的Intent,minifest,titile名字
// 以及一些config change等等
activity.attach(appContext, this, getInstrumentation(), r.token,
r.ident, app, r.intent, r.activityInfo, title, r.parent,
r.embeddedID, r.lastNonConfigurationInstances, config,
r.referrer, r.voiceInteractor, window, r.configCallback);
// luncher的时候这个应该是空
if (customIntent != null) {
activity.mIntent = customIntent;
}
r.lastNonConfigurationInstances = null;
checkAndBlockForNetworkAccess();
activity.mStartedActivity = false;
// 获得主题
int theme = r.activityInfo.getThemeResource();
if (theme != 0) {
activity.setTheme(theme); // 设置主题
}
activity.mCalled = false;
if (r.isPersistable()) {
mInstrumentation.callActivityOnCreate(activity, r.state, r.persistentState);
} else {
// 调用Activity的onCreate方法
mInstrumentation.callActivityOnCreate(activity, r.state);
}
if (!activity.mCalled) {
throw new SuperNotCalledException(
"Activity " + r.intent.getComponent().toShortString() +
" did not call through to super.onCreate()");
}
r.activity = activity; // 把这个activity的实例给ActiviyClientRecord
r.stopped = true; // 目前刚创建activity肯定还是不可见状态,所以先置为stop状态
if (!r.activity.mFinished) { // 如果这个Activity没有要finish
activity.performStart(); // 调用Activity的onStart方法
r.stopped = false; // 调用onStart方法了,说明要变为可见了,所以stopped置为false
}
if (!r.activity.mFinished) {
if (r.isPersistable()) {
if (r.state != null || r.persistentState != null) {
mInstrumentation.callActivityOnRestoreInstanceState(activity, r.state,
r.persistentState);
}
} else if (r.state != null) {
// 调用onRestoreInstance方法
mInstrumentation.callActivityOnRestoreInstanceState(activity, r.state);
}
}
// 调用OnPostCreate,一般应用不太会重写这个方法
// 会设置window的title等
if (!r.activity.mFinished) {
activity.mCalled = false;
if (r.isPersistable()) {
mInstrumentation.callActivityOnPostCreate(activity, r.state,
r.persistentState);
} else {
mInstrumentation.callActivityOnPostCreate(activity, r.state);
}
if (!activity.mCalled) {
throw new SuperNotCalledException(
"Activity " + r.intent.getComponent().toShortString() +
" did not call through to super.onPostCreate()");
}
}
}
r.paused = true; // 目前来说onstart好了,表示可见的了,但是还没有到前台,所以目前应该是pause状态
// 把ActivityRecord和ActivityClientRecord设置到map集合中
mActivities.put(r.token, r);
} catch (SuperNotCalledException e) {
throw e;
} catch (Exception e) {
if (!mInstrumentation.onException(activity, e)) {
throw new RuntimeException(
"Unable to start activity " + component
+ ": " + e.toString(), e);
}
}
return activity;
}
```
后半段开始通过makeApplication获取Application,正常情况下可以目前的Application已经是存在的可以直接返回,makeApplication这个方法之前也分析过了,可以回到前面看看。
接着获取title,config后,如果前面Activity创建成功的话,会把这个Activity设置给Activity的context,然后调用attach方法进行activity的初始化:
```java
final void attach(Context context, ActivityThread aThread,
Instrumentation instr, IBinder token, int ident,
Application application, Intent intent, ActivityInfo info,
CharSequence title, Activity parent, String id,
NonConfigurationInstances lastNonConfigurationInstances,
Configuration config, String referrer, IVoiceInteractor voiceInteractor,
Window window, ActivityConfigCallback activityConfigCallback) {
attachBaseContext(context); // 赋值context
mFragments.attachHost(null /*parent*/); // fragment的初始化
// window的初始化
mWindow = new PhoneWindow(this, window, activityConfigCallback);
mWindow.setWindowControllerCallback(this);
mWindow.setCallback(this);
mWindow.setOnWindowDismissedCallback(this);
mWindow.getLayoutInflater().setPrivateFactory(this);
if (info.softInputMode != WindowManager.LayoutParams.SOFT_INPUT_STATE_UNSPECIFIED) {
mWindow.setSoftInputMode(info.softInputMode);
}
if (info.uiOptions != 0) {
mWindow.setUiOptions(info.uiOptions);
}
mUiThread = Thread.currentThread(); // 当前主线程
mMainThread = aThread; // ActivityThread
mInstrumentation = instr; // 可以看做代为处理Activty的一个工具类
mToken = token; // ActivityRecord
mIdent = ident;
mApplication = application; // Application
mIntent = intent; // 启动Activity的Intent
mReferrer = referrer;
mComponent = intent.getComponent(); // component
mActivityInfo = info; // minifest
mTitle = title;
mParent = parent;
mEmbeddedID = id;
mLastNonConfigurationInstances = lastNonConfigurationInstances;
if (voiceInteractor != null) {
if (lastNonConfigurationInstances != null) {
mVoiceInteractor = lastNonConfigurationInstances.voiceInteractor;
} else {
mVoiceInteractor = new VoiceInteractor(voiceInteractor, this, this,
Looper.myLooper());
}
}
mWindow.setWindowManager(
(WindowManager)context.getSystemService(Context.WINDOW_SERVICE),
mToken, mComponent.flattenToString(),
(info.flags & ActivityInfo.FLAG_HARDWARE_ACCELERATED) != 0);
if (mParent != null) {
mWindow.setContainer(mParent.getWindow());
}
mWindowManager = mWindow.getWindowManager();
mCurrentConfig = config; // 配置config
mWindow.setColorMode(info.colorMode);
}
```
如果activity中有fragment的话,会先做fragment的初始化。之后会创建一个PhoneWindow,然后进行初始化。关于PhoneWindow会在分析WMS的文章中叙述,这里只要知道是和显示相关的就可以了。
之后会把和这个Activity相关的变量保存下来,比如ActivityThread,ActivityRecord,intent,ComponentName,父Activity等等。最后通过WMS来设置显示的内容,这样一个Activity就初始化完毕了。
接着我们会看到调用callActivityOnCreate方法,通过这个方法的名字我们可以猜测出是会调用我们熟悉的Activity的onCreate方法,的确是的,看下这个方法:
```java
public void callActivityOnCreate(Activity activity, Bundle icicle) {
prePerformCreate(activity);
activity.performCreate(icicle);// 调用客户端Activity的OnCreate方法
postPerformCreate(activity);
}
final void performCreate(Bundle icicle) {
restoreHasCurrentPermissionRequest(icicle);
onCreate(icicle);
mActivityTransitionState.readState(icicle);
performCreateCommon();
}
```
callActivityOnCreate方法会继续调用performCreate,最后我们可以看到会调用onCreate方法,这个就是我们最熟悉的那个onCreate方法了。到这里我们终于看到Activity是怎么走到oncreate的了,虽然走了这么长的路,但是最终不虚此行,心里还是很开心的。但是还没结束,我们继续回到performLaunchActivity方法,后面还有一点剩下的代码。
接着可以看到先把Activity的状态设置为Stop,因为目前还是不可见状态。接着回调用activity的performStart方法:
```java
final void performStart() {
mActivityTransitionState.setEnterActivityOptions(this, getActivityOptions());
mFragments.noteStateNotSaved();
mCalled = false;
mFragments.execPendingActions();
// 调用onStart
mInstrumentation.callActivityOnStart(this);
if (!mCalled) {
throw new SuperNotCalledException(
"Activity " + mComponent.toShortString() +
" did not call through to super.onStart()");
}
mFragments.dispatchStart();
mFragments.reportLoaderStart();
// This property is set for all builds except final release
boolean isDlwarningEnabled = SystemProperties.getInt("ro.bionic.ld.warning", 0) == 1;
boolean isAppDebuggable =
(mApplication.getApplicationInfo().flags & ApplicationInfo.FLAG_DEBUGGABLE) != 0;
// debug下的一些处理
if (isAppDebuggable || isDlwarningEnabled) {
String dlwarning = getDlWarning();
if (dlwarning != null) {
String appName = getApplicationInfo().loadLabel(getPackageManager())
.toString();
String warning = "Detected problems with app native libraries\n" +
"(please consult log for detail):\n" + dlwarning;
if (isAppDebuggable) {
new AlertDialog.Builder(this).
setTitle(appName).
setMessage(warning).
setPositiveButton(android.R.string.ok, null).
setCancelable(false).
show();
} else {
Toast.makeText(this, appName + "\n" + warning, Toast.LENGTH_LONG).show();
}
}
}
mActivityTransitionState.enterReady(this);
}
```
这段方法和前面调用onCreate一样,是调用onStart的方法。这里我们可以看到调用了callActivityOnStart方法:
```java
public void callActivityOnStart(Activity activity) {
activity.onStart();
}
```
这里很简单就是调用了onStart方法。我们回去再看。
onStart调用完后,把stop状态置为false,因为目前已经调用过onStart了,说明马上要显示了。在调用下一个生命周期的方法前,我们看到调用了callActivityOnRestoreInstanceState方法,这个方法大家也是比较熟悉的,在离开Activity前,如果有什么是需要保存的一般会调用onSaveInstanceState来保存,而恢复的时候就是调用onRestoreInstanceState来恢复:
```java
public void callActivityOnRestoreInstanceState(Activity activity, Bundle savedInstanceState) {
activity.performRestoreInstanceState(savedInstanceState);
}
final void performRestoreInstanceState(Bundle savedInstanceState) {
onRestoreInstanceState(savedInstanceState);
restoreManagedDialogs(savedInstanceState);
}
```
可以看到这里最终是调用到了onRestoreInstanceState。
接着我们看到还会调用callActivityOnPostCreate这个方法:
```java
public void callActivityOnPostCreate(Activity activity, Bundle icicle) {
activity.onPostCreate(icicle);
}
```
这里会调用Activity的onPostCreate方法,也是一个生命周期的方法,他是排在onStart和onRestoreInstanceState后调用的,平时我们一般重写这个方法的时候不多,大家知道下这个方法就可以了。
到这里我们看代码可以看到会把Activity的paused状态置为true,目前来说已经执行过onStart但是还没有在前台显示,所以目前还是后台的一个Activity,所以把状态先切为pause。
最后我们看到ActivityThread中有mActivities这个变量,这个是个map,key是ActivityRecord,value是ActivityClientRecord,我们现在已经创建了一个新的Activity了,把他保存进mActivities中。
#调用onResume
至此创建一个Activity已经完成了,我们回到handleLaunchActivity方法。如果创建成功接着就会调用我们梦寐以求的handleResumeActivity方法了:
```java
final void handleResumeActivity(IBinder token,
boolean clearHide, boolean isForward, boolean reallyResume, int seq, String reason) {
// 通过ActivityRecord获得ActivityClientRecord
ActivityClientRecord r = mActivities.get(token);
if (!checkAndUpdateLifecycleSeq(seq, r, "resumeActivity")) {
return;
}
// If we are getting ready to gc after going to the background, well
// we are back active so skip it.
unscheduleGcIdler(); // 停止GC
mSomeActivitiesChanged = true;
// TODO Push resumeArgs into the activity for consideration
// 调用onResume
r = performResumeActivity(token, clearHide, reason);
if (r != null) {
// 从ActivityClientRecord中获取Activity
final Activity a = r.activity;
if (localLOGV) Slog.v(
TAG, "Resume " + r + " started activity: " +
a.mStartedActivity + ", hideForNow: " + r.hideForNow
+ ", finished: " + a.mFinished);
final int forwardBit = isForward ?
WindowManager.LayoutParams.SOFT_INPUT_IS_FORWARD_NAVIGATION : 0;
// If the window hasn't yet been added to the window manager,
// and this guy didn't finish itself or start another activity,
// then go ahead and add the window.
boolean willBeVisible = !a.mStartedActivity;
if (!willBeVisible) {
try {
willBeVisible = ActivityManager.getService().willActivityBeVisible(
a.getActivityToken());
} catch (RemoteException e) {
throw e.rethrowFromSystemServer();
}
}
if (r.window == null && !a.mFinished && willBeVisible) {
// 开始初始化windows的一些属性
// 获取activity关联的window
r.window = r.activity.getWindow();
// 获取DecorView,即Activity的顶层View
View decor = r.window.getDecorView();
// DecorView设为不可见
decor.setVisibility(View.INVISIBLE);
// 得到ViewManager
ViewManager wm = a.getWindowManager();
// 布局参数
WindowManager.LayoutParams l = r.window.getAttributes();
a.mDecor = decor;
l.type = WindowManager.LayoutParams.TYPE_BASE_APPLICATION;
l.softInputMode |= forwardBit;
if (r.mPreserveWindow) {
a.mWindowAdded = true;
r.mPreserveWindow = false;
// Normally the ViewRoot sets up callbacks with the Activity
// in addView->ViewRootImpl#setView. If we are instead reusing
// the decor view we have to notify the view root that the
// callbacks may have changed.
ViewRootImpl impl = decor.getViewRootImpl();
if (impl != null) {
impl.notifyChildRebuilt();
}
}
if (a.mVisibleFromClient) {
if (!a.mWindowAdded) {
a.mWindowAdded = true;
// view添加到window中
wm.addView(decor, l);
} else {
// The activity will get a callback for this {@link LayoutParams} change
// earlier. However, at that time the decor will not be set (this is set
// in this method), so no action will be taken. This call ensures the
// callback occurs with the decor set.
a.onWindowAttributesChanged(l);
}
}
// If the window has already been added, but during resume
// we started another activity, then don't yet make the
// window visible.
// 根据注释,window已经被添加了,但是在resume期间启动了另一个activity,那么还是不显示
} else if (!willBeVisible) {
if (localLOGV) Slog.v(
TAG, "Launch " + r + " mStartedActivity set");
r.hideForNow = true;
}
// Get rid of anything left hanging around.
cleanUpPendingRemoveWindows(r, false /* force */);
// The window is now visible if it has been added, we are not
// simply finishing, and we are not starting another activity.
if (!r.activity.mFinished && willBeVisible
&& r.activity.mDecor != null && !r.hideForNow) {
if (r.newConfig != null) {
// 执行onConfigChange
performConfigurationChangedForActivity(r, r.newConfig);
if (DEBUG_CONFIGURATION) Slog.v(TAG, "Resuming activity "
+ r.activityInfo.name + " with newConfig " + r.activity.mCurrentConfig);
r.newConfig = null;
}
if (localLOGV) Slog.v(TAG, "Resuming " + r + " with isForward="
+ isForward);
WindowManager.LayoutParams l = r.window.getAttributes();
if ((l.softInputMode
& WindowManager.LayoutParams.SOFT_INPUT_IS_FORWARD_NAVIGATION)
!= forwardBit) {
l.softInputMode = (l.softInputMode
& (~WindowManager.LayoutParams.SOFT_INPUT_IS_FORWARD_NAVIGATION))
| forwardBit;
if (r.activity.mVisibleFromClient) {
ViewManager wm = a.getWindowManager();
View decor = r.window.getDecorView();
wm.updateViewLayout(decor, l);
}
}
r.activity.mVisibleFromServer = true;
mNumVisibleActivities++;
if (r.activity.mVisibleFromClient) {
r.activity.makeVisible();
}
}
if (!r.onlyLocalRequest) {
r.nextIdle = mNewActivities;
mNewActivities = r;
if (localLOGV) Slog.v(
TAG, "Scheduling idle handler for " + r);
Looper.myQueue().addIdleHandler(new Idler());
}
r.onlyLocalRequest = false;
// Tell the activity manager we have resumed.
if (reallyResume) {
try {
// 通知AMS,已经resume好了
ActivityManager.getService().activityResumed(token);
} catch (RemoteException ex) {
throw ex.rethrowFromSystemServer();
}
}
} else {
// If an exception was thrown when trying to resume, then
// just end this activity.
try {
// activity为空,finish
ActivityManager.getService()
.finishActivity(token, Activity.RESULT_CANCELED, null,
Activity.DONT_FINISH_TASK_WITH_ACTIVITY);
} catch (RemoteException ex) {
throw ex.rethrowFromSystemServer();
}
}
}
```
首先这里开始还是停止GC,之后会判断pendingIntents和pendingResults是否为null。这里pendingIntents表示需要调用onNewIntent流程,pendingResults表示有需要回复给调用者的数据,即onActivtyResult流程。这里调用流程都是差不多的,我们这篇文章重点先把启动Activity的流程讲完了,其他的流程我们后面的文章统一来看,只要知道一个流程,其他流程理解就比如容易了。
这里处理完onNewIntent和onActivtyResult后,会调用performResumeActivity,这个方法就是调用onResume的入口了:
```java
final void performResume() {
performRestart(); // 根据当前是不是stop状态,会先调用reStart,后调用onStart
mFragments.execPendingActions();
mLastNonConfigurationInstances = null;
mCalled = false;
// mResumed is set by the instrumentation
// 调用onResume
mInstrumentation.callActivityOnResume(this);
if (!mCalled) {
throw new SuperNotCalledException(
"Activity " + mComponent.toShortString() +
" did not call through to super.onResume()");
}
// invisible activities must be finished before onResume() completes
if (!mVisibleFromClient && !mFinished) {
Log.w(TAG, "An activity without a UI must call finish() before onResume() completes");
if (getApplicationInfo().targetSdkVersion
> android.os.Build.VERSION_CODES.LOLLIPOP_MR1) {
throw new IllegalStateException(
"Activity " + mComponent.toShortString() +
" did not call finish() prior to onResume() completing");
}
}
// Now really resume, and install the current status bar and menu.
mCalled = false;
mFragments.dispatchResume();
mFragments.execPendingActions();
// 调用PostResume,一般app不用重写这个方法
onPostResume();
if (!mCalled) {
throw new SuperNotCalledException(
"Activity " + mComponent.toShortString() +
" did not call through to super.onPostResume()");
}
}
```
这里方法第一句,会执行performRestart,我们进去看一眼:
```java
final void performRestart() {
mFragments.noteStateNotSaved();
if (mToken != null && mParent == null) {
// No need to check mStopped, the roots will check if they were actually stopped.
WindowManagerGlobal.getInstance().setStoppedState(mToken, false /* stopped */);
}
if (mStopped) { // 如果当前还是stop状态,要开启start
mStopped = false;
synchronized (mManagedCursors) {
final int N = mManagedCursors.size();
for (int i=0; i<N; i++) {
ManagedCursor mc = mManagedCursors.get(i);
if (mc.mReleased || mc.mUpdated) {
if (!mc.mCursor.requery()) {
if (getApplicationInfo().targetSdkVersion
>= android.os.Build.VERSION_CODES.ICE_CREAM_SANDWICH) {
throw new IllegalStateException(
"trying to requery an already closed cursor "
+ mc.mCursor);
}
}
mc.mReleased = false;
mc.mUpdated = false;
}
}
}
mCalled = false;
// 先调用restart
mInstrumentation.callActivityOnRestart(this);
if (!mCalled) {
throw new SuperNotCalledException(
"Activity " + mComponent.toShortString() +
" did not call through to super.onRestart()");
}
// 在调用onStart
performStart();
}
}
```
这个方法处理如果当前Activity的状态是stop的话,这里会先调用callActivityOnRestart执行onRestart的流程,再调用performStart走onStart的流程。我们回到performResume方法,执行完performRestart流程后,接着就调用callActivityOnResume:
```java
public void callActivityOnResume(Activity activity) {
activity.mResumed = true;
activity.onResume(); // onResume,客户端可以重写
if (mActivityMonitors != null) {
synchronized (mSync) {
final int N = mActivityMonitors.size();
for (int i=0; i<N; i++) {
final ActivityMonitor am = mActivityMonitors.get(i);
am.match(activity, activity, activity.getIntent());
}
}
}
}
```
可以看到这个方法就是调用onResume方法的入口,到这里也就调用到了大家熟悉的onResume方法了。好了,这里也不用多说。我们回到performResumeActivity方法,最后会把paused,stopped置为false,这2个状态都不是了。state也会置为null,表示onRestoreInstance也没有需要恢复的数据了。
# 检查是否显示Activity
回到handleResumeActivity方法。下面有个变量mStartedActivity,表示Activity是否已经启动,为false说明目前Activity还没有启动好,那自然接下去是需要显示的,后面会执行window布局等相关工作。如果时true的话,那说明启动好了,但是需不需要显示会通过AMS的willActivityBeVisibleLocked方法继续检查下,我们看下这个方法:
```java
boolean willActivityBeVisibleLocked(IBinder token) {
for (int taskNdx = mTaskHistory.size() - 1; taskNdx >= 0; --taskNdx) {
final ArrayList<ActivityRecord> activities = mTaskHistory.get(taskNdx).mActivities;
for (int activityNdx = activities.size() - 1; activityNdx >= 0; --activityNdx) {
final ActivityRecord r = activities.get(activityNdx);
if (r.appToken == token) {
return true;
}
if (r.fullscreen && !r.finishing) {
return false;
}
}
}
final ActivityRecord r = ActivityRecord.forTokenLocked(token);
if (r == null) {
return false;
}
if (r.finishing) Slog.e(TAG, "willActivityBeVisibleLocked: Returning false,"
+ " would have returned true for r=" + r);
return !r.finishing;
}
```
可以看到,这个方法主要检查下AMS中是否有这个要启动的ActivityRecord相关的ActivityRecord,如果有会返回true,那么就继续显示的流程,否则代表不需要显示。这里的细节可以注意下,从历史任务栈的后往前遍历,如果遇到一个是这个启动的Activity,那么返回true表示要显示。如果不是的话,会判断是不是全屏的,如果是全屏的说明当前这Activity在前端,那自然现在启动的不会在他前面,所以返回false,否则不是全屏的那就在遍历下去,如果找到和启动一样的了,那就返回true表示可以继续走显示的流程。我们返回handleResumeActivity方法。
接着如果window是空,或获取window和DecorView,然后把DecorView加入window等一系列wms初始化操作。再往后还会触发view的布局。期间如果config费空的话,我们看到还会调用performConfigurationChangedForActivity方法来调用onConfigChange,
```java
private void performConfigurationChangedForActivity(ActivityClientRecord r,
Configuration newBaseConfig) {
performConfigurationChangedForActivity(r, newBaseConfig,
r.activity.getDisplay().getDisplayId(), false /* movedToDifferentDisplay */);
}
private Configuration performActivityConfigurationChanged(Activity activity,
Configuration newConfig, Configuration amOverrideConfig, int displayId,
boolean movedToDifferentDisplay) {
.....................
if (shouldChangeConfig) {
activity.mCalled = false;
activity.onConfigurationChanged(configToReport);
if (!activity.mCalled) {
throw new SuperNotCalledException("Activity " + activity.getLocalClassName() +
" did not call through to super.onConfigurationChanged()");
}
}
return configToReport;
}
```
这里一路跟进去,最终会调用到onConfigurationChanged方法。这里方法具体有兴趣的同学可以自己看看,我们主要知道这个流程就可以了。我们回到handleResumeActivity方法。
之后我们还会看到Looper.myQueue().addIdleHandler(new Idler()),这个会往主线程的Handler中添加限制时候执行的流程,这个我们在讲Handler的时候再说,这里是在闲置时候执行的操作,主要是清理一些无效的数据,后面我们再说。
# onResume完成通知AMS
最后会再次执行activityResumed通知AMS,onResume流程执行完毕了,我们看下AMS中的这个方法:
```java
public final void activityResumed(IBinder token) {
final long origId = Binder.clearCallingIdentity();
synchronized(this) {
ActivityRecord.activityResumedLocked(token);
mWindowManager.notifyAppResumedFinished(token);
}
Binder.restoreCallingIdentity(origId);
}
```
这里先是会继续调用ActivityRecord的activityResumedLocked,然后调用wms的notifyAppResumedFinished通知完成onResume。我们这里主要在看下ActivityRecord的activityResumedLocked:
```java
static void activityResumedLocked(IBinder token) {
final ActivityRecord r = ActivityRecord.forTokenLocked(token);
if (DEBUG_SAVED_STATE) Slog.i(TAG_STATES, "Resumed activity; dropping state of: " + r);
if (r != null) {
r.icicle = null;
r.haveState = false;
}
}
```
这里由于已经执行完onResume了,一个Activity就算是执行完了,这里会把icicle置空,haveState置为false,表示这个ActivityRecord中已经没有需要启动Activity需要恢复的数据了。
我们回到handleLaunchActivity方法,还有最后一点方法,我们这里贴一下代码:
```java
if (!r.activity.mFinished && r.startsNotResumed) {
performPauseActivityIfNeeded(r, reason);
if (r.isPreHoneycomb()) {
r.state = oldState;
}
}
```
这里进入的分支表示,启动一个Activity并非是前台的Activity,此时由于前面的流程Activity已经执行了onResume了,所以现在需要调用performPauseActivityIfNeeded执行onPause才能让他不在前台,我们看下这个方法:
```java
private void performPauseActivityIfNeeded(ActivityClientRecord r, String reason) {
if (r.paused) { // 已经pause了,return
// You are already paused silly...
return;
}
try {
r.activity.mCalled = false;
// 调用onPause方法
mInstrumentation.callActivityOnPause(r.activity);
EventLog.writeEvent(LOG_AM_ON_PAUSE_CALLED, UserHandle.myUserId(),
r.activity.getComponentName().getClassName(), reason);
if (!r.activity.mCalled) {
throw new SuperNotCalledException("Activity " + safeToComponentShortString(r.intent)
+ " did not call through to super.onPause()");
}
} catch (SuperNotCalledException e) {
throw e;
} catch (Exception e) {
if (!mInstrumentation.onException(r.activity, e)) {
throw new RuntimeException("Unable to pause activity "
+ safeToComponentShortString(r.intent) + ": " + e.toString(), e);
}
}
r.paused = true;
}
```
这里看到如果当前已经是pause状态了就返回,否则就调用callActivityOnPause方法:
```java
public void callActivityOnPause(Activity activity) {
activity.performPause();
}
final void performPause() {
mDoReportFullyDrawn = false;
mFragments.dispatchPause();
mCalled = false;
onPause();
mResumed = false;
if (!mCalled && getApplicationInfo().targetSdkVersion
>= android.os.Build.VERSION_CODES.GINGERBREAD) {
throw new SuperNotCalledException(
"Activity " + mComponent.toShortString() +
" did not call through to super.onPause()");
}
mResumed = false;
}
```
这个方法最终也会调用Activity的onPause方法,这里我们onPause的调用也看到了。
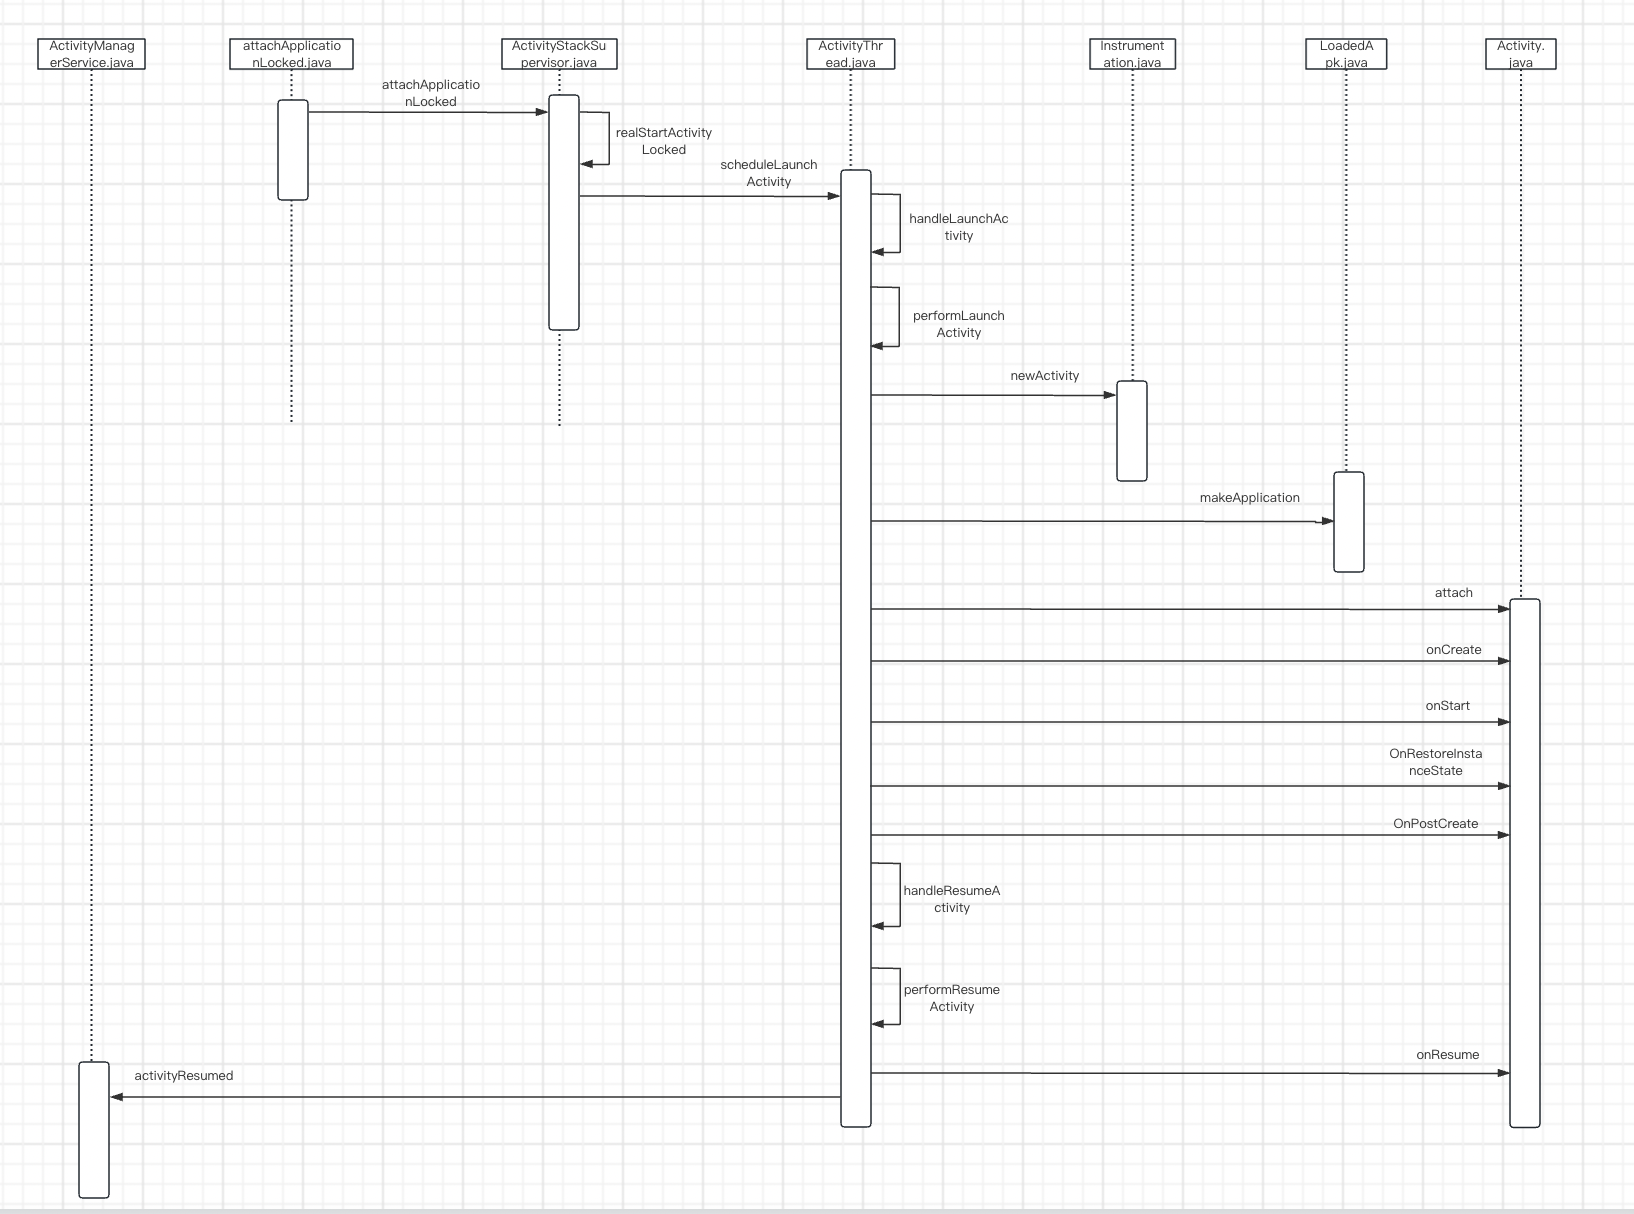
到这里整个启动一个Activity的流程就都介绍完了,我们这里从进程的启动到Activity的启动都介绍过了。中间跨进程的调用来来回回虽然有好几次,但他们都是通过binder来通信的,而这里binder通信是通过AIDL来实现的。所以这里涉及到知识点总体还是挺多的,不过好在套路基本相同,这里主要还是要把AMS的启动流程理解了,其他的可以结合其他知识的文章在看一下。应该说AMS的主要流程这篇文章介绍的差不多了,基本的生命周期方法也都执行到了,剩下还有个onDestory的销毁方法还没说到,我们放在下一篇来说。现在我们看下启动Activity的时序图。

AMS源码分析(四)