
对于android的开发者来说,AMS的重要性不言而喻,大多数人可能接触android的第一个程序就是从怎么写一个Activity开始的,所以对于了解AMS的源码是非常重要的。虽然AMS是以Activity来命令的,但是四大组件其实都是通过AMS来触发的,所以了解AMS不仅对于开发Activity是有帮助,对其他几个组件也是同样有帮助的,那么今天开始就开始准备把AMS相关内容来写一写。虽然是说AMS,但是其实AMS中掺杂了不止AMS,想PMS,WMS等等都是有包含的,由于本系列我们主要是说AMS,所以其他模块就不会详细的说,只说一下基本功能便于对AMS的上下文有所了解就可以。另外,虽然android的版本升级,AMS的内容也是越来越复杂,早期的AMS内容虽然也不少,但是由于android系统的功能相对简单,所以逻辑上还是比较清晰的,虽然android版本的升级,加入了越来越多的特性,所以使AMS的内容也越来越庞杂,这篇博客选取的是android8.0的内容,虽然不是很新的内容,但是考虑到这个版本在service上有比较重要的改动,所以选择这个版本来讲对于实际开发是有帮助的,虽然在android 10上对Activity的启动也有大的改动,但是这个版本我还没吃透,所以放到后面再补充。另外考虑到其实AMS的主线流程其实变化不是非常大,所以选取8这个版本对应理解AMS的流程来说没有什么影响,而且由于我手边正好有个编译好的android 8的AOSP版本,所以也就直接可以对照着源码讲了(主要是不想再编译新的android版本了-_-!)。另外我比较了下7,8,9这三个版本,其实本质上变化不大,比如9在代码封装上更进了一步,所以如果有同学看的是这几个版本,其实对于理解都是差不多的,当然更低版本其实更简单一些,如果理解了高版本肯定更没什么问题了。好了,那么下面我们就开始AMS的分析吧。
由于AMS的内容还是非常庞杂,所以如果一行行代码看肯定是深陷其中,不可自拔,主要是除了主线的流程外,AMS有很多的分支逻辑,有些是优化,有些是特殊的逻辑,所以我们主要以主线流程为主,从一个Activity点击开始到最终的启动,把这中间设计到的种种逻辑梳理通了,那么主要内容就搞懂了。在分析的过程中如果遇到一些分支的逻辑或者流程,我尽量把我已经理解的也写出来,如有不对还请多多包涵。在AMS的整个流程中,由于会有多次的AMS和客户进程之间的进程间通信,他们的通信是通过binder来进行的,由于binder之前有好几篇文章专门说过,这里也就不详细说其中的过程了,就把一些关键入口或者执行函数说一下,具体binder的内容可以看下之前binder的文章。由于会画时序图,所以准备以每次的进程间通信为一个单位来画一张时序图,否则整个流程一张图就太庞大了,看得也眼花。好了,下面就正式开始了。
# 第一部分 从调用者进入AMS
说起入口方法,相信大家都很熟了,就是startActivity方法嘛,好,我们一步一步跟进去看看:
```java
public void startActivity(Intent intent, @Nullable Bundle options) {
if (options != null) {
startActivityForResult(intent, -1, options);
} else {
// Note we want to go through this call for compatibility with
// applications that may have overridden the method.
startActivityForResult(intent, -1);
}
}
```
这个方法会根据有没有option参数,调用startActivityForResult不同参数的版本,这里比如要设置一些动画之类的,可以用这个参数,我们不多考虑这个,继续跟进去看下startActivityForResult方法:
```java
public void startActivityForResult(@RequiresPermission Intent intent, int requestCode,
@Nullable Bundle options) {
// mParent是在setParent或者attach中赋值的,代表当前Activity的父类。第一次肯定是空,所以会走if分支
if (mParent == null) {
// 做得一些动画,比如转场动画的属性
options = transferSpringboardActivityOptions(options);
// mMainThread.getApplicationThread()是mApplication,可以理解为本地对象的stub,这里是发起者的stub
// mToken是本activity在AMS中的代理。这里指发起者Activity在AMS中的ActivityRecord
// intent包含了启动的信息,比如minifest,action,category,类路径等。是目标的Activity
Instrumentation.ActivityResult ar =
mInstrumentation.execStartActivity(
this, mMainThread.getApplicationThread(), mToken, this,
intent, requestCode, options);
if (ar != null) {
// 回调给发起者
mMainThread.sendActivityResult(
mToken, mEmbeddedID, requestCode, ar.getResultCode(),
ar.getResultData());
}
if (requestCode >= 0) {
mStartedActivity = true;
}
cancelInputsAndStartExitTransition(options);
} else {
if (options != null) {
mParent.startActivityFromChild(this, intent, requestCode, options);
} else {
mParent.startActivityFromChild(this, intent, requestCode);
}
}
}
```
这里的mParent在Activity启动后会在attach的时候会被赋值,一般我们启动一个新Activity这里为null,里面option前面也解释过了,暂不考虑。
这个Instrumentation这个类后面会经常看到,我们Activity调用的很多方法会在这个类里面,可以看做一个主要的辅助类,辅助Activity执行一些操作,他们初始化是在本进程创建的时候初始化的,后面我们会说到这个。他的静态内部类ActivityResult封装了需要回复的一些参数,一般我们如果需要目标Activity给回复的时候会调用startActivityForResult,然后再返回Activity就会得到相应的回复,回复的数据就被封装在ActivityResult这个类中。从上面代码中看到如果这个变量不空的话,后面会调用sendActivityResult方法,相信大家也猜的出来最终会调用Activity的onActivityResult方法来接收数据,具体onActivityResult相关流程这里就先不跟进去了,因为后面正常的流程也会看到这个方法,那里我们再说。我们先看下这里execStartActivity这个方法,这个方法有几个参数是比较重要的,我们先介绍下。
mMainThread是一个ActivityThread,他是描述一个进程的,他的里面保存了进程相关的各种元素,比如这里用到的参数ApplicationThread,我们看下ApplicationThread的结构:
```java
private class ApplicationThread extends IApplicationThread.Stub {
........
}
```
熟悉AIDL的同学可能看到这个结构就可以理解了,这个ApplicationThread是本地的一个服务端,里面的方法可以直接本地的相关函数,既然是AIDL,那么在其他进程用到它的地方肯定也有一份,我们这里的其他进程其实就是指的AMS,AMS中要和其他进程通信就会保存每个进程的代理,对应到每个进程中就是这里的ApplicationThread,至于AMS中的我们后面会说到,这里只要了解下ApplicationThread是什么就可以了。
我们看另一个参数mToken,他的类型是IBinder,是不是可以想到什么,没错,他是代表了每个Activity在AMS中的一个对象,我们看下他的类结构:
```java
static class Token extends IApplicationToken.Stub {
private final WeakReference<ActivityRecord> weakActivity;
Token(ActivityRecord activity) {
weakActivity = new WeakReference<>(activity);
}
............
}
```
可以看到他也是一个binder,内部保存了一个ActivityRecord的弱引用,这个代表每个被创建的Activity都会在AMS中保留一份,这个后面说到AMS的时候也会看到。
剩下的一些参数,比如intent, requestCode,这些都比较好理解了,我们接着看下面的方法:
```java
public ActivityResult execStartActivity(
Context who, IBinder contextThread, IBinder token, Activity target,
Intent intent, int requestCode, Bundle options) {
// IApplicationThread是个aidl,可见contextThread是Application,是IApplicationThread的stub
// 可见whoThread就是发起者的stub
IApplicationThread whoThread = (IApplicationThread) contextThread;
Uri referrer = target != null ? target.onProvideReferrer() : null;
if (referrer != null) {
intent.putExtra(Intent.EXTRA_REFERRER, referrer);
}
.............
try {
intent.migrateExtraStreamToClipData();
intent.prepareToLeaveProcess(who);
// 先获得AMS的代理对象,然后调用getService
// whoThread是调用者的stub
// token是本activity在AMS中的代理。这里指发起者Activity在AMS中的ActivityRecord
// target是调用者的Activity
int result = ActivityManager.getService()
.startActivity(whoThread, who.getBasePackageName(), intent,
intent.resolveTypeIfNeeded(who.getContentResolver()),
token, target != null ? target.mEmbeddedID : null,
requestCode, 0, null, options);
// 检查上面启动activity时候返回的结果,如果返回结果又异常,比如没找到类,没权限之类的,会抛异常
checkStartActivityResult(result, intent);
} catch (RemoteException e) {
throw new RuntimeException("Failure from system", e);
}
return null;
}
```
这个方法我们可以看到后面会调用startActivity方法,把调用者的信息,以及要启动Activity的Intent传递过去,这里就开始第一次的跨进程通信了。
这个是一个binder通信,我们稍微说一下,在低版本的android中,AMS是的代理类是一个单独的类,比如像这样:
```java
class ActivityManagerProxy implements IActivityManager
{
.......
}
```
我们这里startActivity方法就是封装在这里类里面,我们可以直接查看源码。从android 8开始这里都被改为AIDL的形式了,具体的代码由编译自动生成,看来google也是为了统一,把这些重复的工作都交给机器自动来做了,也挺好的,这样省去了很多重复的工作,我们看下代码:
```java
public static IActivityManager getService() {
return IActivityManagerSingleton.get();
}
private static final Singleton<IActivityManager> IActivityManagerSingleton =
new Singleton<IActivityManager>() {
@Override
protected IActivityManager create() {
final IBinder b = ServiceManager.getService(Context.ACTIVITY_SERVICE);
final IActivityManager am = IActivityManager.Stub.asInterface(b);
return am;
}
};
```
可以看到最后通过IActivityManager这个类来获得了一个AIDL的代理,IActivityManager现在就是一个aidl文件,名字为IActivityManager.aidl。 编译后会生成java文件,我们现在调用的是startActivity方法,我们去生成的java文件中找下这个方法:
```java
// 生成文件IActivityManager.java
@Override public int startActivity(android.app.IApplicationThread caller, java.lang.String callingPackage, android.content.Intent intent, java.lang.String resolvedType, android.os.IBinder resultTo, java.lang.String resultWho, int requestCode, int flags, android.app.ProfilerInfo profilerInfo, android.os.Bundle options) throws android.os.RemoteException
{
android.os.Parcel _data = android.os.Parcel.obtain();
android.os.Parcel _reply = android.os.Parcel.obtain();
int _result;
try {
_data.writeInterfaceToken(DESCRIPTOR);
_data.writeStrongBinder((((caller!=null))?(caller.asBinder()):(null)));
_data.writeString(callingPackage);
if ((intent!=null)) {
_data.writeInt(1);
intent.writeToParcel(_data, 0);
}
else {
_data.writeInt(0);
}
_data.writeString(resolvedType);
_data.writeStrongBinder(resultTo);
_data.writeString(resultWho);
_data.writeInt(requestCode);
_data.writeInt(flags);
if ((profilerInfo!=null)) {
_data.writeInt(1);
profilerInfo.writeToParcel(_data, 0);
}
else {
_data.writeInt(0);
}
if ((options!=null)) {
_data.writeInt(1);
options.writeToParcel(_data, 0);
}
else {
_data.writeInt(0);
}
mRemote.transact(Stub.TRANSACTION_startActivity, _data, _reply, 0);
_reply.readException();
_result = _reply.readInt();
}
finally {
_reply.recycle();
_data.recycle();
}
return _result;
}
```
我们找到了这个方法绝大部分是是把数据写入parcel中,其中主要的一句代码是mRemote.transact(Stub.TRANSACTION_startActivity, _data, _reply, 0),这里通过transact会调用到AMS端的这个类中case为TRANSACTION_startActivity的方法,我们还是在这个生成的java文件中找:
```java
// 生成文件IActivityManager.java
case TRANSACTION_startActivity:
{
data.enforceInterface(DESCRIPTOR);
android.app.IApplicationThread _arg0;
_arg0 = android.app.IApplicationThread.Stub.asInterface(data.readStrongBinder());
java.lang.String _arg1;
_arg1 = data.readString();
android.content.Intent _arg2;
if ((0!=data.readInt())) {
_arg2 = android.content.Intent.CREATOR.createFromParcel(data);
}
else {
_arg2 = null;
}
java.lang.String _arg3;
_arg3 = data.readString();
android.os.IBinder _arg4;
_arg4 = data.readStrongBinder();
java.lang.String _arg5;
_arg5 = data.readString();
int _arg6;
_arg6 = data.readInt();
int _arg7;
_arg7 = data.readInt();
android.app.ProfilerInfo _arg8;
if ((0!=data.readInt())) {
_arg8 = android.app.ProfilerInfo.CREATOR.createFromParcel(data);
}
else {
_arg8 = null;
}
android.os.Bundle _arg9;
if ((0!=data.readInt())) {
_arg9 = android.os.Bundle.CREATOR.createFromParcel(data);
}
else {
_arg9 = null;
}
int _result = this.startActivity(_arg0, _arg1, _arg2, _arg3, _arg4, _arg5, _arg6, _arg7, _arg8, _arg9);
reply.writeNoException();
reply.writeInt(_result);
return true;
}
```
这段也是编译自动生成的,虽然我们看的眼花缭乱的,但是不用管,只要看到this.startActivity这句就可以知道是调用AMS的这个方法了,现在我们直接到ActivityManagerService的中找这个方法就可以了。
由于android 8.0很多这种系统的binder调用都修改为了aidl的这种形式,使得代码的寻找比以前稍微麻烦了点,如果不编译的话还看不到,所以这里稍微说明了下,还有其他的文件也是这样的就不细说了,套路都是一样的,各位同学可以自己去查找。
好了,目前为止,我们从调用进程的任务就暂时告一段落,下面会进入AMS的进程,在进入AMS前我们先描绘下这部分的时序图:

# 第二部分 第一次进入AMS
接上面讲的,现在进入ActivityManagerService的startActivity方法:
```java
// 经过binder后会到这里
// caller是调用者的stub
// intent不用解释,目标对象的意图
// resultTo是发起者在AMS中代理,比如一个ActivityRecord
@Override
public final int startActivity(IApplicationThread caller, String callingPackage,
Intent intent, String resolvedType, IBinder resultTo, String resultWho, int requestCode,
int startFlags, ProfilerInfo profilerInfo, Bundle bOptions) {
return startActivityAsUser(caller, callingPackage, intent, resolvedType, resultTo,
resultWho, requestCode, startFlags, profilerInfo, bOptions,
UserHandle.getCallingUserId());
}
```
这个方法继续调用startActivityAsUser:
```java
// 其他进程启动一个Activity后,第二步会调用到这个方法
@Override
public final int startActivityAsUser(IApplicationThread caller, String callingPackage,
Intent intent, String resolvedType, IBinder resultTo, String resultWho, int requestCode,
int startFlags, ProfilerInfo profilerInfo, Bundle bOptions, int userId) {
// 这里调用这个方法,判断下是否进程隔离,如果是进程隔离的不能继续调用,报错
enforceNotIsolatedCaller("startActivity");
// 检查是否有权限,如果权限有问题会抛出异常,否则返回当前的用户ID
userId = mUserController.handleIncomingUser(Binder.getCallingPid(), Binder.getCallingUid(),
userId, false, ALLOW_FULL_ONLY, "startActivity", null);
// TODO: Switch to user app stacks here.
// 继续调用
return mActivityStarter.startActivityMayWait(caller, -1, callingPackage, intent,
resolvedType, null, null, resultTo, resultWho, requestCode, startFlags,
profilerInfo, null, null, bOptions, false, userId, null, null,
"startActivityAsUser");
}
```
这里首先做一些权限方面的检查,最后会调用到startActivityMayWait这个方法,我们看下这个方法:
```java
// caller,调用者的stub
// resultTo调用者在AMS在的代理,即ActivityRecord
// inTask是任务栈
// reason是理由,暂时理解为是哪个方法调用了这个方法
final int startActivityMayWait(IApplicationThread caller, int callingUid,
String callingPackage, Intent intent, String resolvedType,
IVoiceInteractionSession voiceSession, IVoiceInteractor voiceInteractor,
IBinder resultTo, String resultWho, int requestCode, int startFlags,
ProfilerInfo profilerInfo, WaitResult outResult,
Configuration globalConfig, Bundle bOptions, boolean ignoreTargetSecurity, int userId,
IActivityContainer iContainer, TaskRecord inTask, String reason) {
// Refuse possible leaked file descriptors
// 不允许有文件描述符包含在intent中
if (intent != null && intent.hasFileDescriptors()) {
throw new IllegalArgumentException("File descriptors passed in Intent");
}
mSupervisor.mActivityMetricsLogger.notifyActivityLaunching();
// 是否指定了组件名
boolean componentSpecified = intent.getComponent() != null;
// Save a copy in case ephemeral needs it
final Intent ephemeralIntent = new Intent(intent);
// Don't modify the client's object!
intent = new Intent(intent);
// 这里貌似根据是否有ACTION_VIEW表示可以修改为隐式启动,所以下面把setComponent置空
if (componentSpecified
&& intent.getData() != null
&& Intent.ACTION_VIEW.equals(intent.getAction())
&& mService.getPackageManagerInternalLocked()
.isInstantAppInstallerComponent(intent.getComponent())) {
// intercept intents targeted directly to the ephemeral installer the
// ephemeral installer should never be started with a raw URL; instead
// adjust the intent so it looks like a "normal" instant app launch
intent.setComponent(null /*component*/);
componentSpecified = false;
}
//解析intent封装为ResolveInfo
ResolveInfo rInfo = mSupervisor.resolveIntent(intent, resolvedType, userId);
if (rInfo == null) { // 如果没有找到,可能是Direct Boot模式,会到特殊的空间去查找
UserInfo userInfo = mSupervisor.getUserInfo(userId);
if (userInfo != null && userInfo.isManagedProfile()) {
// Special case for managed profiles, if attempting to launch non-cryto aware
// app in a locked managed profile from an unlocked parent allow it to resolve
// as user will be sent via confirm credentials to unlock the profile.
UserManager userManager = UserManager.get(mService.mContext);
boolean profileLockedAndParentUnlockingOrUnlocked = false;
long token = Binder.clearCallingIdentity();
try {
UserInfo parent = userManager.getProfileParent(userId);
profileLockedAndParentUnlockingOrUnlocked = (parent != null)
&& userManager.isUserUnlockingOrUnlocked(parent.id)
&& !userManager.isUserUnlockingOrUnlocked(userId);
} finally {
Binder.restoreCallingIdentity(token);
}
if (profileLockedAndParentUnlockingOrUnlocked) {
rInfo = mSupervisor.resolveIntent(intent, resolvedType, userId,
PackageManager.MATCH_DIRECT_BOOT_AWARE
| PackageManager.MATCH_DIRECT_BOOT_UNAWARE);
}
}
}
// Collect information about the target of the Intent.
// 从ResolveInfo获取目标Activity的数据封装为ActivityInfo,这个里面重新设置了component
ActivityInfo aInfo = mSupervisor.resolveActivity(intent, rInfo, startFlags, profilerInfo);
.............
```
这个方法比较长,我们分段来看。首先判断下intent是否带有文件描述符,文件描述符是linux中的概念,是一个整型数,代表一个数组的下标,在linux中如果一个文件打开了另一个文件,就会把那个文件的句柄保存在自己的一个数组中,这个做这样的判断应该是从安全方面考虑,我们不用多管。
接着取出intent的component,下面会判断,如果这个intent是ACTION_VIEW,并且getData数据不空,那么即使给出了component也会把他清空,我的理解是compoment是代表一个包名和类名,这表示有明确的指出了需要启动的组件,而ACTION_VIEW是一个隐式调用,他可能会匹配多个目标,这样的话二者就可能会有冲突,所以这里的优先级是以ACTION_VIEW为优先,让他去匹配多个组件。
接着下面mSupervisor.resolveIntent方法就会去寻找和这个intent匹配的数据了,由于这里面主要是PMS来处理这些数据,我们稍稍看下这里的方法:
```java
// 解析一个intent把他封装为ResolveInfo
ResolveInfo resolveIntent(Intent intent, String resolvedType, int userId, int flags) {
synchronized (mService) {
return mService.getPackageManagerInternalLocked().resolveIntent(intent, resolvedType,
PackageManager.MATCH_INSTANT | PackageManager.MATCH_DEFAULT_ONLY | flags
| ActivityManagerService.STOCK_PM_FLAGS, userId);
}
}
```
可以看到他进一步调用到PMS的resolveIntent,最后会调用这个方法:
```java
// 解析Intent
private ResolveInfo resolveIntentInternal(Intent intent, String resolvedType,
int flags, int userId, boolean resolveForStart) {
try {
Trace.traceBegin(TRACE_TAG_PACKAGE_MANAGER, "resolveIntent");
if (!sUserManager.exists(userId)) return null; // 不存在用户,return
final int callingUid = Binder.getCallingUid();
flags = updateFlagsForResolve(flags, userId, intent, callingUid, resolveForStart);
enforceCrossUserPermission(callingUid, userId,
false /*requireFullPermission*/, false /*checkShell*/, "resolve intent");
Trace.traceBegin(TRACE_TAG_PACKAGE_MANAGER, "queryIntentActivities");
final List<ResolveInfo> query = queryIntentActivitiesInternal(intent, resolvedType,
flags, callingUid, userId, resolveForStart);
Trace.traceEnd(TRACE_TAG_PACKAGE_MANAGER);
final ResolveInfo bestChoice =
chooseBestActivity(intent, resolvedType, flags, query, userId);
return bestChoice;
} finally {
Trace.traceEnd(TRACE_TAG_PACKAGE_MANAGER);
}
}
```
这里我们看到queryIntentActivitiesInternal这个方法,这里返回的是一个集合,前面我们说了,一个ACTION_VIEW他可能会找到多个组件,所以这里返回一个集合是正确的。这个方法我们就不跟进去看了,这里理解他的意义,就是解析出了一个可能包含多个组件的集合,下面我们可以更加这个集合然后会显示一个ResolveActivity来供用户选择,相信各位看到这里的同学肯定能理解我的意思,我们平时使用的时候也经常会遇到这种情况,比如分享一个图片什么的,从手机底部就会弹出多个应用来供你选择,这里就不多说了,我们回到前面。
如果这里解析出来为空,会通过Direct Boot这种模式来解析,这是在7.0中新的一种模式,会在特殊的存储空间中保留数据,所以这里在检查下看能不能解析出数据。这个是特殊的一种处理,我们也不多考虑。
这段代码最后会通过resolveActivity方法来把前面解析出的数据,封装为ActivityInfo:
```java
// 获取Activity的ActivityInfo,这里ActivityInfo可以简单理解为这个Activity的minifest
// 或者是ResolveActivity数据
ActivityInfo resolveActivity(Intent intent, ResolveInfo rInfo, int startFlags,
ProfilerInfo profilerInfo) {
// 从ResolveInfo中获取ActivityInfo
final ActivityInfo aInfo = rInfo != null ? rInfo.activityInfo : null;
if (aInfo != null) {
// Store the found target back into the intent, because now that
// we have it we never want to do this again. For example, if the
// user navigates back to this point in the history, we should
// always restart the exact same activity.
// 设置intent的component,设置包名,类名
intent.setComponent(new ComponentName(
aInfo.applicationInfo.packageName, aInfo.name));
// Don't debug things in the system process
if (!aInfo.processName.equals("system")) {
if ((startFlags & ActivityManager.START_FLAG_DEBUG) != 0) {
mService.setDebugApp(aInfo.processName, true, false);
}
if ((startFlags & ActivityManager.START_FLAG_NATIVE_DEBUGGING) != 0) {
mService.setNativeDebuggingAppLocked(aInfo.applicationInfo, aInfo.processName);
}
if ((startFlags & ActivityManager.START_FLAG_TRACK_ALLOCATION) != 0) {
mService.setTrackAllocationApp(aInfo.applicationInfo, aInfo.processName);
}
if (profilerInfo != null) {
mService.setProfileApp(aInfo.applicationInfo, aInfo.processName, profilerInfo);
}
}
final String intentLaunchToken = intent.getLaunchToken();
if (aInfo.launchToken == null && intentLaunchToken != null) {
aInfo.launchToken = intentLaunchToken;
}
}
return aInfo;
}
```
这段方法主要是取出解析的intent,然后由于intent不一定是原始的那个,所以这个解析出的如果有精确的component,那么会把他设置给intent,最后返回ActivityInfo。
好了,我们看前面方法startActivityMayWait接下里的一段代码:
```java
ActivityOptions options = ActivityOptions.fromBundle(bOptions);
// ActivityContainer里面持有一个ActivityStack,所以就可以简单理解为
// 持有一个ActivityStack。这个类主要作用是对应着一个display,在一个屏幕
// 中,如果要操作他里面的ActivityStack都会通过Container来处理,可以看做
// 是display和activityStack的中介类。
// 这里获取container的mParentActivity是看他是不是在一个虚拟屏幕中,比如
// 投屏,这样他的mParentActivity是非空的
ActivityStackSupervisor.ActivityContainer container =
(ActivityStackSupervisor.ActivityContainer)iContainer;
synchronized (mService) {
if (container != null && container.mParentActivity != null &&
container.mParentActivity.state != RESUMED) {
// Cannot start a child activity if the parent is not resumed.
// 从注释看,如果要开启一个子Activity,父Activity需要在前台才可以开启
return ActivityManager.START_CANCELED;
}
final int realCallingPid = Binder.getCallingPid(); // 获取调用者pid
final int realCallingUid = Binder.getCallingUid(); // 获取调用者uid
// 下面做一些处理
int callingPid;
if (callingUid >= 0) {
callingPid = -1;
} else if (caller == null) {
callingPid = realCallingPid;
callingUid = realCallingUid;
} else {
callingPid = callingUid = -1;
}
final ActivityStack stack;
// 如果container是空,说明activityStack没有对应,当然activityidsplay肯定也没有
// 或者有的,但是display是默认的display,即桌面的
if (container == null || container.mStack.isOnHomeDisplay()) {
// 把当前前台ActivityStack给他
stack = mSupervisor.mFocusedStack;
} else {
// 说明container非空,并且不是桌面的,就用提供的这个
stack = container.mStack;
}
stack.mConfigWillChange = globalConfig != null
&& mService.getGlobalConfiguration().diff(globalConfig) != 0;
if (DEBUG_CONFIGURATION) Slog.v(TAG_CONFIGURATION,
"Starting activity when config will change = " + stack.mConfigWillChange);
final long origId = Binder.clearCallingIdentity();
```
这里出现了一个新的类ActivityContainer,他是ActivityStackSupervisor的内部类,这个类是和一个ActivityStack一一对应的,ActivityStack这里也是AMS中的一个重要类,他的里面包含了有任务栈,而任务栈里面包含了我们在一个任务栈中Activity,这个在后续我们会在结合代码详细说下。回到ActivityContainer,在后面我们会看到当创建一个ActivityContainer的时候,同时会创建一个ActivityStack,所以可以简单的把ActivityContainer看做是持有一个ActivityStack,同时由于他对应着这一个displayId,所以当一个屏幕需要操作某个ActivityStack的时候,会通过ActivityContainer来操作,所以这个类存在的实际意义是封装了一系列的屏幕操作ActivityStack的方法,他是一个中间的操作类。
我们回到上面的方法,可以看到这里从方法参数中获取ActivityContainer,然后获得他的mParentActivity变量,这个变量只有在当屏幕是虚拟屏的时候才有,所谓虚拟屏就是比如一个投屏,这个mParentActivity就是他的宿主,正常情况下这里都是空的,我们了解下就好。
之后会获取调用者的pid,uid之类的,然后如果上面的ActivityContainer是空的话,会从ActivityStackSupervisor中获取当前的焦点stack,即前台stack,这样就得到的当前前台的ActivityStack,为下一步启动Activity做准备。
AMS的里面类确实是非常的多,这里说的ActivityStackSupervisor也是一个管理类,上面我们说过ActivityContainer封装了一系列的ActivityStack和屏幕打交道的方法,包括创建ActivityStack,添加到屏幕,从屏幕移除等等,而ActivityStackSupervisor就是一个大管家,他里面包含了所有的ActivityContainer的信息,当然也包含了ActivityStack,所以如果ActivityStack有些什么操作都可以通过ActivityStackSupervisor作为入口找到相应的对象,我们从这个类的名字也大概可以知道他的作用。
继续看后面的代码:
```java
// 重量级进程
if (aInfo != null &&
(aInfo.applicationInfo.privateFlags
& ApplicationInfo.PRIVATE_FLAG_CANT_SAVE_STATE) != 0) {
// This may be a heavy-weight process! Check to see if we already
// have another, different heavy-weight process running.
// 判断进程包名是不是一样
if (aInfo.processName.equals(aInfo.applicationInfo.packageName)) {
// 取出当前运行的重量级进程
final ProcessRecord heavy = mService.mHeavyWeightProcess;
// 判断要启动的是不是当前运行的重量级进程
if (heavy != null && (heavy.info.uid != aInfo.applicationInfo.uid
|| !heavy.processName.equals(aInfo.processName))) {
int appCallingUid = callingUid;
if (caller != null) {
// 取出调用者进程
ProcessRecord callerApp = mService.getRecordForAppLocked(caller);
if (callerApp != null) {
appCallingUid = callerApp.info.uid;
} else {
Slog.w(TAG, "Unable to find app for caller " + caller
+ " (pid=" + callingPid + ") when starting: "
+ intent.toString());
ActivityOptions.abort(options);
return ActivityManager.START_PERMISSION_DENIED;
}
}
IIntentSender target = mService.getIntentSenderLocked(
ActivityManager.INTENT_SENDER_ACTIVITY, "android",
appCallingUid, userId, null, null, 0, new Intent[] { intent },
new String[] { resolvedType }, PendingIntent.FLAG_CANCEL_CURRENT
| PendingIntent.FLAG_ONE_SHOT, null);
// 封装重量级进程的intent
Intent newIntent = new Intent();
if (requestCode >= 0) {
// Caller is requesting a result.
newIntent.putExtra(HeavyWeightSwitcherActivity.KEY_HAS_RESULT, true);
}
newIntent.putExtra(HeavyWeightSwitcherActivity.KEY_INTENT,
new IntentSender(target));
if (heavy.activities.size() > 0) {
ActivityRecord hist = heavy.activities.get(0);
newIntent.putExtra(HeavyWeightSwitcherActivity.KEY_CUR_APP,
hist.packageName);
newIntent.putExtra(HeavyWeightSwitcherActivity.KEY_CUR_TASK,
hist.getTask().taskId);
}
newIntent.putExtra(HeavyWeightSwitcherActivity.KEY_NEW_APP,
aInfo.packageName);
newIntent.setFlags(intent.getFlags());
// 重量级进程切换的界面
newIntent.setClassName("android",
HeavyWeightSwitcherActivity.class.getName());
intent = newIntent;
resolvedType = null;
caller = null;
callingUid = Binder.getCallingUid();
callingPid = Binder.getCallingPid();
componentSpecified = true;
rInfo = mSupervisor.resolveIntent(intent, null /*resolvedType*/, userId);
aInfo = rInfo != null ? rInfo.activityInfo : null;
if (aInfo != null) {
aInfo = mService.getActivityInfoForUser(aInfo, userId);
}
}
}
}
```
这段代码是关于重量级进程的,在AMS中会保存当前运行的重量级进程,从名字就可以感觉出这种进程比较消耗资源,一般不会轻易被杀死,比如一些大型游戏之类的。所以当用户已经启动了一个重量级进程的时候,当然又要启动一个重量级进程,这里就发弹出一个界面,从代码看是HeavyWeightSwitcherActivity这个类,让用户显示的切换另一个重量级进程,这里google也是从功耗的角度来考虑UI的交互。
这块知道下重量级进程的处理逻辑就行,下面继续看启动Activity的代码:
```java
final ActivityRecord[] outRecord = new ActivityRecord[1];
// 继续启动Activity
int res = startActivityLocked(caller, intent, ephemeralIntent, resolvedType,
aInfo, rInfo, voiceSession, voiceInteractor,
resultTo, resultWho, requestCode, callingPid,
callingUid, callingPackage, realCallingPid, realCallingUid, startFlags,
options, ignoreTargetSecurity, componentSpecified, outRecord, container,
inTask, reason);
........................
if (outResult != null) {
outResult.result = res;
if (res == ActivityManager.START_SUCCESS) {
// 一般进入START_SUCCESS这个分支,说明是adb am启动的Activity
// 是一个新进程的,现在加入mWaitingActivityLaunched这个集合
// 等处理后,会变成START_TASK_TO_FRONT状态
mSupervisor.mWaitingActivityLaunched.add(outResult);
do {
try {
mService.wait(); // AMS阻塞,等待唤醒
} catch (InterruptedException e) {
}
} while (outResult.result != START_TASK_TO_FRONT
&& !outResult.timeout && outResult.who == null);
if (outResult.result == START_TASK_TO_FRONT) {
res = START_TASK_TO_FRONT;
}
}
if (res == START_TASK_TO_FRONT) {
final ActivityRecord r = outRecord[0];
// ActivityRecord may represent a different activity, but it should not be in
// the resumed state.
if (r.nowVisible && r.state == RESUMED) {
outResult.timeout = false;
outResult.who = r.realActivity;
outResult.totalTime = 0;
outResult.thisTime = 0;
} else {
outResult.thisTime = SystemClock.uptimeMillis();
mSupervisor.waitActivityVisible(r.realActivity, outResult);
// Note: the timeout variable is not currently not ever set.
do {
try {
mService.wait();
} catch (InterruptedException e) {
}
} while (!outResult.timeout && outResult.who == null);
}
}
}
mSupervisor.mActivityMetricsLogger.notifyActivityLaunched(res, outRecord[0]);
return res;
```
这些就是剩下的其余代码了。这里会继续调用startActivityLocked方法,这个方法我们稍等下说,这个是主线流程,我们把这个方法的后面一小段先讲一下。
后面一段代码只有在outResult非空时候才会进入,这个一般是在我们用adb am start -w来启动一个新进程的Activity时候才会进入。因为要启动一个新进程,所以在启动进程的Application后会返回START_SUCCESS,这样首先会把这个等待的WaitResult对象加入mWaitingActivityLaunched这个集合中,然后调用wait方法AMS就阻塞了,当进程启动工作全部结束后,会唤醒AMS,同时会在postStartActivityProcessing方法中把这个返回值置为START_TASK_TO_FRONT,这样AMS就会继续往下执行下去了。postStartActivityProcessing这个方法会在接下去要讲的startActivityLocked后面遇到,等说到这个方法的时候我们在看一下。这部分由于是通过adb命令来启动才会遇到,所以了解一下就好。下面我们看startActivityLocked方法:
```java
int startActivityLocked(IApplicationThread caller, Intent intent, Intent ephemeralIntent,
String resolvedType, ActivityInfo aInfo, ResolveInfo rInfo,
IVoiceInteractionSession voiceSession, IVoiceInteractor voiceInteractor,
IBinder resultTo, String resultWho, int requestCode, int callingPid, int callingUid,
String callingPackage, int realCallingPid, int realCallingUid, int startFlags,
ActivityOptions options, boolean ignoreTargetSecurity, boolean componentSpecified,
ActivityRecord[] outActivity, ActivityStackSupervisor.ActivityContainer container,
TaskRecord inTask, String reason) {
if (TextUtils.isEmpty(reason)) { // 启动理由,也就是字符串不能为空
throw new IllegalArgumentException("Need to specify a reason.");
}
mLastStartReason = reason; // 赋值启动理由
mLastStartActivityTimeMs = System.currentTimeMillis(); // 最后启动Activity的时间
mLastStartActivityRecord[0] = null;
// 继续启动
mLastStartActivityResult = startActivity(caller, intent, ephemeralIntent, resolvedType,
aInfo, rInfo, voiceSession, voiceInteractor, resultTo, resultWho, requestCode,
callingPid, callingUid, callingPackage, realCallingPid, realCallingUid, startFlags,
options, ignoreTargetSecurity, componentSpecified, mLastStartActivityRecord,
container, inTask);
if (outActivity != null) {
// mLastStartActivityRecord[0] is set in the call to startActivity above.
outActivity[0] = mLastStartActivityRecord[0]; // 之后这里会保存目标的ActivityRecord
}
return mLastStartActivityResult;
}
```
这个方法比较简单,会继续调用startActivity方法,这里会传入一个参数mLastStartActivityRecord,用来保存需要启动的ActivityRecord。下面继续:
```java
private int startActivity(IApplicationThread caller, Intent intent, Intent ephemeralIntent,
String resolvedType, ActivityInfo aInfo, ResolveInfo rInfo,
IVoiceInteractionSession voiceSession, IVoiceInteractor voiceInteractor,
IBinder resultTo, String resultWho, int requestCode, int callingPid, int callingUid,
String callingPackage, int realCallingPid, int realCallingUid, int startFlags,
ActivityOptions options, boolean ignoreTargetSecurity, boolean componentSpecified,
ActivityRecord[] outActivity, ActivityStackSupervisor.ActivityContainer container,
TaskRecord inTask) {
int err = ActivityManager.START_SUCCESS;
// Pull the optional Ephemeral Installer-only bundle out of the options early.
final Bundle verificationBundle
= options != null ? options.popAppVerificationBundle() : null;
ProcessRecord callerApp = null; // 每个进程都在AMS中有个ProcessRecord
if (caller != null) {
// 获取调用者进程记录,如果是从桌面启动一个Activity,caller是Launcher
callerApp = mService.getRecordForAppLocked(caller);
if (callerApp != null) {
callingPid = callerApp.pid;
callingUid = callerApp.info.uid;
} else { // 没找到调用者进程,返回
Slog.w(TAG, "Unable to find app for caller " + caller
+ " (pid=" + callingPid + ") when starting: "
+ intent.toString());
err = ActivityManager.START_PERMISSION_DENIED;
}
}
final int userId = aInfo != null ? UserHandle.getUserId(aInfo.applicationInfo.uid) : 0;
if (err == ActivityManager.START_SUCCESS) { // 打印一些信息
Slog.i(TAG, "START u" + userId + " {" + intent.toShortString(true, true, true, false)
+ "} from uid " + callingUid);
}
ActivityRecord sourceRecord = null;
ActivityRecord resultRecord = null;
if (resultTo != null) { // resultTo是发起者的
//获取调用的者的ActivityRecord
sourceRecord = mSupervisor.isInAnyStackLocked(resultTo);
if (DEBUG_RESULTS) Slog.v(TAG_RESULTS,
"Will send result to " + resultTo + " " + sourceRecord);
if (sourceRecord != null) { // 如果调用者的的ActivityRecord非空
if (requestCode >= 0 && !sourceRecord.finishing) { // 如果requestCode>=0表示需要给调用者回复,同时调用者不是finishing状态
resultRecord = sourceRecord; // 把回复的ActivityRecord设置为调用者的ActivityRecord
}
}
}
```
这个方法比较长,我们也是分步来看。首先最开始通过调用者端的ApplicationThread,即一个binder,来获取保存在AMS中的ProcessRecord。ProcessRecord是代表一个进程,所有运行的进程在AMS端都会有一份这个对象,这个对象中最重要的一个变量是该进程ApplicationThread的代理,通过这个代理AMS就可以和各个进程通信了。
我们继续说这个方法,首先通过调用者传过来的ApplicationThread来获取ProcessRecord,这个方法如下:
```java
// 根据IApplicationThread,即一个进程的stub获取ProcessRecord
final ProcessRecord getRecordForAppLocked(
IApplicationThread thread) {
if (thread == null) { // null退出
return null;
}
// mLruProcesses保存着所有启动进程的ProcessRecord,这里取出他们在保存数组中的位置
// 然后通过mLruProcesses获取
int appIndex = getLRURecordIndexForAppLocked(thread);
if (appIndex >= 0) {
return mLruProcesses.get(appIndex);
}
// Validation: if it isn't in the LRU list, it shouldn't exist, but let's
// double-check that.
// 下面是再次检查下有没有
final IBinder threadBinder = thread.asBinder();
final ArrayMap<String, SparseArray<ProcessRecord>> pmap = mProcessNames.getMap();
for (int i = pmap.size()-1; i >= 0; i--) {
final SparseArray<ProcessRecord> procs = pmap.valueAt(i);
for (int j = procs.size()-1; j >= 0; j--) {
final ProcessRecord proc = procs.valueAt(j);
if (proc.thread != null && proc.thread.asBinder() == threadBinder) {
Slog.wtf(TAG, "getRecordForApp: exists in name list but not in LRU list: "
+ proc);
return proc;
}
}
}
return null;
}
```
这个方法的总体逻辑十分简单,就是通过参数从指定数据集中获取ProcessRecord对象。这里值得注意的是,该方法首先通过getLRURecordIndexForAppLocked这个方法来获取ProcessRecord,如果没有得到的话,再通过遍历ProcessNames这个集合来获取。通过getLRURecordIndexForAppLocked这个方法名我们可以猜测,寻找是通过最近最少使用的算法来执行的,这里这个算法细节我们这里暂且不说,先把主线流程都说通,后面会专门写一篇文章说些特殊的细节。如果通过这个算法没有找到的话,会在遍历保存所有ProcessRecord的map寻找数据。可以看到google也是在尽量的优化一些性能方面的东西。
获取了ProcessRecord后,在得到调用者的pid和uid,这里就算是完成了。接着这里的参数resultTo是一个代表着调用者的,表示启动这个Activty后返回的时候是回复给哪个Activity, 这里通过resultTo来获取发起者在AMS中的ActivityRecord,我们看下这个方法:
```java
// token是调用者Activty在AMS中的代理,即ActivityRecord的一个封装
ActivityRecord isInAnyStackLocked(IBinder token) {
// 获取所有屏幕的数量
int numDisplays = mActivityDisplays.size();
// 遍历所有屏幕
for (int displayNdx = 0; displayNdx < numDisplays; ++displayNdx) {
// 取得这个屏幕下所有的ActivityStack
ArrayList<ActivityStack> stacks = mActivityDisplays.valueAt(displayNdx).mStacks;
// 遍历这个屏幕的所有ActivityStack
for (int stackNdx = stacks.size() - 1; stackNdx >= 0; --stackNdx) {
// 经过校验等一系列操作,确认获得这个ActivityRecord
final ActivityRecord r = stacks.get(stackNdx).isInStackLocked(token);
if (r != null) {
return r;
}
}
}
return null;
}
```
这个方法看到最后isInStackLocked这里,他继续调用的该方法来获取:
```java
// 根据传入的ActivityRecord获取对应的ActivityRecord
ActivityRecord isInStackLocked(IBinder token) {
final ActivityRecord r = ActivityRecord.forTokenLocked(token);
// 验证一下这个ActivityRecord,没有问题的话就返回
return isInStackLocked(r);
}
// 校验一下ActivityRecord是否在他的TaskRecord中,他的TaskRecord是否在ActivityStack中
ActivityRecord isInStackLocked(ActivityRecord r) {
if (r == null) {
return null;
}
final TaskRecord task = r.getTask(); // 获取这个ActivityRecord的TaskRecord
final ActivityStack stack = r.getStack(); // 获取这个ActivityRecord的ActivityStack
// TaskRecord非空,并且他的栈里面包含r,同时ActivityStack的TaskRecord集合中包含现在这个ActivityRecord所属的TaskRecord
if (stack != null && task.mActivities.contains(r) && mTaskHistory.contains(task)) {
if (stack != this) Slog.w(TAG,
"Illegal state! task does not point to stack it is in.");
return r; // 返回这个ActivityRecord
}
return null;
}
```
这里调用了ActivityRecord.forTokenLocked来得到这个ActivityRecord:
```java
static ActivityRecord forTokenLocked(IBinder token) {
try {
return Token.tokenToActivityRecordLocked((Token)token);
} catch (ClassCastException e) {
Slog.w(TAG, "Bad activity token: " + token, e);
return null;
}
}
static class Token extends IApplicationToken.Stub {
private final WeakReference<ActivityRecord> weakActivity;
Token(ActivityRecord activity) {
weakActivity = new WeakReference<>(activity);
}
private static ActivityRecord tokenToActivityRecordLocked(Token token) {
if (token == null) {
return null;
}
ActivityRecord r = token.weakActivity.get();
if (r == null || r.getStack() == null) {
return null;
}
return r;
}
@Override
public String toString() {
StringBuilder sb = new StringBuilder(128);
sb.append("Token{");
sb.append(Integer.toHexString(System.identityHashCode(this)));
sb.append(' ');
sb.append(weakActivity.get());
sb.append('}');
return sb.toString();
}
}
```
这里我们看到Token是个IApplicationToken.Stub的子类,所以他本身具有进程间通信的能力,这里在new这个类的时候,会把一个ActivityRecord传入保存在这个类的弱引用中,所以如果我们要获取ActivityRecord就通过tokenToActivityRecordLocked方法,从这个弱引用中获取。好了,我们回到startActivity这个方法,获得了这个回复的ActivityRecord后,我们把他赋值给resultRecord变量。我们继续看下下一段代码:
```java
final int launchFlags = intent.getFlags(); // 获取目标Intent的启动模式
final int launchFlags = intent.getFlags(); // 获取目标Intent的启动模式
// FLAG_ACTIVITY_FORWARD_RESULT表示需要给源页表返回数据,可能是跨几个页面的,比如A-B-C,这里如果目标activity是C
// B的resultTo是A,那么现在就由C替代B返回给A了,
// sourceRecord就是上面说的B
// 下面这里if说明调用者也有需要返回的页面,即sourceRecord前面还有页面需要他返回
if ((launchFlags & Intent.FLAG_ACTIVITY_FORWARD_RESULT) != 0 && sourceRecord != null) {
// 既然B要返回给A,那么requestCode没有意义,sourceRecord.requestCode才是最终需要返回的那个值,所以这里返回冲突
if (requestCode >= 0) {
ActivityOptions.abort(options);
return ActivityManager.START_FORWARD_AND_REQUEST_CONFLICT;
}
resultRecord = sourceRecord.resultTo; // 获取调用者需要result的Activity
// 检查下这个需要返回的ActivityRecord是否非null,并且和TaskRecord,ActivityStack关系是否正常
if (resultRecord != null && !resultRecord.isInStackLocked()) {
resultRecord = null;
}
resultWho = sourceRecord.resultWho; // 取出需要返回的Activity的字符串
requestCode = sourceRecord.requestCode; // 取出需要返回的requestCode
// 这个值保存到resultRecord了,由现在这个C代替返回了,所以sourceRecord可以清0
sourceRecord.resultTo = null;
if (resultRecord != null) {
// resultRecord即上面首的A,把A中返回的B去掉
resultRecord.removeResultsLocked(sourceRecord, resultWho, requestCode);
}
if (sourceRecord.launchedFromUid == callingUid) {
callingPackage = sourceRecord.launchedFromPackage; // 把调用者包名改成前面的那个需要返回的
}
}
```
这里我们首先获取启动的flag,这里判断下是不是FLAG_ACTIVITY_FORWARD_RESULT这个flag,这个flag是一个特殊的启动模式。比如有A->B->C这样的启动顺序,并且都是startForResult这样需要有回复的,如果在B启动C的时候加了这个启动flag,那么C完成后的回复就不会给B,而且是给A,这里就是对这个逻辑做的处理。
我们看到sourceRecord就是调用者,如果他带有这个flag,而且requestCode还是大于0的,那么就会报错,因为这个flag等于是一个中介,本身不会接受数据,而且他的调用者才会接受数据,所以这样表示一种冲突了,系统会判断为错误。既然返回的目标不是sourceRecord,那么就要把返回给sourceRecord的返回者,即sourceRecord.resultTo,所以接下来把返回值的数据包括,sourceRecord.resultTo,sourceRecord.resultWho,sourceRecord.requestCode都重新赋值,如果返回的数据中有sourceRecord相关的,要清掉,因为现在他不是接受者了,最后如果sourceRecord要返回的进程uid和现在调用者是一样的话,把调用者包名修改为现在要返回的那个。好,继续下一段代码:
```java
// 下面判断一些错误情况,比如这个目标Component是空,即没有包名和类名,那么就会报错
if (err == ActivityManager.START_SUCCESS && intent.getComponent() == null) {
// We couldn't find a class that can handle the given Intent.
// That's the end of that!
err = ActivityManager.START_INTENT_NOT_RESOLVED;
}
// 这里如果目标ActivityInfo是空也会报错
if (err == ActivityManager.START_SUCCESS && aInfo == null) {
// We couldn't find the specific class specified in the Intent.
// Also the end of the line.
err = ActivityManager.START_CLASS_NOT_FOUND;
}
if (err == ActivityManager.START_SUCCESS && sourceRecord != null
&& sourceRecord.getTask().voiceSession != null) {
// If this activity is being launched as part of a voice session, we need
// to ensure that it is safe to do so. If the upcoming activity will also
// be part of the voice session, we can only launch it if it has explicitly
// said it supports the VOICE category, or it is a part of the calling app.
if ((launchFlags & FLAG_ACTIVITY_NEW_TASK) == 0
&& sourceRecord.info.applicationInfo.uid != aInfo.applicationInfo.uid) {
try {
intent.addCategory(Intent.CATEGORY_VOICE);
if (!AppGlobals.getPackageManager().activitySupportsIntent(
intent.getComponent(), intent, resolvedType)) {
Slog.w(TAG,
"Activity being started in current voice task does not support voice: "
+ intent);
err = ActivityManager.START_NOT_VOICE_COMPATIBLE;
}
} catch (RemoteException e) {
Slog.w(TAG, "Failure checking voice capabilities", e);
err = ActivityManager.START_NOT_VOICE_COMPATIBLE;
}
}
}
if (err == ActivityManager.START_SUCCESS && voiceSession != null) {
// If the caller is starting a new voice session, just make sure the target
// is actually allowing it to run this way.
try {
if (!AppGlobals.getPackageManager().activitySupportsIntent(intent.getComponent(),
intent, resolvedType)) {
Slog.w(TAG,
"Activity being started in new voice task does not support: "
+ intent);
err = ActivityManager.START_NOT_VOICE_COMPATIBLE;
}
} catch (RemoteException e) {
Slog.w(TAG, "Failure checking voice capabilities", e);
err = ActivityManager.START_NOT_VOICE_COMPATIBLE;
}
}
//获取需要result的Activity的ActivityStack
final ActivityStack resultStack = resultRecord == null ? null : resultRecord.getStack();
if (err != START_SUCCESS) {
// 如果上面判断目标要启动的Activity有错误的话,比如没有component,没有ActivityInfo等,下面sendActivityResultLocked就回复给result消息
if (resultRecord != null) {
resultStack.sendActivityResultLocked(
-1, resultRecord, resultWho, requestCode, RESULT_CANCELED, null);
}
ActivityOptions.abort(options);
return err;
}
//这里判断是否有权限调用目标
boolean abort = !mSupervisor.checkStartAnyActivityPermission(intent, aInfo, resultWho,
requestCode, callingPid, callingUid, callingPackage, ignoreTargetSecurity, callerApp,
resultRecord, resultStack, options);
abort |= !mService.mIntentFirewall.checkStartActivity(intent, callingUid,
callingPid, resolvedType, aInfo.applicationInfo);
if (mService.mController != null) {
try {
// The Intent we give to the watcher has the extra data
// stripped off, since it can contain private information.
Intent watchIntent = intent.cloneFilter();
abort |= !mService.mController.activityStarting(watchIntent,
aInfo.applicationInfo.packageName);
} catch (RemoteException e) {
mService.mController = null;
}
}
mInterceptor.setStates(userId, realCallingPid, realCallingUid, startFlags, callingPackage);
mInterceptor.intercept(intent, rInfo, aInfo, resolvedType, inTask, callingPid, callingUid,
options);
intent = mInterceptor.mIntent;
rInfo = mInterceptor.mRInfo;
aInfo = mInterceptor.mAInfo;
resolvedType = mInterceptor.mResolvedType;
inTask = mInterceptor.mInTask;
callingPid = mInterceptor.mCallingPid;
callingUid = mInterceptor.mCallingUid;
options = mInterceptor.mActivityOptions;
if (abort) { // 如果进了这个分支,说明没有权限再往下执行了,回复给result的Activity一个错误消息
if (resultRecord != null) {
resultStack.sendActivityResultLocked(-1, resultRecord, resultWho, requestCode,
RESULT_CANCELED, null);
}
// We pretend to the caller that it was really started, but
// they will just get a cancel result.
ActivityOptions.abort(options);
return START_SUCCESS;
}
// 权限弹窗
if (mService.mPermissionReviewRequired && aInfo != null) {
if (mService.getPackageManagerInternalLocked().isPermissionsReviewRequired(
aInfo.packageName, userId)) {
IIntentSender target = mService.getIntentSenderLocked(
ActivityManager.INTENT_SENDER_ACTIVITY, callingPackage,
callingUid, userId, null, null, 0, new Intent[]{intent},
new String[]{resolvedType}, PendingIntent.FLAG_CANCEL_CURRENT
| PendingIntent.FLAG_ONE_SHOT, null);
final int flags = intent.getFlags();
Intent newIntent = new Intent(Intent.ACTION_REVIEW_PERMISSIONS);
newIntent.setFlags(flags
| Intent.FLAG_ACTIVITY_EXCLUDE_FROM_RECENTS);
newIntent.putExtra(Intent.EXTRA_PACKAGE_NAME, aInfo.packageName);
newIntent.putExtra(Intent.EXTRA_INTENT, new IntentSender(target));
if (resultRecord != null) {
newIntent.putExtra(Intent.EXTRA_RESULT_NEEDED, true);
}
intent = newIntent;
resolvedType = null;
callingUid = realCallingUid;
callingPid = realCallingPid;
rInfo = mSupervisor.resolveIntent(intent, resolvedType, userId);
aInfo = mSupervisor.resolveActivity(intent, rInfo, startFlags,
null /*profilerInfo*/);
.............
}
}
```
这段代码主要是做一些权限的判断,如果有错误,比如要启动的包名类名是空,或者解析出的ActivityInfo是空等等,就会返回。我们稍稍看下这里的几个方法,不会很详细的展开,因为有些会涉及到PMS我们会在PMS那边再说,主要大概看下这里做了些什么事情。先看下checkStartAnyActivityPermission这个方法:
```java
// 判断是否有权限调用目标对象
boolean checkStartAnyActivityPermission(Intent intent, ActivityInfo aInfo,
String resultWho, int requestCode, int callingPid, int callingUid,
String callingPackage, boolean ignoreTargetSecurity, ProcessRecord callerApp,
ActivityRecord resultRecord, ActivityStack resultStack, ActivityOptions options) {
//根据调用者pid和uid
final int startAnyPerm = mService.checkPermission(START_ANY_ACTIVITY, callingPid,
callingUid);
if (startAnyPerm == PERMISSION_GRANTED) {
return true;
}
final int componentRestriction = getComponentRestrictionForCallingPackage(
aInfo, callingPackage, callingPid, callingUid, ignoreTargetSecurity);
final int actionRestriction = getActionRestrictionForCallingPackage(
intent.getAction(), callingPackage, callingPid, callingUid);
if (componentRestriction == ACTIVITY_RESTRICTION_PERMISSION
|| actionRestriction == ACTIVITY_RESTRICTION_PERMISSION) {
if (resultRecord != null) {
resultStack.sendActivityResultLocked(-1,
resultRecord, resultWho, requestCode,
Activity.RESULT_CANCELED, null);
}
final String msg;
if (actionRestriction == ACTIVITY_RESTRICTION_PERMISSION) {
msg = "Permission Denial: starting " + intent.toString()
+ " from " + callerApp + " (pid=" + callingPid
+ ", uid=" + callingUid + ")" + " with revoked permission "
+ ACTION_TO_RUNTIME_PERMISSION.get(intent.getAction());
} else if (!aInfo.exported) {
msg = "Permission Denial: starting " + intent.toString()
+ " from " + callerApp + " (pid=" + callingPid
+ ", uid=" + callingUid + ")"
+ " not exported from uid " + aInfo.applicationInfo.uid;
} else {
msg = "Permission Denial: starting " + intent.toString()
+ " from " + callerApp + " (pid=" + callingPid
+ ", uid=" + callingUid + ")"
+ " requires " + aInfo.permission;
}
Slog.w(TAG, msg);
throw new SecurityException(msg);
}
if (actionRestriction == ACTIVITY_RESTRICTION_APPOP) {
final String message = "Appop Denial: starting " + intent.toString()
+ " from " + callerApp + " (pid=" + callingPid
+ ", uid=" + callingUid + ")"
+ " requires " + AppOpsManager.permissionToOp(
ACTION_TO_RUNTIME_PERMISSION.get(intent.getAction()));
Slog.w(TAG, message);
return false;
} else if (componentRestriction == ACTIVITY_RESTRICTION_APPOP) {
final String message = "Appop Denial: starting " + intent.toString()
+ " from " + callerApp + " (pid=" + callingPid
+ ", uid=" + callingUid + ")"
+ " requires appop " + AppOpsManager.permissionToOp(aInfo.permission);
Slog.w(TAG, message);
return false;
}
if (options != null) {
if (options.getLaunchTaskId() != INVALID_STACK_ID) {
final int startInTaskPerm = mService.checkPermission(START_TASKS_FROM_RECENTS,
callingPid, callingUid);
if (startInTaskPerm != PERMISSION_GRANTED) {
final String msg = "Permission Denial: starting " + intent.toString()
+ " from " + callerApp + " (pid=" + callingPid
+ ", uid=" + callingUid + ") with launchTaskId="
+ options.getLaunchTaskId();
Slog.w(TAG, msg);
throw new SecurityException(msg);
}
}
// Check if someone tries to launch an activity on a private display with a different
// owner.
final int launchDisplayId = options.getLaunchDisplayId();
if (launchDisplayId != INVALID_DISPLAY
&& !isCallerAllowedToLaunchOnDisplay(callingPid, callingUid, launchDisplayId)) {
final String msg = "Permission Denial: starting " + intent.toString()
+ " from " + callerApp + " (pid=" + callingPid
+ ", uid=" + callingUid + ") with launchDisplayId="
+ launchDisplayId;
Slog.w(TAG, msg);
throw new SecurityException(msg);
}
}
return true;
}
```
这个方法开始调用了checkPermission这个方法如果通过检查就正常返回了,否则下面继续检查一些和pid,uid等相关的权限,这个方法主要处理当前用户身份,以及进场相关属性等相关的检验,具体自己可以跟进去看一下。
另外这里有个拦截器方法intercept,我们进去稍稍看下:
```java
void intercept(Intent intent, ResolveInfo rInfo, ActivityInfo aInfo, String resolvedType,
TaskRecord inTask, int callingPid, int callingUid, ActivityOptions activityOptions) {
mUserManager = UserManager.get(mService.mContext);
mIntent = intent;
mCallingPid = callingPid;
mCallingUid = callingUid;
mRInfo = rInfo;
mAInfo = aInfo;
mResolvedType = resolvedType;
mInTask = inTask;
mActivityOptions = activityOptions;
if (interceptSuspendPackageIfNeed()) {// 包被挂起
return;
}
if (interceptQuietProfileIfNeeded()) { // 静默状态
return;
}
interceptWorkProfileChallengeIfNeeded();
}
```
这个方法是在Activity启动的时候,判断是否需要拦截。比如如果包被挂起了,或者当前是静默模式那么就不会直接继续后面的启动步骤了。具体方法就不深入看了,我也是每个都深入研究过,这里知道具体做什么就可以了。
回到前的方法,一般第一次Activity启动起来了,往往都会有权限的弹窗,这里是通过PMS的isPermissionsReviewRequired方法来判断的,最后IIntentSender这个类来处理的,这个在后面PMS中我们再说。
这里权限都检查完了,我们继续看下面的正常流程:
```java
// 这里r是创建一个目标的ActivityRecord
ActivityRecord r = new ActivityRecord(mService, callerApp, callingPid, callingUid,
callingPackage, intent, resolvedType, aInfo, mService.getGlobalConfiguration(),
resultRecord, resultWho, requestCode, componentSpecified, voiceSession != null,
mSupervisor, container, options, sourceRecord);
if (outActivity != null) {
outActivity[0] = r; // 把目标的activity设置进目标的数组中
}
if (r.appTimeTracker == null && sourceRecord != null) {
// If the caller didn't specify an explicit time tracker, we want to continue
// tracking under any it has.
r.appTimeTracker = sourceRecord.appTimeTracker;
}
final ActivityStack stack = mSupervisor.mFocusedStack; // 获取前台的ActivityStack
if (voiceSession == null && (stack.mResumedActivity == null
|| stack.mResumedActivity.info.applicationInfo.uid != callingUid)) {
// 如果当前前台app的uid和调用者的不是一个,那么看看是否允许切换,不允许的话就
// 把这个带启动的Activity封装为PendingActivityLaunch,然后放入mPendingActivityLaunches集合中
if (!mService.checkAppSwitchAllowedLocked(callingPid, callingUid,
realCallingPid, realCallingUid, "Activity start")) {
PendingActivityLaunch pal = new PendingActivityLaunch(r,
sourceRecord, startFlags, stack, callerApp);
mPendingActivityLaunches.add(pal);
ActivityOptions.abort(options);
return ActivityManager.START_SWITCHES_CANCELED;
}
}
if (mService.mDidAppSwitch) {
// This is the second allowed switch since we stopped switches,
// so now just generally allow switches. Use case: user presses
// home (switches disabled, switch to home, mDidAppSwitch now true);
// user taps a home icon (coming from home so allowed, we hit here
// and now allow anyone to switch again).
mService.mAppSwitchesAllowedTime = 0;
} else {
mService.mDidAppSwitch = true;
}
// 处理等待启动的Activity列表
doPendingActivityLaunchesLocked(false);
// 上面方法里面处理等待启动的Activity列表中,也会调用startActivity,差别就是doResume参数上面是false,下面是true
// r是目标的ActivityRecord,sourceRecord是发起的ActivityRecord,继续调用Activity
return startActivity(r, sourceRecord, voiceSession, voiceInteractor, startFlags, true,
options, inTask, outActivity);
```
这里开始就是创建ActivityRecord了,可以看到ActivityRecord构造方法里面有非常多的参数,当然也都是比较重要的,比如AMS,调用者的ProcessRecord,pid,uid,ActivityRecord等等,这个Activity的intent,minifest的信息等等。之后获取当前前台的ActivityStack,然后比较前台当前显示的Activity的uid和调用者的是否一致,如果不一样,还要判断是不是可以切换为当前要启动的Activity中,如果不允许切换则会把当前要启动的Activity放入到mPendingActivityLaunches中,否则就继续走下面的流程。
之后便调用doPendingActivityLaunchesLocked这个方法,我们看下这个方法:
```java
// 处理等待启动的Activity列表
final void doPendingActivityLaunchesLocked(boolean doResume) {
// 遍历等待启动Activity的列表
while (!mPendingActivityLaunches.isEmpty()) {
// 获取第一个等待启动的Activity
final PendingActivityLaunch pal = mPendingActivityLaunches.remove(0);
// 这里参数doResume在启动一个Activity的时候是false
final boolean resume = doResume && mPendingActivityLaunches.isEmpty();
try {
// 正式调用,把等待启动的ActivityRecord,他的调用者ActivityRecord作为参数传入
startActivity(pal.r, pal.sourceRecord, null, null, pal.startFlags, resume, null,
null, null /*outRecords*/);
} catch (Exception e) {
Slog.e(TAG, "Exception during pending activity launch pal=" + pal, e);
pal.sendErrorResult(e.getMessage());
}
}
}
```
可以看到这个方法是遍历mPendingActivityLaunches这个集合,这个集合上面介绍了是之前启动一个Activity时,由于那是前台显示的Activity不允许被切换,所以暂时被放入了这个集合,现在首先要启动他们,启动方法是调用startActivity,这个方法接下去我们就会介绍,正常启动一个Activity流程也是会调用这个方法,区别在于这里的resume参数,这个参数表示这个启动的Activity需要不需要被前台显示,这个mPendingActivityLaunches都是不需要的,只有那个最新的即将要显示的Activity才是需要resume的,这个我们在后面的流程中就会看到。
接下去就继续调用startActivity方法:
```java
private int startActivity(final ActivityRecord r, ActivityRecord sourceRecord,
IVoiceInteractionSession voiceSession, IVoiceInteractor voiceInteractor,
int startFlags, boolean doResume, ActivityOptions options, TaskRecord inTask,
ActivityRecord[] outActivity) {
int result = START_CANCELED;
try {
mService.mWindowManager.deferSurfaceLayout();
// r是目标的ActivityRecord,sourceRecord是发起的ActivityRecord,继续调用Activity中
result = startActivityUnchecked(r, sourceRecord, voiceSession, voiceInteractor,
startFlags, doResume, options, inTask, outActivity);
} finally {
// If we are not able to proceed, disassociate the activity from the task. Leaving an
// activity in an incomplete state can lead to issues, such as performing operations
// without a window container.
if (!ActivityManager.isStartResultSuccessful(result)
&& mStartActivity.getTask() != null) {
mStartActivity.getTask().removeActivity(mStartActivity);
}
mService.mWindowManager.continueSurfaceLayout();
}
// 上面startActivityUnchecked如果是一个刚启动的Activity,一般会返回START_SUCCESS,这个返回值返回到
// startActivityMayWait方法中,AMS会阻塞在这个方法中,postStartActivityProcessing方法中会把mWaitingActivityLaunched
// 集合中的返回结果置为START_TASK_TO_FRONT
postStartActivityProcessing(r, result, mSupervisor.getLastStack().mStackId, mSourceRecord,
mTargetStack);
return result;
}
```
这个方法里面主要有2个方法startActivityUnchecked和postStartActivityProcessing。startActivityUnchecked这个方法是接下去的主线流程,我们后面会继续说,先看下postStartActivityProcessing这个方法,记得前面在startActivityMayWait方法中说的,如果通过adb am start -w命令启动Activity后,会让AMS进入睡眠状态,然后唤醒后,需要在返回结果是START_TASK_TO_FRONT才会继续后面的流程吗?修改返回结果就是在这个方法里面了:
```java
void postStartActivityProcessing(
ActivityRecord r, int result, int prevFocusedStackId, ActivityRecord sourceRecord,
ActivityStack targetStack) {
...............
if (result == START_TASK_TO_FRONT && !mSupervisor.mWaitingActivityLaunched.isEmpty()) {
mSupervisor.reportTaskToFrontNoLaunch(mStartActivity);
}
................
}
void reportTaskToFrontNoLaunch(ActivityRecord r) {
boolean changed = false;
for (int i = mWaitingActivityLaunched.size() - 1; i >= 0; i--) {
WaitResult w = mWaitingActivityLaunched.remove(i);
if (w.who == null) {
changed = true;
// Set result to START_TASK_TO_FRONT so that startActivityMayWait() knows that
// the starting activity ends up moving another activity to front, and it should
// wait for this new activity to become visible instead.
// Do not modify other fields.
w.result = START_TASK_TO_FRONT;
}
}
if (changed) {
mService.notifyAll(); // 唤醒
}
}
```
可以看到这里方法最终会调用reportTaskToFrontNoLaunch来设置结果START_TASK_TO_FRONT,最后还会唤醒AMS。至此前面通过adb启动遗留的这个问题就解决了。
下面应该是继续看startActivityUnchecked方法,但是考虑本篇文章写了已经比较长了,并且startActivityUnchecked方法是一个非常长的方法,里面还涉及到启动模式的切换等,算是在我看来AMS种最复杂的方法之一,是比较烧脑的,所以准备放在下一篇文章里面说。这里虽然还是在AMS里面执行流程,但是由于内容也不少了,所以下面还是用时序图把AMS到目前的流程总结下,也给本篇文章做个结尾。
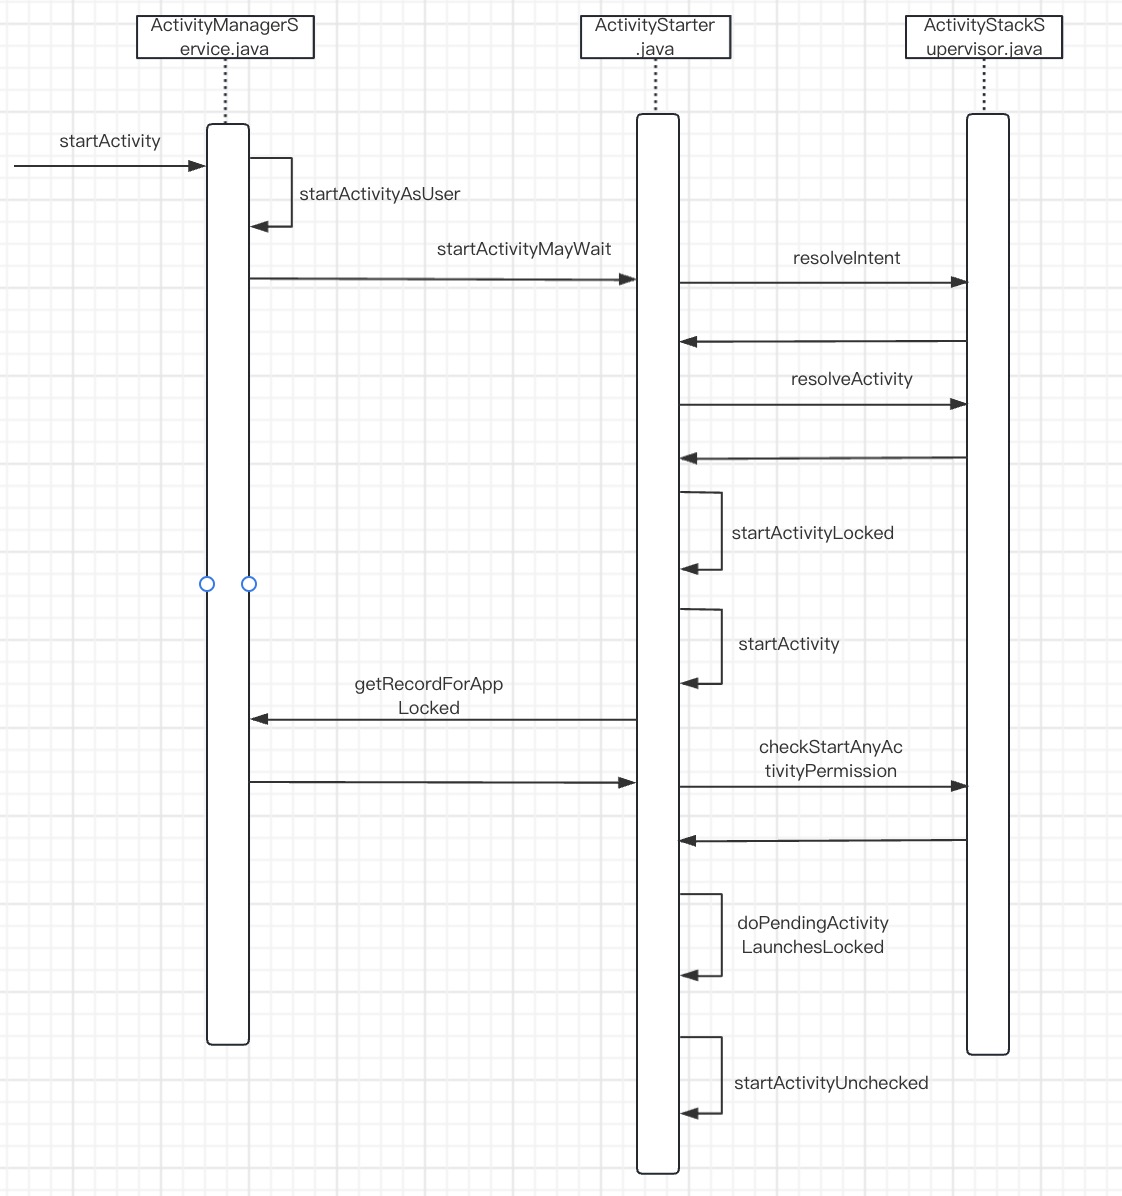

AMS源码分析(一)